Lexmark 7350 User's Guide
Lexmark 7350 - X Color Inkjet Manual
 |
UPC - 734646001755
View all Lexmark 7350 manuals
Add to My Manuals
Save this manual to your list of manuals |
Lexmark 7350 manual content summary:
- Lexmark 7350 | User's Guide - Page 1
In-One User's Guide November 2005 www.lexmark.com Lexmark and Lexmark with diamond design are trademarks of Lexmark International, Inc., registered in the United States and/or other countries. All other trademarks are the property of their respective owners. © 2006 Lexmark International, Inc. All - Lexmark 7350 | User's Guide - Page 2
740 West New Circle Road, Lexington, Kentucky 40550, U.S.A. In the United Kingdom and Eire, send to Lexmark International Ltd., Marketing and Services Department, Westhorpe House, Westhorpe, Marlow Bucks SL7 3RQ. Lexmark may use or distribute any of the information you supply in any way it believes - Lexmark 7350 | User's Guide - Page 3
Using the Fax menu...24 Learning about the software 26 Using the printer software...26 Using the Productivity Suite...26 Using the All-In-One Copying tab...28 Using the Saved Images tab...29 Using the Maintain/Troubleshoot link...29 Using the Solution Center...30 Using Print Properties...31 Opening - Lexmark 7350 | User's Guide - Page 4
Loading paper and original documents 34 Loading paper...34 Loading various paper types...35 Loading original documents into the ADF 38 Loading original documents on the scanner glass 39 Printing...41 Printing a document...41 Printing collated copies...41 Printing the last page first (reverse page - Lexmark 7350 | User's Guide - Page 5
network printers...66 Shared printing...66 Direct IP printing...67 Tips for installing a network printer...67 Assigning an IP address...67 Finding your MAC address...67 Configuring a network printer manually...67 Finding a printer/print server located on remote subnets 68 Network troubleshooting - Lexmark 7350 | User's Guide - Page 6
...71 Cleaning the print cartridge nozzles...72 Wiping the print cartridge nozzles and contacts 72 Preserving the print cartridges...73 Cleaning the scanner glass...73 Ordering supplies...74 Recycling Lexmark products...74 Troubleshooting...75 Setup troubleshooting...75 Incorrect language appears - Lexmark 7350 | User's Guide - Page 7
92 Jams and misfeeds troubleshooting 92 Paper jam in the printer...92 Paper jam in the ADF...92 Paper or specialty media misfeeds...93 Printer does not feed paper, envelopes, or specialty media 93 Banner paper jams...94 Error messages...94 Black Ink Low/Color Ink Low/Photo Ink Low 94 Clear Paper - Lexmark 7350 | User's Guide - Page 8
8 - Lexmark 7350 | User's Guide - Page 9
to find The User's Guide gives you instructions for using the printer You can find this document on the Lexmark Web site. and other information such as: When you install the printer software, the User's • Maintenance Guide may also be installed. • Troubleshooting 1 Click Start Œ Programs or - Lexmark 7350 | User's Guide - Page 10
Web site are subject to change. Where to find Visit our Web site at www.lexmark.com. 1 Go to the Web site. 2 Select a country from the drop- Record the following information (located on the store receipt and the back of the printer), and have it ready when you contact us so that we may serve you - Lexmark 7350 | User's Guide - Page 11
and information on setup troubleshooting. Installation software for the printer. Also includes the printer software Help. Note: Installing the printer software also installs the Help. Printed booklet that serves as a guide. Installing another language control panel These instructions apply only if - Lexmark 7350 | User's Guide - Page 12
ready to fax Choosing a fax connection You can connect the printer with equipment such as a telephone, an answering machine, or a computer modem. If problems occur, see "Setup troubleshooting" on page 75. Note: The printer is an analog device that works best when directly connected to the wall - Lexmark 7350 | User's Guide - Page 13
telephone cord into an active telephone wall jack. Note: For more information on connecting the printer to telecommunications equipment, see the additional setup instructions that came with the printer. Setup steps may vary depending on your country. Connecting to a telephone Connect a telephone to - Lexmark 7350 | User's Guide - Page 14
a telephone, and then plug it into the EXT port of the printer. LINE EXT Note: For more information on connecting the printer to telecommunications equipment, see the additional setup instructions that came with the printer. Setup steps may vary depending on your country. Connecting to an answering - Lexmark 7350 | User's Guide - Page 15
a third telephone cord from the answering machine to the EXT port of the printer. LINE EXT Note: For more information on connecting the printer to telecommunications equipment, see the additional setup instructions that came with the printer. Setup steps may vary depending on your country. 15 - Lexmark 7350 | User's Guide - Page 16
you have the following: • A telephone • A computer with a modem • Three telephone cords • A telephone wall jack 2 Connect a telephone cord into the LINE port of the printer, and then plug it into an active telephone wall jack. LINE EXT LINE EXT 3 Remove the protective plug from the EXT port of - Lexmark 7350 | User's Guide - Page 17
a third telephone cord from the computer modem to the EXT port of the printer. LINE EXT LINE EXT Note: For more information on connecting the printer to telecommunications equipment, see the additional setup instructions that came with the printer. Setup steps may vary depending on your country. 17 - Lexmark 7350 | User's Guide - Page 18
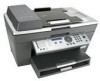
Understanding the parts of the printer 2 1 3 9 8 x 7 4 5 Use the 1 Automatic Document Feeder (ADF) 2 ADF input tray 3 ADF. Connect a PictBridge-enabled digital camera to the printer. Load paper. Stack paper as it exits. Operate the printer. For more information, see "Using the control panel" - Lexmark 7350 | User's Guide - Page 19
line to send and receive faxes. The printer must be connected to this telephone line to receive incoming fax calls. Note: Do not connect additional devices to the LINE port, and do not connect a DSL (digital subscriber line), ISDN (integrated services digital network), or cable modem to the - Lexmark 7350 | User's Guide - Page 20
Using the control panel buttons and menus Using the control panel The display shows: • All-In-One status • Messages • Menus Note: Words on the display may be abbreviated or shortened using ellipses. 1 2 3 4 Press 1 One-Touch Dial buttons (1-5) 2 Copy Mode 3 Scan Mode 4 Fax Mode 5 Fax Auto Answer 6 - Lexmark 7350 | User's Guide - Page 21
1 2 34 Press 1 Quality 2 3 4 5 6 7 8 Lighter/ Darker 8 7 65 To Adjust the quality of a copy, scan, or fax. • Increase a number. • Enter a space between letters or numbers. • Scroll through menus, submenus, or settings on the display. • Choose a menu or submenu item that appears on the display. - Lexmark 7350 | User's Guide - Page 22
on which mode is selected. 3 Start Black Start a black-and-white copy, scan, or fax job, depending on which mode is selected. 4 Power • Turn the printer on and off. • Stop the print, copy, fax, or scan process. Navigating the control panel menus 1 Press Copy Mode, Scan Mode, or Fax Mode. The - Lexmark 7350 | User's Guide - Page 23
on a page. Collate copies as they exit. Choose how many pages to print on a page. Specify the size and type of the original document. • View ink levels. • Clean cartridges. • Align cartridges. • Print a test page. Customize printer settings. Adjust the color intensity. 23 - Lexmark 7350 | User's Guide - Page 24
previous menus. Use this Original Size Maintenance Device Setup To Specify the size of the original. • View ink levels. • Clean cartridges. • Align cartridges. • Print a test page. Customize printer settings. Using the Fax menu To access and navigate the Fax menu: 1 From the control panel, press - Lexmark 7350 | User's Guide - Page 25
Dial a telephone number while listening to the call through a speaker on the printer. This is useful when you must navigate an automated answering system before sending for receiving a fax. • View ink levels. • Clean cartridges. • Align cartridges. • Print a test page. Customize printer settings. 25 - Lexmark 7350 | User's Guide - Page 26
the printer software Use this The Productivity Suite The All-In-One Center The Solution Center Print Properties The Photo Editor Fast Pics The Fax Setup Utility To Open the component necessary for you to complete a task. Scan, copy, print, and fax. Find troubleshooting, maintenance, and cartridge - Lexmark 7350 | User's Guide - Page 27
Learn more about what you can do with this software. Find maintenance and troubleshooting information and tools to keep the printer working properly. View a Web-based tutorial. Using the All-In-One Copy. 1 Click Start ΠPrograms or All Programs ΠLexmark 7300 Series. 2 Select All-In-One Center. 27 - Lexmark 7350 | User's Guide - Page 28
Using the Scanning & Copying tab Use the Scanning & Copying tab to perform scanning and copying tasks, to select a task from Productivity Tools, or to preview an image. From this section Scan Copy Productivity Tools Preview You can • Select a program to send a scanned image to. • Select what type - Lexmark 7350 | User's Guide - Page 29
Setup Utility. 1 Click Start Œ Programs or All Programs Œ Lexmark 7300 Series. 2 Select All-In-One Center. 3 Click Maintain/Troubleshoot. 4 Select from these topics: • Maintain or fix quality problems • Troubleshoot problems • Device status and ink levels • More printing ideas and how to's • Contact - Lexmark 7350 | User's Guide - Page 30
. Note: Wait until scanning is complete before installing new print cartridges. • View shopping options for new cartridges. • Print a test page. • Clean to fix horizontal streaks. • Align to fix blurry edges. • Troubleshoot other ink problems. Learn how to contact us by telephone, e-mail, or on - Lexmark 7350 | User's Guide - Page 31
lower right corner of the screen. Using Print Properties Opening Print Properties Print Properties is the software that controls the printing function when the printer is connected to a computer. You can change the settings in Print Properties based on the type of project you want to create. You - Lexmark 7350 | User's Guide - Page 32
Quality/Speed setting. • Select a Paper Type. • Customize how the printer prints several copies of a single print job: collated or normal. • software to edit graphics or photos. 1 Click Start Œ Programs or All Programs Œ Lexmark 7300 Series. 2 Select Photo Editor. 3 Click File Œ Open to select the - Lexmark 7350 | User's Guide - Page 33
From this section Image Adjust Image Size Drawing Tools You can • Adjust the color depth. • Adjust the color balance. • Colorize the image. • Colorize the image to sepia tones. • Adjust the Brightness/Contrast. • Adjust the blur. • Adjust the sharpness. • Despeckle (blur) the image to remove dust - Lexmark 7350 | User's Guide - Page 34
• If you are using specialty paper, you follow the instructions that came with it. • You do not force paper into the printer. 2 Lift the paper exit tray, and extend the center paper guide. 3 Insert paper into the paper tray. 4 Adjust the paper guides to rest against the left, right, and bottom edges - Lexmark 7350 | User's Guide - Page 35
: Photos require more drying time. Remove each photo as it exits, and allow it to dry to avoid ink smudging. • The letterhead side of the paper faces down. • The top of the letterhead feeds into the printer first. • The paper guides rest against the left, right, and bottom edges of the paper. 35 - Lexmark 7350 | User's Guide - Page 36
Remove each envelope as it exits, and allow it to dry to avoid ink smudging. • You use full label sheets. Partial sheets (with areas exposed labels faces down. • The top of the labels feeds into the printer first. • The paper guides rest against the left, right, and bottom edges of the label sheets - Lexmark 7350 | User's Guide - Page 37
The paper size fits within these dimensions: Width: - 76-216 mm - 3.0-8.5 inches Length: - 127-432 mm - 5.0-17.0 inches • The paper guides rest against the left, right, all the way to the back of the paper tray. • The paper guides rest against the left, right, and bottom edges of the cards. Note: - Lexmark 7350 | User's Guide - Page 38
down into the paper tray with the first page of the banner on top. • The leading edge of the banner paper feeds into the printer. • The paper guides rest against the right and left edges of the paper. • You have selected the correct paper size for the banner in Print Properties. For - Lexmark 7350 | User's Guide - Page 39
edge of the paper. • The document is loaded text side up. • The paper guide is against the edge of the paper. • The paper size fits within these dimensions: Width: - 210.0 mm-215.9 mm - 8.27 in.-8.5 in. Length: - 279 the ADF. 1 Make sure the computer and the printer are on. 2 Open the top cover. 39 - Lexmark 7350 | User's Guide - Page 40
3 Place the original document face down on the scanner glass in the upper left corner. Note: Photos should be loaded as shown. 4 Close the top cover to avoid dark edges on the scanned image. 40 - Lexmark 7350 | User's Guide - Page 41
Printing Printing a document 1 Load paper. 2 With a document open, click File ΠPrint. 3 Click Properties, Preferences, Options, or Setup. 4 Adjust the settings. 5 Click OK. 6 Click OK or Print. Printing collated copies If you print multiple copies of a document, you can choose to print each copy - Lexmark 7350 | User's Guide - Page 42
Printing transparencies 1 Load transparencies. 2 With a document open, click File ΠPrint. 3 Click OK or Print. Note: To prevent smudging, remove each transparency as it exits, and let it dry before stacking. Transparencies may require up to 15 minutes to dry. Printing envelopes 1 Load envelopes. 2 - Lexmark 7350 | User's Guide - Page 43
the Paper Size list, select a card size. 8 Click OK. 9 Click OK or Print. Notes: • To avoid paper jams, do not force the cards into the printer. • To prevent smudging, remove each card as it exits, and let it dry before stacking. 43 - Lexmark 7350 | User's Guide - Page 44
Copying ADF Scanner glass x Use the ADF for multiple-page A4, letter or legal size documents. Use the scanner glass for single pages, small items (such as postcards or photos), or thin media (such as magazine clippings). Note: If you want to customize copy settings, see "Using the Copy menu" on - Lexmark 7350 | User's Guide - Page 45
4 Press . 5 Press or repeatedly until appears next to Collate. 6 Press . 7 Press or repeatedly until On appears. 8 Press . 9 Press or repeatedly until the number of copies you want to print appears. 10 Press . 11 Press Start Color or Start Black. Repeating an image on one page You can print - Lexmark 7350 | User's Guide - Page 46
7 Press or repeatedly until the setting you want appears. 8 Press Start Color or Start Black. 46 - Lexmark 7350 | User's Guide - Page 47
Using the Scan menu" on page 24. Scanning a document 1 Make sure the printer is connected to a computer, and both the printer and the computer are on. 2 Load an original document faceup into the ADF or appears. 5 Press Start Color or Start Black. 6 Follow the instructions on the computer screen. 47 - Lexmark 7350 | User's Guide - Page 48
program to edit the text. 7 Click Send Now. 8 Edit and save the document. Scanning images for editing 1 Make sure the printer is connected to a computer, and both the printer and the computer are on. 2 Load an original document faceup into the ADF or facedown on the scanner glass. Note: Do not - Lexmark 7350 | User's Guide - Page 49
. 11 Click Scan Now. Scanning to a computer over a network 1 Make sure: • The printer is connected to the network through a print server, and the printer, print server, and computer receiving the scan are on. • The printer is configured to scan over a network (Direct IP Printing). 2 Load an original - Lexmark 7350 | User's Guide - Page 50
Faxing ADF Scanner glass x Use the ADF for multiple-page A4, letter, or legal size documents. Use the scanner glass for single pages, small items (such as postcards or photos), or thin media (such as magazine clippings). Note: If you want to customize fax settings: • Using the control panel, - Lexmark 7350 | User's Guide - Page 51
of 30 fax numbers have been entered. Sending a fax using the control panel 1 Make sure the printer is on. 2 Load an original document faceup into the ADF or facedown on the scanner glass. Note Fax a document in the All-in-One. 6 Follow the instructions on the computer screen to complete the task. 51 - Lexmark 7350 | User's Guide - Page 52
numbers will be dialed again. Sending a fax while listening to a call (On Hook Dial) The manual dialing feature lets you dial a telephone number while listening to the call through a speaker on the printer. It is useful when you must navigate an automated answering system or enter a calling card - Lexmark 7350 | User's Guide - Page 53
57. Receiving a fax manually 1 Make sure the Fax Auto Answer light is off. 2 To receive the fax: • Press Start Black or • Press * 9 * on the telephone after you answer it and hear fax tones 3 Hang up the telephone. The printer receives the fax. Using Caller ID Caller ID is a service provided by some - Lexmark 7350 | User's Guide - Page 54
be away, but still want to receive your faxes. There are three fax forwarding settings: • Off-(Default). • Forward-The printer sends the fax to the designated fax number. • Print & Forward-The printer prints the fax and then sends it to the designated fax number. To set up fax forwarding: 1 From the - Lexmark 7350 | User's Guide - Page 55
Setting up Quick Dial buttons and Speed Dial numbers Setting up Quick Dial buttons using the control panel 1 From the control panel, press Fax Mode. 2 Enter a fax number. Notes: • You can include a calling card number as part of the fax number. • Enter a maximum of 64 digits in a fax number. 3 Hold - Lexmark 7350 | User's Guide - Page 56
or repeatedly until the setting you want appears. 6 Press and follow the instructions on the display. Use this Add Number Edit Number Remove Number Print To Speed Dial and Group Dial entries in the Phone Book. Note: For instructions on how to add Speed Dial or Group Dial entries to the Phone - Lexmark 7350 | User's Guide - Page 57
provided by some telephone companies that assigns multiple phone numbers to a single telephone line. If you subscribe to this service, you can program your printer to have a distinctive ring pattern and phone number for incoming faxes. 1 From the control panel, press Fax Mode. 2 Press . 3 Press - Lexmark 7350 | User's Guide - Page 58
is being used in a business or office, it may be connected to a Private Branch Exchange (PBX) telephone system. Ordinarily, when dialing a fax number, the printer waits to recognize the dial tone and then dials the fax number. However, this method of dialing may not work if the PBX telephone system - Lexmark 7350 | User's Guide - Page 59
3 Click Manage fax history or All-In-One fax settings. 4 Click each tab, and change the settings as needed. On this tab Send You can • Enter your name and fax number. Notes: - You can include a calling card number as part of the fax number. - Enter a maximum of 64 digits in a fax number. • Select - Lexmark 7350 | User's Guide - Page 60
entries. 5 Click OK after you finish customizing the settings. 6 Close the Fax Setup Utility. Setting up a fax header During the initial setup of your printer, you were prompted to enter your name, fax number, date, and time. This information is used to create a fax header for faxes you send. If - Lexmark 7350 | User's Guide - Page 61
13 Press . 14 Press or repeatedly until Date appears. 15 Press . 16 Enter the date using the keypad. 17 Press . 18 Press or repeatedly until Time appears. 19 Press . 20 Press or to select 12 hr or 24 hr. 21 Press to save the setting. 22 Enter the time. 23 Press . 24 If you selected the 12- - Lexmark 7350 | User's Guide - Page 62
6 Press . 7 Press or until Block appears. 8 Press to save this setting. Blocking junk faxes If you have Caller ID, you can block faxes sent from specific numbers and/or all faxes which do not include a Caller ID number. 1 From the control panel, press Fax Mode. 2 Press . 3 If you want to block - Lexmark 7350 | User's Guide - Page 63
Working with photos Printing borderless photos Printing photos stored on the computer using the Productivity Suite 1 Load photo paper. For best results, use photo or glossy paper with the glossy or coated side facing down. 2 From the desktop, double-click the Productivity Suite icon. 3 Click Manage - Lexmark 7350 | User's Guide - Page 64
end of the cable into the PictBridge port on the front of the printer. Note: Make sure the PictBridge-enabled digital camera is set to the correct . For more information, see the camera documentation. 3 Follow the instructions in the camera documentation to select and print photos. Customizing photos - Lexmark 7350 | User's Guide - Page 65
10 Drag the photos onto the page. Note: Right-click the photo on the page for editing options. 11 Click Print Now. Note: To prevent smudging, remove each page as it exits, and let it dry before stacking. Adding text captions to a photo page 1 Load paper. For best results, use photo or glossy paper - Lexmark 7350 | User's Guide - Page 66
to make sure g When prompted, select Test Page to make sure the computer can print to the shared printer. the computer can print to the shared printer. h Follow the instructions on the computer screen until installation is complete. i Repeat this procedure for each network computer you want to - Lexmark 7350 | User's Guide - Page 67
of the print server in the port name. If the IP address is not automatically assigned during printer software installation, you can try manually entering an address after selecting your printer/print server from the available list. Finding your MAC address You may need the media access control - Lexmark 7350 | User's Guide - Page 68
on the same network as the computer. If the printer and print server are located on another network (called a subnet), you must manually enter an IP address during printer software installation. Network troubleshooting tips 1 Make sure the printer is set up correctly. For more information, see the - Lexmark 7350 | User's Guide - Page 69
moves and stops at the loading position, unless the printer is busy. 3 Press down on the lever to raise the cartridge lid. 4 Remove the used print cartridge. To recycle the used cartridge, see "Recycling Lexmark products" on page 74. If the cartridge you removed is not empty and you want to use - Lexmark 7350 | User's Guide - Page 70
the gold contact area on the back or the metal nozzles on the bottom of the cartridges. 2 Press down on the cartridge levers to raise the cartridge lids. 3 Insert the black cartridge or the photo cartridge in the left carrier. Insert the color cartridge in the right carrier. 4 Close the lids. 70 - Lexmark 7350 | User's Guide - Page 71
to print an alignment page. For more information, see "Aligning print cartridges" on page 71. Note: The scanner unit must be closed to document, make sure you: • Use the appropriate paper for the document. Use Lexmark Premium Photo Paper if you are printing photos or other high quality images. - Lexmark 7350 | User's Guide - Page 72
. 4 Press or repeatedly until appears next to Maintenance. 5 Press . 6 Press or repeatedly until appears next to Clean Cartridges. 7 Press . A page prints, forcing ink through the print cartridge nozzles to clean them. 8 Print the document again to verify that the print quality has improved. 9 If - Lexmark 7350 | User's Guide - Page 73
times. 11 If print quality is still not satisfactory, replace the print cartridges. Preserving the print cartridges • Keep a new cartridge in its packaging until you are ready to install it. • Do not remove a cartridge from the printer except to replace, clean, or store it in an airtight container - Lexmark 7350 | User's Guide - Page 74
, use only Lexmark print cartridges. Lexmark photo paper types Lexmark Premium Photo Paper when printing photos or other high-quality images. Recycling Lexmark products To return Lexmark products to Lexmark for recycling: 1 Visit our Web site at www.lexmark.com/recycle. 2 Follow the instructions - Lexmark 7350 | User's Guide - Page 75
" on page 92 • "Error messages" on page 94 • "Removing and reinstalling the software" on page 100 Setup troubleshooting Incorrect language appears on the display 1 From the control panel, press Copy Mode. 2 Press . 3 Press or repeatedly until appears next to 9. 4 Press . appears next - Lexmark 7350 | User's Guide - Page 76
on page 94 for more information. The following operating systems are supported: • Windows 98/Me • Windows 2000 • Windows XP Check that plug the square end of the USB cable into the back of the printer. If the printer is connected to the computer through another device: 1 Disconnect the USB cable - Lexmark 7350 | User's Guide - Page 77
setup.exe. 6 Follow the instructions on the computer screen to install the software. 1 Visit our Web site at www.lexmark.com to check for the latest software. 2 Click drivers & downloads. 3 Click Find Drivers and Downloads. 4 Select your printer family. 5 Select your printer model. 6 Select your - Lexmark 7350 | User's Guide - Page 78
the print cartridges. If the printer is connected to the computer through another device: 1 Disconnect the USB cable from any other device, such as a USB hub or switch box. 2 Directly connect the cable to the printer and the computer. Make sure the printer is set as the default printer and is - Lexmark 7350 | User's Guide - Page 79
lexmark.com to check for the latest software. a Click drivers & downloads. b Click Find Drivers and Downloads. c Select your printer family. d Select your printer troubleshooting cartridges. For more information, see "Removing a used print cartridge" on page 69 and "Installing print cartridges - Lexmark 7350 | User's Guide - Page 80
Check the ink levels, and install a new print cartridge if necessary. See "Improving print quality" on page 79. To avoid ink smudging when lexmark.com to check for the latest software. a Click drivers & downloads. b Click Find Drivers and Downloads. c Select your printer family. d Select your printer - Lexmark 7350 | User's Guide - Page 81
setting. 1 From the software application, click File ΠPrint. 2 Click Properties, Preferences, Options, or Setup. 3 Click Paper Setup. 4 Check the paper size. Printer does not print or respond See "Page does not print" on page 77. Print speed is slow Close all applications not in use. Try minimizing - Lexmark 7350 | User's Guide - Page 82
software still does not install correctly, visit our Web site at www.lexmark.com to check for the latest software. a Click drivers & downloads. b Click Find Drivers and Downloads. c Select your printer family. d Select your printer model. e Select your operating system. f Select the file you want to - Lexmark 7350 | User's Guide - Page 83
your operating system. f Select the file you want to download, and follow the directions on the computer screen. Scanner message is displayed, see "Error messages" on page 94. Check the ink levels and install a new print cartridge if necessary. If the scanner glass is dirty, gently wipe it with - Lexmark 7350 | User's Guide - Page 84
paper size being used matches the size you selected. Scan troubleshooting Scanner does not respond If an error message is displayed, see lexmark.com to check for the latest software. a Click drivers & downloads. b Click Find Drivers and Downloads. c Select your printer family. d Select your printer - Lexmark 7350 | User's Guide - Page 85
software still does not install correctly, visit our Web site at www.lexmark.com to check for the latest software. a Click drivers & downloads. b Click Find Drivers and Downloads. c Select your printer family. d Select your printer model. e Select your operating system. f Select the file you want to - Lexmark 7350 | User's Guide - Page 86
From the Selected Application Does Not Support Multiple Pages dialog, click Cancel. troubleshooting Tips for faxing using the Productivity Suite If you are faxing using the Productivity Suite, make sure: • The printer message appears, follow the instructions on the error message dialog. If the - Lexmark 7350 | User's Guide - Page 87
service, connect the printer to an analog telephone port (an R-interface port) on an ISDN terminal adapter. For more information and to request an R-interface port, contact your ISDN provider. • If you are using DSL, connect to a DSL filter or router that will support print cartridge is installed - Lexmark 7350 | User's Guide - Page 88
. If the Fax Auto Answer light is on: • The printer will answer after the preset number of telephone rings. • If you are using a distinctive ring, see "Setting the distinctive ring" on page 57. Check the ink levels, and install a new cartridge if necessary. Check to see whether Fax Forwarding is - Lexmark 7350 | User's Guide - Page 89
on page 55. • As an alternative, dial the telephone number manually. Make sure the printer is detecting a dial tone. • See "Sending a fax while Printer receives a blank fax Ask the sender to verify the original document was loaded correctly. Check the ink levels, and install a new print cartridge - Lexmark 7350 | User's Guide - Page 90
cartridges. Received fax has poor print quality Ask that the sender: • Check that the quality of the original document is satisfactory. • Resend the fax. There may have been a problem save the setting. Check the ink levels and install a new print cartridge if necessary. Decrease the transmission - Lexmark 7350 | User's Guide - Page 91
of the previous actions fixes the problem, uninstall the printer software, and reinstall it. For more information, see "Removing and reinstalling the software" on page 100. Cannot print to the network printer See the print server documentation for setup instructions if: • The lights of the print - Lexmark 7350 | User's Guide - Page 92
the printer. Contact your system support person to make sure the printer is connected to a working network connection. Make sure the printer is . Make sure security keys are correct. Jams and misfeeds troubleshooting Paper jam in the printer To remove the paper: 1 Open the rear access door - Lexmark 7350 | User's Guide - Page 93
printer. See "Loading various paper types" on page 35 for information about: • Maximum loading amounts per paper type • Specific loading instructions for supported guides: • When using media less than 8.5 inches wide • Against the edges of the paper or media, making sure it does not buckle Printer - Lexmark 7350 | User's Guide - Page 94
level or levels and install a new cartridge or cartridges, if necessary. Low ink warnings occur when a cartridge is 25% full, 15% full, and 10% full. To order supplies, see "Ordering supplies" on page 74. 2 Press to continue. Clear Paper Jam See "Paper jam in the printer" on page 92. Clear ADF Jam - Lexmark 7350 | User's Guide - Page 95
outlet. 4 If the Power button is not lit, press Power. 5 Reinsert the print cartridges. 6 If the error: • Does not reappear, the problem has been corrected. • Reappears, one of the cartridges is not working properly. Continue with Procedure 2. Procedure 2 Follow this procedure to determine which - Lexmark 7350 | User's Guide - Page 96
into the wall outlet. 8 Press Power to turn the printer on. 9 Reinstall the print cartridges. For more information, see "Installing print cartridges" on page 70. Left Cartridge Missing/Right Cartridge Missing One or both cartridges are missing or not installed properly. For more information, see - Lexmark 7350 | User's Guide - Page 97
Problem 1 Remove the print cartridges. 2 Make sure the sticker and tape have been removed. 1 2 3 Reinsert the print cartridges. 4 Press to align the cartridges. Load only plain, unmarked paper for aligning cartridges. The printer support the type of fax you attempted to send. If it does not support: - Lexmark 7350 | User's Guide - Page 98
an ISDN telephone service, connect the printer to an analog telephone port (an R-interface port) on an ISDN terminal adapter. For more information and to request an R-interface port, contact your ISDN provider. • If you are using DSL, connect to a DSL filter or router that will support analog use - Lexmark 7350 | User's Guide - Page 99
until you reset the transmission speed. 9 Resend the fax. 10 If the problem persists, repeat step 1 through step 9 to send the fax at successively lower transmission speeds. Phone Line Busy The printer automatically redials three times at 3-minute intervals. You can change the default settings - Lexmark 7350 | User's Guide - Page 100
you try to use the printer, you may need to remove and reinstall the printer software. 1 Close all open software applications. 2 Disable any anti-virus programs. 3 Click Start ΠPrograms or All Programs ΠLexmark 7300 Series. 4 Select Uninstall. 5 Follow the instructions on the computer screen to - Lexmark 7350 | User's Guide - Page 101
7 Click Cancel on all New Hardware Found screens. 8 Insert the CD, and then follow the instructions on the computer screen to reinstall the software. 101 - Lexmark 7350 | User's Guide - Page 102
4418-G60 Trademarks Lexmark and Lexmark with diamond design are trademarks of Lexmark International, Inc., registered and used in accordance with the instructions, may cause harmful interference to Consult your point of purchase or service representative for additional suggestions. The manufacturer - Lexmark 7350 | User's Guide - Page 103
information statement should be directed to: Director of Lexmark Technology & Services Lexmark International, Inc. 740 West New Circle Road directives has been signed by the Director of Manufacturing and Technical Support, Lexmark International, Inc., S.A., Boigny, France. This product satisfies the - Lexmark 7350 | User's Guide - Page 104
service. If you experience trouble with this equipment, for repair or warranty information, contact Lexmark International, Inc. at www.lexmark.com or your Lexmark AC power sources. This has been identified as a major nationwide problem. It is recommended that the customer install an appropriate AC - Lexmark 7350 | User's Guide - Page 105
major nationwide problem. It is Facsimile User Instructions. The services. This equipment shall not be set up to make automatic calls to the Telecom's 111 Emergency Service 30 minute period for any single manual call initiation, and • The equipment billing tone filter (Lexmark part number 14B5123) - Lexmark 7350 | User's Guide - Page 106
part number 14B5109) to be installed on any line which receives metering pulses in Switzerland. The Lexmark filter must be used, as metering pulses are present on all analog telephone lines in Switzerland. ENERGY STAR Power consumption Product power consumption It is - Lexmark 7350 | User's Guide - Page 107
Total energy usage It is sometimes helpful to calculate the total product energy usage. Since power consumption claims are provided in power units of Watts, the power consumption should be multiplied by the time the product spends in each mode in order to calculate energy usage. The total product - Lexmark 7350 | User's Guide - Page 108
tray 18 loading documents 38 paper capacity 39 scanning multiple pages 47 album page, creating 64 aligning print cartridges 71 alignment problem 97 All-In-One Center Maintain/Troubleshoot link 29 opening 27 Saved Images tab 29 Scanning & Copying tab 28 answering machine, receiving a fax with 53 - Lexmark 7350 | User's Guide - Page 109
37 printing 43 information, finding 9 inserting PictBridge-enabled digital camera 64 installing network printer 67 print cartridges 70 software and sharing printer on network 66 IP address, assigning 67 J jams and misfeeds troubleshooting banner paper jams 94 paper jam in ADF 92 paper jam in - Lexmark 7350 | User's Guide - Page 110
troubleshooting cannot print to network printer 91 network name does not appear in list 92 printer to be configured does not appear in list of printers found on network 91 network troubleshooting Editor, using 32 photo ink low error 94 photo paper cartridge nozzles, cleaning 72 print cartridges - Lexmark 7350 | User's Guide - Page 111
or photo copies 84 poor copy quality 83 scanner unit does not close 83 troubleshooting, error messages alignment problem 97 black ink low 94 cartridge error 95 clear ADF jam 94 clear carrier jam 95 clear paper jam 94 color ink low 94 error 1104 96 failed to connect 97 fax error 97 fax mode - Lexmark 7350 | User's Guide - Page 112
troubleshooting, setup cannot print from digital camera using PictBridge 79 incorrect language appears on display 75 page does not print 77 power button is not lit 76 software does not install 76 U unwanted faxes, blocking 62 USB port 19 W Web site button 26 finding 10 112
-
 1
1 -
 2
2 -
 3
3 -
 4
4 -
 5
5 -
 6
6 -
 7
7 -
8
-
9
-
10
-
11
-
12
-
13
-
14
-
15
-
16
-
17
-
18
-
19
-
20
-
21
-
22
-
23
-
24
-
25
-
26
-
27
-
28
-
29
-
30
-
31
-
32
-
33
-
34
-
35
-
36
-
37
-
38
-
39
-
40
-
41
-
42
-
43
-
44
-
45
-
46
-
47
-
48
-
49
-
50
-
51
-
52
-
53
-
54
-
55
-
56
-
57
-
58
-
59
-
60
-
61
-
62
-
63
-
64
-
65
-
66
-
67
-
68
-
69
-
70
-
71
-
72
-
73
-
74
-
75
-
76
-
77
-
78
-
79
-
80
-
81
-
82
-
83
-
84
-
85
-
86
-
87
-
88
-
89
-
90
-
91
-
92
-
93
-
94
-
95
-
96
-
97
-
98
-
99
-
100
-
101
-
102
-
103
-
104
-
105
-
106
-
107
-
108
-
109
-
110
-
111
-
112
 |
 |

7300 Series All-In-One
User's Guide
November 2005
www.lexmark.com
Lexmark and Lexmark with diamond design are trademarks of Lexmark International, Inc., registered in the United States and/or other countries.
All other trademarks are the property of their respective owners.
© 2006 Lexmark International, Inc.
All rights reserved.
740 West New Circle Road
Lexington, Kentucky 40550