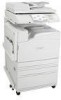
Lexmark 940e Setup Guide
Lexmark 940e - X Color Laser Manual
 |
UPC - 734646027366
View all Lexmark 940e manuals
Add to My Manuals
Save this manual to your list of manuals |
Lexmark 940e manual content summary:
- Lexmark 940e | Setup Guide - Page 1
MFP Setup Guide April 2007 www.lexmark.com Lexmark and Lexmark with diamond design are trademarks of Lexmark International, Inc., registered in the United States and/or other countries. All other trademarks are the property of their respective owners. © 2007 Lexmark International, Inc. All - Lexmark 940e | Setup Guide - Page 2
service or repairs, other than those described in the user documentation, to a professional service person. CAUTION: The printer Lexmark components. The safety features of some parts may not always be obvious. Lexmark the section in your operating instructions that discusses the guidelines for - Lexmark 940e | Setup Guide - Page 3
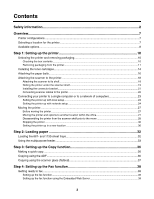
the box contents ...10 Removing packaging from the printer...11 Installing the toner cartridges...14 Attaching the paper bails...16 Attaching the scanner to the printer 18 Attaching the scanner to its shelf...18 Rolling the printer under the scanner shelf 19 Installing the connector bracket - Lexmark 940e | Setup Guide - Page 4
reading USB drive appears 50 Jobs do not print...50 Make sure the printer is ready to print ...50 Check to see if the standard exit bin Check to see if the paper tray is empty ...50 Make sure the correct printer software is installed 50 Make sure the internal print server is installed properly and - Lexmark 940e | Setup Guide - Page 5
51 Drawers...51 Make sure the paper is loaded correctly...51 Reset the printer ...51 Duplex unit...51 Paper frequently jams...52 Check the paper ... 52 Check the paper guides...52 Has the paper absorbed moisture due to high humidity 52 Contacting Customer Support...52 Administrative settings...52 - Lexmark 940e | Setup Guide - Page 6
6 - Lexmark 940e | Setup Guide - Page 7
of air conditioners, heaters, or ventilators - Free from direct sunlight, humidity extremes, or temperature fluctuations - Clean, dry, and free of dust CAUTION: The printer weighs 91.2 kg (201 lb); therefore, it requires two people to roll it safely into place. The scanner weighs 25 kg (55 lb - Lexmark 940e | Setup Guide - Page 8
height is 693 mm (27.28 in.). For other clearance measurements, follow this illustration: For the fully configured printer, the recommended amount of space to allow for the printer height is 1,750 mm (68.89 in.). For other clearance measurements, follow this illustration: Available options Memory - Lexmark 940e | Setup Guide - Page 9
Firmware cards • Bar Code and Forms • ImageQuickTM • IPDS and SCS/TNe • PrintCryptionTM • PRESCRIBE Note: Use a #2 Phillips screwdriver to remove the system board access cover. Other internal options • RS-232 serial interface card • Parallel 1284-B interface card • MarkNetTM N8000 Series Internal - Lexmark 940e | Setup Guide - Page 10
to avoid any damage. Once all boxes are unpacked, verify that you have the following items: 1 Four toner cartridges: black, cyan, magenta, and yellow 2 Setup Guide 3 • Printer with the standard tray (Tray 1) • High capacity feeder, which consists of: - Optional 520-sheet tray (Tray 2) - Optional - Lexmark 940e | Setup Guide - Page 11
4 Four brackets to attach the scanner to its scanner shelf 5 Connector bracket, which secures the scanner shelf to the printer 6 Software and Documentation CD 7 USB cable 8 Power cord 9 Scanner 10 Paper bails and a template 11 Paper size labels for the trays 12 Wrench 13 Scanner shelf Removing - Lexmark 940e | Setup Guide - Page 12
2 Open the front printer door. 3 Pull the black stopper out. 4 Press the button located on the bottom of the metal latch, and then pull the metal latch up. 12 - Lexmark 940e | Setup Guide - Page 13
5 Pull the Styrofoam packaging out. 6 Lower the metal bar. 7 Pull the tag to remove the packaging strips. 8 Locate the side of the printer shown in step 10. 9 Lift the release latch. 13 - Lexmark 940e | Setup Guide - Page 14
10 Lower the door. 11 Keep the metal bar down. Pull on the packaging as shown to release and remove the red metal brackets. 12 Push the metal bar up. 13 Push the metal latch down. Installing the toner cartridges 1 Unpack the toner cartridges. 2 Remove the packaging wrapped around each cartridge. 14 - Lexmark 940e | Setup Guide - Page 15
the tape from each cartridge. 4 Insert the black toner cartridge into the printer. Warning: Make sure the toner cartridge is fully inserted before completing step 5. 5 Turn the knob on the cartridge clockwise to lock the cartridge into place. 6 Insert the remaining three cartridges. Make sure they - Lexmark 940e | Setup Guide - Page 16
. Attaching the paper bails You should find a package with the paper bails and a template in Tray 1. The paper bails help prevent offset bin stacking by guiding each sheet of paper or specialty media into the standard exit bin. 1 Align the template with the top of the printer as shown. 16 - Lexmark 940e | Setup Guide - Page 17
2 Remove the film to expose the sticky pad on each paper bail, and then place each bail in an area indicated by the template. 3 Press on each paper bail for 25 seconds to make sure each bail adheres well. 17 - Lexmark 940e | Setup Guide - Page 18
Attaching the scanner to the printer Attaching the scanner to its shelf Note: This operation requires a #2 Phillips screwdriver. CAUTION: The it on its shelf. 2 Locate the four brackets that came in the box with the printer and the scanner shelf. 3 Attach the left front bracket to the shelf. 18 - Lexmark 940e | Setup Guide - Page 19
bracket with the holes on the shelf. 7 Insert the screws, and then tighten them. 8 Attach the right rear bracket in the same way. Rolling the printer under the scanner shelf CAUTION: The printer weighs 91.2 kg (201 lb); therefore, it requires two people to roll it safely. 19 - Lexmark 940e | Setup Guide - Page 20
Roll the printer under the scanner shelf. 20 - Lexmark 940e | Setup Guide - Page 21
Installing the connector bracket When you unpacked the printer, you should have found the connector bracket in its own bag. 1 At the rear of the printer, remove the two screws shown. 21 - Lexmark 940e | Setup Guide - Page 22
2 Align the connector bracket with the holes, and then insert the screws and tighten them. Connecting scanner cables to the printer Locate the three cables on the back of the scanner. 1 Attach the black scanner-printer interface cable to the printer, and then tighten the two screws. 22 - Lexmark 940e | Setup Guide - Page 23
with a USB or parallel cable). When setting up this type of printer with a USB cable, you should install the printer software before connecting the USB cable. The Software and Documentation CD can be used to install the necessary printer software on most Windows operating systems. 1 Insert the - Lexmark 940e | Setup Guide - Page 24
, and then attach the other end of the cable to the computer. 3 Insert the power cord into the printer, and then insert the plug into a wall outlet. 4 Turn the printer on. 5 Verify printer setup by printing a menu settings page. For more information, see "Printing a menu settings page" on page 46 - Lexmark 940e | Setup Guide - Page 25
is set up to be "shared" so that other network computers can print to it. The Software and Documentation CD can be used to install the necessary printer software on most Windows operating systems. 1 Connect the Ethernet cable from the computer to the wall LAN outlet. 2 Connect a telephone cord - Lexmark 940e | Setup Guide - Page 26
3 Connect the Ethernet cable as shown. 4 Insert the power cord into the printer, and then insert the plug into a wall outlet. 5 Turn the printer on. 6 Insert the CD. 7 Verify printer setup by printing a network setup page. For more information, see "Printing a network setup page" on page 46. 26 - Lexmark 940e | Setup Guide - Page 27
location by following these precautions: • Keep the printer in an upright position. • Move the printer using a cart that has a surface able to support the full footprint of the printer. Move the options using a cart that has a surface able to support the dimensions of the options. • Avoid severe - Lexmark 940e | Setup Guide - Page 28
Disassembling the printer from the scanner shelf prior to the move 1 Turn the printer off. 2 Unplug the printer power cord. 28 - Lexmark 940e | Setup Guide - Page 29
3 Remove the connector bracket. 4 Disconnect all cables from the back of the printer and scanner. 5 Remove any paper or specialty media from the standard exit bin. 6 Remove any paper or specialty media from the multipurpose feeder. 7 Grasp the - Lexmark 940e | Setup Guide - Page 30
lb); therefore, it requires two people to roll it safely. Shipping the printer If shipping the printer, the scanner, and any options, save the original packaging or call the place of purchase for a relocation kit. Disassemble all the items before packing. For more information, see "Disassembling the - Lexmark 940e | Setup Guide - Page 31
3 Complete the setup of the printer and scanner by completing the steps in each heading in this chapter: "Step 1: Setting up the printer" on page 10. 4 Verify that the printer and scanner are functioning properly. For more information, see "Step 7: Verifying printer setup" on page 46. 31 - Lexmark 940e | Setup Guide - Page 32
and the 1133-sheet tray are different in appearance, they support the same paper sizes and types and require the same process for loading paper. Use these instructions to load paper in either tray: 1 Grasp the handle, and open the tray. 2 Squeeze the length guide tab inward as shown, and slide the - Lexmark 940e | Setup Guide - Page 33
edges on a level surface. 4 Load the paper stack with the recommended print side faceup. 5 Make sure the paper guides are secure against the edges of the paper. 6 Insert the tray into the printer. 7 If a different type of paper was loaded than the type previously loaded in the tray, change the Paper - Lexmark 940e | Setup Guide - Page 34
1 Pull the multipurpose feeder tray down. 2 Grasp the extension, and gently pull it out until it is fully extended. 3 Prepare the paper for loading. • Flex sheets of paper back and forth to loosen them, and then fan them. Do not fold or crease the paper. Straighten the edges on a level surface. • - Lexmark 940e | Setup Guide - Page 35
B4, folio, legal, and statement paper with the recommended print side facedown and the short edge of the paper entering the printer first. Notes: - Adjust the additional paper guide to accommodate SRA3 and 12 x 19 paper sizes. - Do not exceed the maximum stack height by forcing paper under the stack - Lexmark 940e | Setup Guide - Page 36
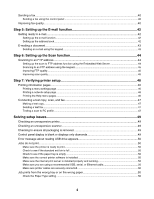
four ways to send an email from the printer. You can type the e-mail address, are loading a document into the ADF, adjust the paper guides. 3 From the control panel, press . Note: If an error when attempting a quick copy. Contact your system support person for access. 4 If you placed the document on - Lexmark 940e | Setup Guide - Page 37
touch Scan Next if you have more pages to scan, or touch Finish the Job if you are done. Touching Finish the Job returns the printer to the copy screen. 37 - Lexmark 940e | Setup Guide - Page 38
scanner lets you scan documents directly to a File Transfer Protocol (FTP) server. Note: Only an FTP destination has been configured by your system support person, the name of the destination becomes available as you first turn on the printer, a series of initial prompts guide you to set up the - Lexmark 940e | Setup Guide - Page 39
Configuration is a task usually completed by the system support person. See your system support person if you are prompted to supply a password during the following instructions. 1 Open a Web browser. 2 In the address bar, type the IP address of the printer (for example, http://192.168.236.24), and - Lexmark 940e | Setup Guide - Page 40
control panel. Sending a fax During initial printer setup, you may be required to configure the printer for faxing. For more information, see 5 Touch Fax It. For more information, see the User's Guide on the Software and Documentation CD. Improving fax quality Question When should I use Text mode? - Lexmark 940e | Setup Guide - Page 41
/Photo mode is recommended for magazine articles, business graphics, and brochures. When should I use Photo mode? Use Photo mode when faxing photos printed on a laser printer or taken from a magazine or newspaper. 41 - Lexmark 940e | Setup Guide - Page 42
e-mail function For e-mail to operate, it must be turned on in the printer configuration and have a valid IP address or gateway address. To set up the a Web browser. 2 In the address bar, type the IP address of the printer and, then press Enter. 3 Click Configuration. 4 Click E-mail/FTP Settings. - Lexmark 940e | Setup Guide - Page 43
these items on the scanner glass. 2 If you are loading a document into the ADF, adjust the paper guides. 3 On the home screen, touch E-mail. 4 Enter the e-mail address or shortcut number. To enter add. 5 Touch E-mail It. For more information, see the User's Guide on the Software and Documentation - Lexmark 940e | Setup Guide - Page 44
lets you scan documents directly to a File Transfer Protocol (FTP) server. Note: an FTP destination has been configured by your system support person, the name of the destination becomes available operate, it must be turned on in the printer configuration and have a valid IP address or gateway - Lexmark 940e | Setup Guide - Page 45
Touch Send It. For more information, see the User's Guide on the Software and Documentation CD. Improving FTP quality Question Tip When should I use Text mode original document is composed mostly of photos printed on a laser printer or taken from a magazine or newspaper. Improving scan quality - Lexmark 940e | Setup Guide - Page 46
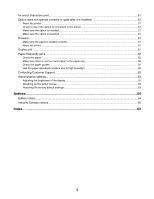
more information, see the User's Guide on the Software and Documentation CD. Printing information pages Printing a menu settings page Print a menu settings page to review the current menu settings and to verify printer options are installed correctly. 1 Make sure the printer is on and Ready appears - Lexmark 940e | Setup Guide - Page 47
quick test copy. Contact your system support person for access. Sending a test fax document into the ADF, adjust the paper guides. 3 On the home screen, touch address bar, type the IP address of the printer. 3 Press Enter. If the Java applet screen scanned output file. 8 Enter a profile name. A profile - Lexmark 940e | Setup Guide - Page 48
Review the instructions on the Scan to PC screen. A shortcut number is automatically assigned when you click Submit. Use this shortcut number when you are ready to scan your documents. a Go to the printer computer to view your file. The output file is saved in the folder location you specified or launched - Lexmark 940e | Setup Guide - Page 49
into any surge protectors, uninterrupted power supplies, or extension cords. • Other electrical equipment plugged into the outlet is working. Once you have checked each of these possibilities, turn the printer off and then back on. This often fixes the problem with the scanner. Checking to ensure - Lexmark 940e | Setup Guide - Page 50
printer, click View User's Guide and Documentation on the Software and Documentation CD. • Print a network setup page and check that the status shows Connected. If the status is Not Connected, check the network cables, and then try printing the network setup page again. Contact your system support - Lexmark 940e | Setup Guide - Page 51
. 2 Check for paper jams or misfeeds. 3 Make sure paper guides are aligned against the edges of the paper. 4 Make sure the paper tray closes properly. 5 Close the door. Reset the printer Turn the printer off. Wait 10 seconds. Turn the printer back on. Duplex unit Make sure the connection between the - Lexmark 940e | Setup Guide - Page 52
wrapper until you use it. Contacting Customer Support When you call Customer Support, describe the problem you are experiencing, the message on the display, and the troubleshooting steps you have already taken to find a solution. You need to know your printer model type and serial number. For more - Lexmark 940e | Setup Guide - Page 53
panel menus Since many people often use a printer, a support person may choose to lock the control panel menus so that the settings cannot be changed from the control panel. 1 Turn the printer off. 2 From the keypad, hold down and while turning the printer on. 3 Release the buttons when the screen - Lexmark 940e | Setup Guide - Page 54
in conjunction with other products, programs, or services, except those expressly designated by the manufacturer, are the user's responsibility. For Lexmark technical support, visit support.lexmark.com. For information on supplies and downloads, visit www.lexmark.com. If you don't have access to - Lexmark 940e | Setup Guide - Page 55
in accordance with the instruction manual, may cause harmful and grounded cable such as Lexmark part number 1021231 for parallel attach following notice is applicable if your printer has a wireless network card installed prevent radio interference to the licensed service, this device is intended to - Lexmark 940e | Setup Guide - Page 56
rieur est strictement interdite. Pour empêcher toute interférence radio au service faisant l'objet d'une licence, cet appareil doit être utilisé à directives is available from the Director of Manufacturing and Technical Support, Lexmark International, S. A., Boigny, France. This product satisfies the - Lexmark 940e | Setup Guide - Page 57
aðrar kröfur, sem gerðar eru í tilskipun 1999/5/EC. Italiano Con la presente Lexmark International, Inc. dichiara che questo questo prodotto è conforme ai requisiti essenziali ed alle altre disposizioni telephone company. This equipment uses the RJ-11C Universal Service Order Code (USOC) jack. 57 - Lexmark 940e | Setup Guide - Page 58
line, as determined by the total RENs, contact your local telephone of your right to file a complaint with the service. If you experience trouble with this equipment, for repair or warranty information, contact Lexmark International, Inc. at www.lexmark.com or your Lexmark major nationwide problem. It - Lexmark 940e | Setup Guide - Page 59
Facsimile User Instructions. The services. This equipment shall not be set up to make automatic calls to the Telecom's 111 Emergency Service minute period for any single manual call initiation, and • Lexmark part number The Lexmark filter (nº de référence Lexmark : 14B5109 ou Lexmark Lexmark Lexmark - Lexmark 940e | Setup Guide - Page 60
attachments -Accidents, misuse, abuse or use inconsistent with Lexmark user's guides, manuals, instructions or guidance -Unsuitable physical or operating environment -Maintenance by anyone other than Lexmark or a Lexmark authorized servicer -Operation of a product beyond the limit of its - Lexmark 940e | Setup Guide - Page 61
, WILL APPLY AFTER THIS PERIOD. ALL INFORMATION, SPECIFICATIONS, PRICES, AND SERVICES ARE SUBJECT TO CHANGE AT ANY TIME WITHOUT NOTICE. Limitation actual damages up to the limit set forth in the following paragraph. Lexmark's liability for actual damages from any cause whatsoever will be limited to - Lexmark 940e | Setup Guide - Page 62
adjusting 52 C calling Customer Support 52 card stock loading 33 checking an unresponsive printer 49 checking an unresponsive scanner internal 8 memory cards 8 P packaging removing from printer 11 paper bails, attaching 16 print troubleshooting error reading USB drive 50 incorrect characters print 51 - Lexmark 940e | Setup Guide - Page 63
zone fax setup 39 toner cartridges installing 14 removing packaging 14 transparencies loading 33 troubleshooting checking an unresponsive printer 49 checking an unresponsive scanner 49 checking to ensure all packaging is removed 49 contacting Customer Support 52 troubleshooting, display display is
-
 1
1 -
 2
2 -
 3
3 -
 4
4 -
 5
5 -
 6
6 -
 7
7 -
8
-
9
-
10
-
11
-
12
-
13
-
14
-
15
-
16
-
17
-
18
-
19
-
20
-
21
-
22
-
23
-
24
-
25
-
26
-
27
-
28
-
29
-
30
-
31
-
32
-
33
-
34
-
35
-
36
-
37
-
38
-
39
-
40
-
41
-
42
-
43
-
44
-
45
-
46
-
47
-
48
-
49
-
50
-
51
-
52
-
53
-
54
-
55
-
56
-
57
-
58
-
59
-
60
-
61
-
62
-
63
 |
 |

Lexmark MFP
Setup Guide
April 2007
www.lexmark.com
Lexmark and Lexmark with diamond design are trademarks of Lexmark International, Inc., registered in the United States and/or other countries.
All other trademarks are the property of their respective owners.
© 2007 Lexmark International, Inc.
All rights reserved.
740 West New Circle Road
Lexington, Kentucky 40550