Lexmark 945e Setup Guide
Lexmark 945e - X Color Laser Manual
 |
UPC - 734646027373
View all Lexmark 945e manuals
Add to My Manuals
Save this manual to your list of manuals |
Lexmark 945e manual content summary:
- Lexmark 945e | Setup Guide - Page 1
Lexmark MFP Setup Guide April 2007 www.lexmark.com Lexmark and Lexmark with diamond design are trademarks of Lexmark International, Inc., registered in the United States and/or other countries. All other trademarks are the property of their respective owners. © 2007 Lexmark International, Inc. - Lexmark 945e | Setup Guide - Page 2
network. Refer service or repairs, other than those described in the user documentation, to a professional service person. CAUTION: The printer specific Lexmark components. The safety features of some parts may not always be obvious. Lexmark is not responsible for the use of other replacement parts - Lexmark 945e | Setup Guide - Page 3
...7 Selecting a location for the printer...7 Available options...8 Step 1: Setting up the printer 10 Unboxing the printer and removing packaging 10 Checking the box contents ...10 Removing packaging from the printer...11 Installing the toner cartridges...14 Attaching the paper bails...16 - Lexmark 945e | Setup Guide - Page 4
only diamonds 49 Error message about reading USB drive appears 50 Jobs do not print...50 Make sure the printer is ready to print ...50 Check to see if the standard exit bin is full 50 Check to see if the paper tray is empty ...50 Make sure the correct printer software is installed 50 Make - Lexmark 945e | Setup Guide - Page 5
correctly...51 Reset the printer ...51 Duplex unit...51 Paper frequently jams...52 Check the paper ...52 Make sure there is not too much paper in the paper tray 52 Check the paper guides...52 Has the paper absorbed moisture due to high humidity 52 Contacting Customer Support...52 Administrative - Lexmark 945e | Setup Guide - Page 6
6 - Lexmark 945e | Setup Guide - Page 7
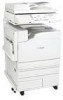
Overview Printer configurations Basic models 1 Automatic Document Feeder (ADF) 2 Control panel 3 Standard exit sheet tray (Tray 4) 8 Multipurpose feeder Selecting a location for the printer Before you unpack the printer, you need to select a location for it. Leave enough room to open trays, covers - Lexmark 945e | Setup Guide - Page 8
height is 693 mm (27.28 in.). For other clearance measurements, follow this illustration: For the fully configured printer, the recommended amount of space to allow for the printer height is 1,750 mm (68.89 in.). For other clearance measurements, follow this illustration: Available options Memory - Lexmark 945e | Setup Guide - Page 9
• Bar Code and Forms • ImageQuickTM • IPDS and SCS/TNe • PrintCryptionTM • PRESCRIBE Note: Use a #2 Phillips screwdriver to remove the system board access cover. Other internal options • RS-232 serial interface card • Parallel 1284-B interface card • MarkNetTM N8000 Series Internal Print Servers 9 - Lexmark 945e | Setup Guide - Page 10
an unpacking sheet to remove the items from each box properly to avoid any damage. Once all boxes are unpacked, verify that you have the following items: 1 Four toner cartridges: black, cyan, magenta, and yellow 2 Setup Guide 3 • Printer with the standard tray (Tray 1) • High capacity feeder, which - Lexmark 945e | Setup Guide - Page 11
to attach the scanner to its scanner shelf 5 Connector bracket, which secures the scanner shelf to the printer 6 Software and Documentation CD 7 USB cable 8 Power cord 9 Scanner 10 Paper bails and a template 11 Paper size labels for the trays 12 Wrench 13 Scanner shelf Removing packaging from the - Lexmark 945e | Setup Guide - Page 12
2 Open the front printer door. 3 Pull the black stopper out. 4 Press the button located on the bottom of the metal latch, and then pull the metal latch up. 12 - Lexmark 945e | Setup Guide - Page 13
5 Pull the Styrofoam packaging out. 6 Lower the metal bar. 7 Pull the tag to remove the packaging strips. 8 Locate the side of the printer shown in step 10. 9 Lift the release latch. 13 - Lexmark 945e | Setup Guide - Page 14
10 Lower the door. 11 Keep the metal bar down. Pull on the packaging as shown to release and remove the red metal brackets. 12 Push the metal bar up. 13 Push the metal latch down. Installing the toner cartridges 1 Unpack the toner cartridges. 2 Remove the packaging wrapped around each cartridge. 14 - Lexmark 945e | Setup Guide - Page 15
the tape from each cartridge. 4 Insert the black toner cartridge into the printer. Warning: Make sure the toner cartridge is fully inserted before completing step 5. 5 Turn the knob on the cartridge clockwise to lock the cartridge into place. 6 Insert the remaining three cartridges. Make sure they - Lexmark 945e | Setup Guide - Page 16
the door. Attaching the paper bails You should find a package with the paper bails and a template in Tray 1. The paper bails help prevent offset bin stacking by guiding each sheet of paper or specialty media into the standard exit bin. 1 Align the template with the top of the printer as shown. 16 - Lexmark 945e | Setup Guide - Page 17
2 Remove the film to expose the sticky pad on each paper bail, and then place each bail in an area indicated by the template. 3 Press on each paper bail for 25 seconds to make sure each bail adheres well. 17 - Lexmark 945e | Setup Guide - Page 18
scanner weighs 25 kg (55 lb); therefore, it requires two people to lift it safely. 1 Lift the scanner, and then set it on its shelf. 2 Locate the four brackets that came in the box with the printer and the scanner shelf. 3 Attach the left front bracket to the shelf. 18 - Lexmark 945e | Setup Guide - Page 19
bracket with the holes on the shelf. 7 Insert the screws, and then tighten them. 8 Attach the right rear bracket in the same way. Rolling the printer under the scanner shelf CAUTION: The printer weighs 91.2 kg (201 lb); therefore, it requires two people to roll it safely. 19 - Lexmark 945e | Setup Guide - Page 20
Roll the printer under the scanner shelf. 20 - Lexmark 945e | Setup Guide - Page 21
Installing the connector bracket When you unpacked the printer, you should have found the connector bracket in its own bag. 1 At the rear of the printer, remove the two screws shown. 21 - Lexmark 945e | Setup Guide - Page 22
2 Align the connector bracket with the holes, and then insert the screws and tighten them. Connecting scanner cables to the printer Locate the three cables on the back of the scanner. 1 Attach the black scanner-printer interface cable to the printer, and then tighten the two screws. 22 - Lexmark 945e | Setup Guide - Page 23
(network). Setting the printer up with local setup Local printing is printing to a locally attached printer (a printer that is connected directly to your computer with a USB or parallel cable). When setting up this type of printer with a USB cable, you should install the printer software before - Lexmark 945e | Setup Guide - Page 24
to the computer. 3 Insert the power cord into the printer, and then insert the plug into a wall outlet. 4 Turn the printer on. 5 Verify printer setup by printing a menu settings page. For more information, see "Printing a menu settings page" on page 46. Setting the printer up with network setup 24 - Lexmark 945e | Setup Guide - Page 25
In Windows environments, network printers can be configured for direct printing or shared printing. Both network printing methods require the installation of printer software and the creation of a network port. Printing method Example IP printing • Printer is connected directly to the network - Lexmark 945e | Setup Guide - Page 26
3 Connect the Ethernet cable as shown. 4 Insert the power cord into the printer, and then insert the plug into a wall outlet. 5 Turn the printer on. 6 Insert the CD. 7 Verify printer setup by printing a network setup page. For more information, see "Printing a network setup page" on page 46. 26 - Lexmark 945e | Setup Guide - Page 27
or finishers, need to be shipped to a new location, all media handling options must be removed from the printer. For shipping, pack the printer and media handling options securely to avoid damage. Before moving the printer CAUTION: The base printer weighs 91.2 kg (201 lb); therefore, it requires - Lexmark 945e | Setup Guide - Page 28
Disassembling the printer from the scanner shelf prior to the move 1 Turn the printer off. 2 Unplug the printer power cord. 28 - Lexmark 945e | Setup Guide - Page 29
3 Remove the connector bracket. 4 Disconnect all cables from the back of the printer and scanner. 5 Remove any paper or specialty media from the standard exit bin. 6 Remove any paper or specialty media from the multipurpose feeder. 7 Grasp the extension on the multipurpose feeder, and then fully - Lexmark 945e | Setup Guide - Page 30
the place of purchase for a relocation kit. Disassemble all the items before packing. For more information, see "Disassembling the printer from the scanner shelf prior to the move" on page 28. Setting the printer up in a new location To set up your printer configuration again: 1 Unpack all items - Lexmark 945e | Setup Guide - Page 31
3 Complete the setup of the printer and scanner by completing the steps in each heading in this chapter: "Step 1: Setting up the printer" on page 10. 4 Verify that the printer and scanner are functioning properly. For more information, see "Step 7: Verifying printer setup" on page 46. 31 - Lexmark 945e | Setup Guide - Page 32
trays, see the User's Guide. Loading the 867- and 1133-sheet trays Although the 867-sheet tray and the 1133-sheet tray are different in appearance, they support the same paper sizes and types and require the same process for loading paper. Use these instructions to load paper in either tray - Lexmark 945e | Setup Guide - Page 33
. Straighten the edges on a level surface. 4 Load the paper stack with the recommended print side faceup. 5 Make sure the paper guides are secure against the edges of the paper. 6 Insert the tray into the printer. 7 If a different type of paper was loaded than the type previously loaded in the tray - Lexmark 945e | Setup Guide - Page 34
3 Prepare the paper for loading. • Flex sheets of paper back and forth to loosen them, and then fan them. Do not fold or crease the paper. Straighten the . Note: Avoid touching the print side of the transparencies. Be careful not to scratch them. • Flex a stack of envelopes back and forth to loosen - Lexmark 945e | Setup Guide - Page 35
first. • Load A3, A5, B4, folio, legal, and statement paper with the recommended print side facedown and the short edge of the paper entering the printer first. Notes: - Adjust the additional paper guide to accommodate SRA3 and 12 x 19 paper sizes. - Do not exceed the maximum stack height by forcing - Lexmark 945e | Setup Guide - Page 36
scanner glass. 2 If you are loading a document into the ADF, adjust the paper guides. 3 From the control panel, press . Note: If an LDSS profile has been installed, you may receive an error when attempting a quick copy. Contact your system support person for access. 4 If you placed the document on - Lexmark 945e | Setup Guide - Page 37
copies. The copy screen appears. 3 Change the copy settings as needed. 4 Touch Copy It. 5 Place the next document on the scanner glass, and then touch Scan Next if you have more pages to scan, or touch Finish the Job if you are done. Touching Finish the Job returns the - Lexmark 945e | Setup Guide - Page 38
, photo paper, or thin media (such as magazine clippings). The scanner lets you scan documents directly to a File Transfer Protocol (FTP) server. Note: Only one FTP address may be sent to the server at a time. Once an FTP destination has been configured by your system support person, the - Lexmark 945e | Setup Guide - Page 39
person. See your system support person if you are prompted to supply a password during the following instructions. 1 Open a Web browser. 2 In the address bar, type the IP address of the printer (for example, http://192.168.236.24), and then press Enter. 3 Click Configuration. 4 Click Fax Setup - Lexmark 945e | Setup Guide - Page 40
During the printer power-on sequence, if the print server is configured to use Network Time Protocol a document into the ADF, adjust the paper guides. 3 On the box. Use this feature if you need to dial an outside line first. 5 Touch Fax It. For more information, see the User's Guide on the Software - Lexmark 945e | Setup Guide - Page 41
faxing an original document that contains a mixture of text and graphics. • Text/Photo mode is recommended for magazine articles, business graphics, and brochures. When should I use Photo mode? Use Photo mode when faxing photos printed on a laser printer or taken from a magazine or newspaper. 41 - Lexmark 945e | Setup Guide - Page 42
Scanner glass Use the ADF for multiple-page documents. You can load up to 75 sheets. Use the scanner glass for single pages, small items (such as postcards or photos), transparencies, photo paper, or thin media (such as magazine clippings). The printer can be used to e-mail scanned documents to one - Lexmark 945e | Setup Guide - Page 43
the paper guides. 3 On the home screen, touch E-mail. 4 Enter the e-mail address or shortcut number. To enter additional recipients, press Next Address, and then enter the address or shortcut number you want to add. 5 Touch E-mail It. For more information, see the User's Guide on the Software and - Lexmark 945e | Setup Guide - Page 44
Setting up the Scan function ADF Scanner glass Use the ADF for multiple-page documents. You can load up to 75 sheets. Use the scanner glass for single pages, small items (such as postcards or photos), transparencies, photo paper, or thin media (such as magazine clippings). The printer can be used - Lexmark 945e | Setup Guide - Page 45
the scanner glass. 2 If you are loading a document into the ADF, adjust the paper guides. 3 On the home screen, touch FTP. 4 Type the FTP address. 5 Touch Send It. For more information, see the User's Guide on the Software and Documentation CD. Improving FTP quality Question Tip When should I use - Lexmark 945e | Setup Guide - Page 46
printer setup To verify that the scan to FTP is working, see "Scanning to an FTP address using the keypad" on page 45. For more information, see the User's Guide on the Software and Documentation CD. Printing information pages Printing a menu settings page Print a menu settings page to review - Lexmark 945e | Setup Guide - Page 47
ADF, adjust the paper guides. 3 From the control panel, press . Note: If an LDSS profile has been installed, you may receive an error when attempting a quick test copy. Contact your system support box. Use this feature if you need to dial an outside line first. 5 Touch Fax It. Testing a scan to PC - Lexmark 945e | Setup Guide - Page 48
. 10 Review the instructions on the Scan to PC screen. A shortcut number is automatically assigned when you click Submit. Use this shortcut number when you are ready to scan your documents. a Go to the printer, and then place your original document faceup, short-edge first into the ADF or facedown - Lexmark 945e | Setup Guide - Page 49
host computer, print server, option, or other network device. Once you have checked each of these possibilities, turn the printer off and then back on. This often fixes the problem. Checking an unresponsive scanner If your scanner is not responding, make sure: • The three cables located on the back - Lexmark 945e | Setup Guide - Page 50
running Windows Vista, Windows XP, Windows Server 2003, Windows 2000/98/Me and using compatible printer software. Make sure the internal print server is installed properly and working • Make sure the internal print server is properly installed and that the printer is connected to the network. For - Lexmark 945e | Setup Guide - Page 51
3 Make sure paper guides are aligned against the edges of the paper. 4 Make sure the paper tray closes properly. 5 Close the door. Reset the printer Turn the printer off. Wait 10 seconds. Turn the printer back on. Duplex unit Make sure the connection between the duplex unit and the printer is secure - Lexmark 945e | Setup Guide - Page 52
• Store paper in its original wrapper until you use it. Contacting Customer Support When you call Customer Support, describe the problem you are experiencing, the message on the display, and the troubleshooting steps you have already taken to find a solution. You need to know your printer model type - Lexmark 945e | Setup Guide - Page 53
printer, a support person may choose to lock the control panel menus so that the settings cannot be changed from the control panel. 1 Turn the printer off. 2 From the keypad, hold down and while turning the printer Menu. Restoring the factory default settings 1 Make sure the printer is on and Ready - Lexmark 945e | Setup Guide - Page 54
in conjunction with other products, programs, or services, except those expressly designated by the manufacturer, are the user's responsibility. For Lexmark technical support, visit support.lexmark.com. For information on supplies and downloads, visit www.lexmark.com. If you don't have access to - Lexmark 945e | Setup Guide - Page 55
as Lexmark part number 1021231 for parallel attach or 1021294 for USB attach. Use of a substitute cable not properly shielded and grounded may result in a violation of FCC regulations. Exposure to radio frequency radiation The following notice is applicable if your printer has a wireless network - Lexmark 945e | Setup Guide - Page 56
located or pointed such that it does not emit RF fields in excess of Health Canada limits for the general population; consult Safety Code toute interférence radio au service faisant l'objet d'une licence which case, the user may be required and Technical Support, Lexmark International, S. - Lexmark 945e | Setup Guide - Page 57
eru í tilskipun 1999/5/EC. Italiano Con la presente Lexmark International, Inc. dichiara che questo questo prodotto è organization, required by the end-user to install and operate this information statement This equipment complies with Part 68 of the FCC rules and Service Order Code (USOC) jack. 57 - Lexmark 945e | Setup Guide - Page 58
network, the telephone company may request that you disconnect the equipment until the problem is resolved. This equipment contains no user serviceable parts. For repair and warranty information, contact Lexmark does not exceed five. The modem REN is located on the rear of the equipment on the - Lexmark 945e | Setup Guide - Page 59
et autres surtensions électriques. Cet équipement utilise des prises de téléphone CA11A. Notice to users of the New Zealand telephone network The following are special conditions for the Facsimile User Instructions. The grant of a telepermit for any item of terminal equipment indicates only that - Lexmark 945e | Setup Guide - Page 60
with Lexmark user's guides, manuals, instructions or guidance -Unsuitable physical or operating environment -Maintenance by anyone other than Lexmark or a Lexmark authorized servicer -Operation of a product beyond the limit of its duty cycle -Use of printing media outside of Lexmark specifications - Lexmark 945e | Setup Guide - Page 61
OR IMPLIED, WILL APPLY AFTER THIS PERIOD. ALL INFORMATION, SPECIFICATIONS, PRICES, AND SERVICES ARE SUBJECT TO CHANGE AT ANY TIME WITHOUT NOTICE. actual damages up to the limit set forth in the following paragraph. Lexmark's liability for actual damages from any cause whatsoever will be limited to - Lexmark 945e | Setup Guide - Page 62
another location within the office 27 using a cart 27 multipurpose feeder loading 33 N network setup 24 network setup page 46 notices 54, 55, 56, 57, 58, 59 O options firmware cards 8 internal 8 memory cards 8 P packaging removing from printer 11 paper bails, attaching 16 print troubleshooting error - Lexmark 945e | Setup Guide - Page 63
error reading USB drive 50 incorrect characters print 51 job prints from wrong tray 50 job prints on wrong paper 50 jobs do not print 50 paper frequently jams 52 troubleshooting, printer options drawers 51 duplex unit 51 option not working 51 U unboxing printer 10 scanner and shelf 10 verifying box
-
 1
1 -
 2
2 -
 3
3 -
 4
4 -
 5
5 -
 6
6 -
 7
7 -
8
-
9
-
10
-
11
-
12
-
13
-
14
-
15
-
16
-
17
-
18
-
19
-
20
-
21
-
22
-
23
-
24
-
25
-
26
-
27
-
28
-
29
-
30
-
31
-
32
-
33
-
34
-
35
-
36
-
37
-
38
-
39
-
40
-
41
-
42
-
43
-
44
-
45
-
46
-
47
-
48
-
49
-
50
-
51
-
52
-
53
-
54
-
55
-
56
-
57
-
58
-
59
-
60
-
61
-
62
-
63
 |
 |

Lexmark MFP
Setup Guide
April 2007
www.lexmark.com
Lexmark and Lexmark with diamond design are trademarks of Lexmark International, Inc., registered in the United States and/or other countries.
All other trademarks are the property of their respective owners.
© 2007 Lexmark International, Inc.
All rights reserved.
740 West New Circle Road
Lexington, Kentucky 40550