Lexmark C2240 Quick Reference
Lexmark C2240 Manual
 |
View all Lexmark C2240 manuals
Add to My Manuals
Save this manual to your list of manuals |
Lexmark C2240 manual content summary:
- Lexmark C2240 | Quick Reference - Page 1
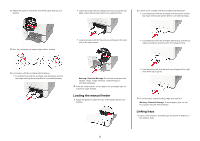
match the paper loaded. Loading the multipurpose feeder 1 Open the multipurpose feeder. Note: The multipurpose feeder is available only in some printer models. 2 Adjust the guides to match the size of the paper that you are loading. Notes: • Load letterhead faceup with the header toward the front - Lexmark C2240 | Quick Reference - Page 2
ap side up and against the right side of the paper guide. 3 Feed the paper until its leading edge gets pulled in. Warning-Potential Damage: To avoid paper jams, do not force paper into the manual feeder. Linking trays 1 Open a web browser, and then type the printer IP address in the address field. 2 - Lexmark C2240 | Quick Reference - Page 3
Repeat, Reserve, or Verify). If the print job is confidential, then assign a user name and a four‑digit PIN. 4 Click OK or Print. 5 From the printer home screen, release the print job. • For confidential print jobs, navigate to: Held jobs > select your user name > Confidential > enter the PIN > select - Lexmark C2240 | Quick Reference - Page 4
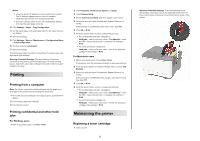
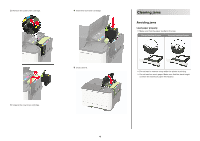
sure that the paper lies flat in the tray. Correct loading of paper Incorrect loading of paper • Do not load or remove a tray while the printer is printing. • Do not load too much paper. Make sure that the stack height is below the maximum paper fill indicator. - Lexmark C2240 | Quick Reference - Page 5
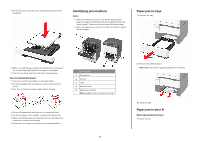
Auto, the printer reprints jammed pages. Paper jam in trays 1 Remove the tray. • Make sure that the paper guides are positioned correctly location 1 Standard bin 2 Door A 3 Trays 4 Manual feeder 5 Multipurpose feeder Note: Available only in some printer models. • Do not use paper that has been - Lexmark C2240 | Quick Reference - Page 6
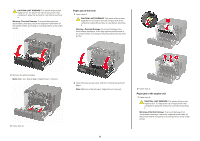
sure that all paper fragments are removed. 3 Close door A. Paper jam in the duplex unit 1 Open door A. CAUTION-HOT SURFACE: The inside of the printer might be hot. To reduce the risk of injury from a hot component, allow the surface to cool before touching it. Warning-Potential Damage: To prevent - Lexmark C2240 | Quick Reference - Page 7
paper. Warning-Potential Damage: To prevent damage from electrostatic discharge, touch any exposed metal frame of the printer before accessing or touching interior areas of the printer. Note: Make sure that all paper fragments are removed. 1 Remove paper from the multipurpose feeder. 2 Remove the - Lexmark C2240 | Quick Reference - Page 8
Paper jam in the manual feeder 1 Remove the tray. 2 Remove the jammed paper. Note: Make sure that all paper fragments are removed. 3 Insert the tray. 8
-
 1
1 -
 2
2 -
 3
3 -
 4
4 -
 5
5 -
 6
6 -
 7
7 -
8
 |
 |

Quick Reference
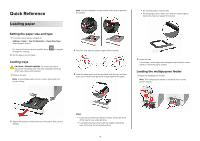
Loading paper
Setting the paper size and type
1
From the control panel, navigate to:
Settings
>
Paper
>
Tray Configuration
>
Paper Size/Type
>
select a paper source
For non-touch-screen printer models, press
to navigate
through the settings.
2
Set the paper size and type.
Loading trays
CAUTION—TIPPING HAZARD:
To reduce the risk of
equipment instability, load each tray separately. Keep all
other trays closed until needed.
1
Remove the tray.
Note:
To avoid paper jams, do not remove trays while the
printer is busy.
2
Adjust the guides to match the size of the paper that you are
loading.
Note:
Use the indicators on the bottom of the tray to position
the guides.
3
Flex, fan, and align the paper edges before loading.
4
Load the paper stack with the printable side faceup, and then
make sure that the side guides fit snugly against the paper.
Notes:
•
Load letterhead faceup with the header toward the front
of the tray for one
‑
sided printing.
•
Load letterhead facedown with the header toward the
back of the tray for two
‑
sided printing.
•
Do not slide paper into the tray.
•
To avoid paper jams, make sure that the stack height is
below the maximum paper fill indicator.
5
Insert the tray.
If necessary, set the paper size and paper type from the control
panel to match the paper loaded.
Loading the multipurpose feeder
1
Open the multipurpose feeder.
Note:
The multipurpose feeder is available only in some
printer models.
1