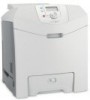
Lexmark C532 User's Guide
Lexmark C532 Manual
 |
View all Lexmark C532 manuals
Add to My Manuals
Save this manual to your list of manuals |
Lexmark C532 manual content summary:
- Lexmark C532 | User's Guide - Page 1
C530, C532, and C534 User's Guide July 2006 www.lexmark.com Lexmark and Lexmark with diamond design are trademarks of Lexmark International, Inc., registered in the United States and/or other countries. All other trademarks are the property of their respective owners. © 2006 Lexmark International - Lexmark C532 | User's Guide - Page 2
to a professional service person. This product is designed, tested, and approved to meet strict global safety standards with the use of specific Lexmark components. The safety features of some parts may not always be obvious. Lexmark is not responsible for the use of other replacement parts. CAUTION - Lexmark C532 | User's Guide - Page 3
feeder...30 Using the multipurpose feeder...32 Loading the manual feeder...33 Using the manual feeder...33 Using the standard exit bin...34 Setting the Paper Size and Paper Type 35 Tray linking...36 Paper and specialty media guide 37 Media guidelines...37 Media characteristics...37 Unacceptable - Lexmark C532 | User's Guide - Page 4
the print quality test pages 50 Printing a duplex job manually from a Macintosh computer 50 Printing only black text and graphics 50 Configuring the printer for black-only printing 51 Removing the color supplies ...51 Configuring the printer for color printing and replacing the color supplies - Lexmark C532 | User's Guide - Page 5
supplies...70 Ordering toner cartridges...71 Ordering a transfer belt...72 Ordering a waste toner box ...73 Ordering a fuser...73 Ordering photoconductors ...73 Moving the printer...73 Before moving the printer ...73 Moving the printer to another location ...74 Administrative support 75 Adjusting - Lexmark C532 | User's Guide - Page 6
...85 Flash memory card...85 Hard disk with adapter...86 Infrared adapter ...86 Internal print server...86 Memory card...86 USB/parallel interface card...86 Solving paper feed problems...86 Paper frequently jams...86 Paper jam message remains after jam is cleared 87 Page that jammed does not - Lexmark C532 | User's Guide - Page 7
...93 Skewed print...93 Blank pages...93 Solid color pages ...93 Paper curl ...94 Toner specks ...94 Toner rubs off ...94 Solving color quality problems...95 Quality menu ...95 Frequently Asked Questions (FAQ) about color printing 97 Contacting Customer Support...100 Notices...102 Power consumption - Lexmark C532 | User's Guide - Page 8
8 - Lexmark C532 | User's Guide - Page 9
Learning about the printer Configured models Basic models The following illustrations show the basic printer models. C532n 1 2 5 4 3 1 Standard exit bin 2 Control panel 3 Standard 250-sheet tray (Tray 1) 4 Manual feeder 5 Tray 1 handhold C530dn, C532dn. C534n, C534dn 1 2 5 4 3 6 - Lexmark C532 | User's Guide - Page 10
3 Standard 250-sheet tray (Tray 1) 4 Tray 1 handhold 5 Multipurpose feeder latch 6 Multipurpose feeder Fully configured model The following illustration shows the fully configured printer model. Not all models can be fully configured by adding an optional 550-sheet drawer. Using the - Lexmark C532 | User's Guide - Page 11
current status of the printer, such as Ready. • Supplies messages-Provide information about supplies, such as Toner Low. • Show-me screens-Provide instructions for resolving common printer errors. These screens are only available when the printer detects an error code. Pressing initiates action on - Lexmark C532 | User's Guide - Page 12
based on the printer model or the options installed. Supplies Menu Replace Supply Cyan Cartridge Magenta Cartridge Yellow Cartridge Black Cartridge Cyan PC Unit Magenta PC Unit Yellow PC Unit Black PC Unit Fuser Transfer Belt Paper Menu Default Source Paper Size/Type Configure MP Substitute Size - Lexmark C532 | User's Guide - Page 13
Network/Ports TCP/IP IPv6 Wireless Standard Network Network Standard USB USB NetWare AppleTalk LexLink USB Direct Help Color Quality Print Quality Printing Guide Supplies Guide Media Guide Print Defects Menu Map Information Guide Connection Guide Moving Guide Learning about the printer 13 - Lexmark C532 | User's Guide - Page 14
drawer, and remove any packing material. 2 Place the drawer in the location chosen for the printer. 3 Align the printer with the 550-sheet drawer, and lower the printer into place. 4 Set the printer software to recognize the 550-sheet tray. a Click Start ΠSettings ΠPrinters. b Double-click the - Lexmark C532 | User's Guide - Page 15
by adding optional cards. The instructions in this section explain how to install the available cards; you can also use them to locate a card for removal. Available options Memory cards • Printer memory • Flash memory • Fonts Firmware cards • Bar Code • PrintCryption™ Note: Use a #2 Phillips - Lexmark C532 | User's Guide - Page 16
Note: Before attempting to access the system board, see "Using the security lock feature" on page 10 and verify there is no security lock on the system board cover. 1 Notice the eight screws located on the metal plate. Turn the screws - Lexmark C532 | User's Guide - Page 17
3 Pull the metal plate forward to remove it. 4 Use the illustration to locate the connector for the card being installed. 1 4 2 3 1 Memory card connector 2 Internal print server connector 3 Hard disk connector 4 Firmware and flash memory card connectors Installing options 17 - Lexmark C532 | User's Guide - Page 18
any system board electronic components or connectors. Installing a memory card The system board has one connector for an optional memory card. CAUTION: If you are installing a memory card after setting up the printer, turn the printer off, and unplug the power cord before continuing. 1 Access - Lexmark C532 | User's Guide - Page 19
2 1 1 Notches 2 Ridges 5 Push the memory card straight into the connector until it snaps into place. Make sure each latch fits over the notch located on either side of the memory card. Installing options 19 - Lexmark C532 | User's Guide - Page 20
the system board access cover. 7 Set the printer software to recognize the memory card. a Click Start ΠSettings ΠPrinters. b Double-click the printer icon. c Click File ΠProperties. d Click the Install Options tab. e Increase the printer memory to the appropriate number. f Click OK. Installing - Lexmark C532 | User's Guide - Page 21
or firmware card after setting up the printer, turn the printer off, and unplug the power cord before continuing. 1 Access the system board. For more information, see "Accessing the system board to install internal options" on page 15. 2 Unpack the memory card. Note: Avoid touching the connection - Lexmark C532 | User's Guide - Page 22
Options tab. e From the Available Options list, select Flash memory. f Click Add. g Click OK. Installing a printer hard disk Note: A #2 Phillips screwdriver is needed to attach the hard disk to the mounting plate. Warning: Hard disks are easily damaged by static electricity. Touch something metal - Lexmark C532 | User's Guide - Page 23
hard disk. 6 Secure the mounting plate to the hard disk with the screws. 7 Press the ribbon cable connector into the connector on the system board. 8 Flip the hard disk over, and then press the three posts on the mounting plate into the holes on the system board. The hard disk snaps - Lexmark C532 | User's Guide - Page 24
system board. For more information, see "Accessing the system board to install internal options" on page 15. 2 Unpack the internal print server or port interface card. 3 Locate the two screws on the printer that attach the metal plate to the connector slot. Remove and save the two screws. 4 Remove - Lexmark C532 | User's Guide - Page 25
Reinstalling the system board access cover Note: This operation requires a #2 Phillips screwdriver. 1 Align and place the eight keyholes on the system board metal plate onto the screws on the system board. 2 Slide the metal plate down. Installing options 25 - Lexmark C532 | User's Guide - Page 26
or an Ethernet cable. A USB port requires a USB cable. Be sure to match the USB symbol on the cable with the USB symbol on the printer. Match the appropriate cable with the connector shown: 2 1 1 Ethernet connector 2 USB symbol 3 USB connector 3 Installing options 26 - Lexmark C532 | User's Guide - Page 27
tray which is part of the optional 550-sheet drawer. It also includes information about the standard exit bin. Loading the standard tray The printer has two trays to select from: the standard tray (Tray 1), also known as the 250-sheet tray, and the optional 550-sheet tray (Tray 2). Load the paper - Lexmark C532 | User's Guide - Page 28
level surface. 5 Load the paper stack with the recommended print side faceup. Load the stack toward the back of the tray as shown. When loading preprinted letterhead, place the header toward the front of the tray. 6 Squeeze the width guide tabs, and slide the width guide to lightly touch the side of - Lexmark C532 | User's Guide - Page 29
in the tray, change the Paper Type setting for the tray from the control panel. For more information, see "Setting the Paper Size and Paper Type" on page 35. Loading the optional 550-sheet tray The optional 550-sheet drawer consists of a 550-sheet tray and a support unit. This tray is loaded - Lexmark C532 | User's Guide - Page 30
Loading the multipurpose feeder 1 Push the multipurpose feeder latch to the right. 2 Pull the multipurpose feeder door down. 3 Grasp the extension, and then pull it straight out until it is fully extended. Loading paper and specialty media 30 - Lexmark C532 | User's Guide - Page 31
fan them. Straighten the edges on a level surface. 5 Locate the stack height limiter and tab. Note: Do not exceed the maximum stack height by forcing paper under the stack height limiter. 4 3 2 1 1 Stack height limiter 2 Size indicators 3 Width guide 4 Tab Loading paper and specialty media 31 - Lexmark C532 | User's Guide - Page 32
possible print quality, use only high-quality paper designed for laser printers. • Remove paper from the multipurpose feeder, and then push the • To prevent jams: - Load only one size and type of paper at a time. - Do not add paper to the multipurpose feeder when it already contains paper. - Do not - Lexmark C532 | User's Guide - Page 33
side up." on page 32. 3 Push the paper in until it stops. The printer pulls it in farther. Using the manual feeder Use the manual feeder to load single sheets not kept in a tray, such as letterhead. From Print Properties, set the Paper Size and Paper Type. When Load manual feeder with appears - Lexmark C532 | User's Guide - Page 34
print jobs facedown. The standard exit bin collects every type of paper and specialty media the printer supports. For more information, see "Paper and specialty media guide" on page 37. Attaching the standard exit bin To attach the standard exit bin to the printer: 1 Align it with the opening - Lexmark C532 | User's Guide - Page 35
. Rotate the paper stop back into its closed position. Setting the Paper Size and Paper Type Note: Trays with matching Paper Size and Paper Type settings are automatically linked by the printer. When a linked tray runs out of paper, the printer draws from another tray. Loading paper and specialty - Lexmark C532 | User's Guide - Page 36
with same size and type of paper, set the Paper Type to be the same for both trays. To disable tray linking, set the Paper Type setting to be different for each tray. For information about linking trays, see the Paper menu table in the Menus and Messages Guide. Loading paper and specialty media 36 - Lexmark C532 | User's Guide - Page 37
treated pulped wood. This content provides the media with a high degree of stability resulting in fewer media feeding problems and better print quality. Media containing fibers such as cotton possesses characteristics that can negatively affect media handling. Paper and specialty media guide 37 - Lexmark C532 | User's Guide - Page 38
media, or curled media • Recycled media containing more than 25% post-consumer waste that does not meet DIN 19 309 • Media weighing less than 60 g/m2 (16 lb) • Multiple-part forms or documents Selecting media Using appropriate media prevents jams and helps ensure trouble-free printing. To help avoid - Lexmark C532 | User's Guide - Page 39
-size and Lexmark part number 12A8241 for A4-size transparencies. Using envelopes Print samples on the envelopes being considered for use before buying large quantities. For information on loading envelopes, see "Loading the multipurpose feeder" on page 30 or "Loading the manual feeder" on page 33 - Lexmark C532 | User's Guide - Page 40
, and design, see the Card Stock & Label Guide available on the Lexmark Web site at www.lexmark.com/publications. Note: Vinyl labels are not supported on this product. Use only paper labels. When printing on labels: • From the printer software, MarkVision Professional, or the control panel, set - Lexmark C532 | User's Guide - Page 41
Guide Supported paper sizes -supported X-unsupported Paper size Dimensions Standard 250-sheet Optional 550-sheet Multipurpose tray (Tray 1) tray (Tray 2) feeder or manual size setting formats the page or envelope for 215.9 x 355.6 mm (8.5 x 14 in.) for the 250-sheet tray unless the size is - Lexmark C532 | User's Guide - Page 42
Paper size Dimensions Standard 250-sheet Optional 550-sheet Multipurpose tray (Tray 1) tray (Tray 2) feeder or manual X X (3 x 6 in.) to 215.9 x 355.6 mm (Manual feeder) (8.5 x 14 in.) 7 3/4 Envelope 98.4 x 190.5 page or envelope for 215.9 x 355.6 mm (8.5 x 14 in.) for the 250-sheet tray - Lexmark C532 | User's Guide - Page 43
Support for paper types Paper type Paper Standard 250-sheet tray (Tray 1) Card stock Transparencies Paper labels* Envelopes X Glossy paper * Vinyl labels are not supported. Paper types and weights Optional 550-sheet Multipurpose tray (Tray 2) feeder or manual feeder Duplex X X X X - Lexmark C532 | User's Guide - Page 44
the printer first. 4 Vinyl labels are not supported. 5 Paper capacities Paper type Standard 250-sheet tray (Tray 1) Paper 250 sheets* Envelopes X * Based on 75 g/m2 (20 lb) paper Optional 550-sheet tray (Tray 2) 550 sheets* X Multipurpose feeder 100 sheets* 10 Paper and specialty media guide - Lexmark C532 | User's Guide - Page 45
reports, and job cancelation. Selection and handling of paper and specialty media can affect how reliably documents print. Installing printer software A printer driver is software that lets the computer communicate with the printer. The printer software is typically installed during the initial - Lexmark C532 | User's Guide - Page 46
, the job is automatically deleted from printer memory. Printing confidential and other held jobs from Windows 1 With a document open, click File ), and then assign a user name. For a confidential job, also enter a four-digit PIN. 5 Click OK or Print, and then go to the printer to release the job. - Lexmark C532 | User's Guide - Page 47
a held job. Many USB flash memory devices are tested and approved for use with the printer. For more information, see the Lexmark Web site at www.lexmark.com. Notes: • USB devices must be compatible with the USB 2.0 standard. • Hi-Speed USB devices must support the Full-Speed standard as well - Lexmark C532 | User's Guide - Page 48
, you can still print PDFs from the USB flash memory device as held jobs. Printing a menu settings page Print a menu settings page to review the current menu settings and to verify printer options are installed correctly. 1 Make sure the printer is on and Ready appears. 2 From the control panel - Lexmark C532 | User's Guide - Page 49
page to verify the network connection. This page also provides important information that aids network printing configuration. 1 Make sure the printer A directory list shows the resources stored in flash memory or on the hard disk. 1 Make sure the printer is on and Ready appears. 2 From the control - Lexmark C532 | User's Guide - Page 50
pages print. 5 Press until Exit Config Menu appears, and then press . Resetting the Printer appears briefly, followed by a clock, and then Ready appears. Printing a duplex job manually from a Macintosh computer 1 Click File ΠPrint. 2 From the drop-down list, choose Paper Handling. 3 Make sure Page - Lexmark C532 | User's Guide - Page 51
supplies in a clean, cool, dark, dry place where the photoconductors will not be touched or scratched. Configuring the printer for black-only printing 1 Turn the printer off. 2 From the control panel, hold down and while turning the printer on. 3 Release the buttons when the clock appears, and wait - Lexmark C532 | User's Guide - Page 52
. Remove all three color photoconductors. 4 Wrap each photoconductor in its original packaging or in a sheet of paper. Tape the packaging to secure it, but do not let the tape touch the shiny photoconductor drums. 1 2 5 Place the photoconductors in their original box, or in any clean, sturdy - Lexmark C532 | User's Guide - Page 53
6 Close the box to protect the photoconductors from light. 7 Lift the small toner cartridge handles slightly and pull straight out. Remove all three color toner cartridges. 8 Place the toner cartridges in a clean, sturdy box. 9 Close the lower door. Printing 53 - Lexmark C532 | User's Guide - Page 54
panel, hold down and while turning the printer on. 3 Release the buttons when the clock appears, and wait for CONFIG MENU to appear. Locate the color residue on the clear end of each photoconductor. Match the residue to the color label on the transfer belt. 4 Press until Color Lock Out appears, and - Lexmark C532 | User's Guide - Page 55
Press until Exit Config Menu appears, and then press . If supplies were not installed, you may see any of the following messages: 84 Cyan PC Unit missing 84 Magenta PC Unit missing 84 Yellow PC Unit missing 31 Missing or defective Cyan cartridge 31 Missing or defective Magenta cartridge 31 Missing - Lexmark C532 | User's Guide - Page 56
Canceling a print job from Mac OS 9.x When you send a job to print, the printer icon for your selected printer appears on the desktop. 1 Double-click the printer icon. A list of print jobs appears in the printer window. 2 Choose a job to cancel. 3 Click the trash icon. Canceling a print job from Mac - Lexmark C532 | User's Guide - Page 57
media path, see the User's Guide. Identifying the paper path The path that paper takes through the printer varies depending on where the paper enters, and whether a duplex (two-sided) job is being printed. When a jam occurs, a message indicating the jam location appears. The following illustration - Lexmark C532 | User's Guide - Page 58
203 203 202 230 201 250 200 241 200 242 Accessing jam areas Open doors and covers, and remove trays to access jam areas. The illustration shows the possible jam areas. 1 2 7 3 1 Upper door 2 Fuser cover 3 Inner door 4 Lower door 5 Standard tray (Tray 1) 4 6 5 Clearing jams 58 - Lexmark C532 | User's Guide - Page 59
7 Exit bin Use the following table to locate instructions for a particular jam. Note: To resolve any message, all media must be cleared from the entire media path. Control panel message Area description See 200.xx Paper Jam Jam at the input sensor "Clearing jams just beyond Tray 1" on page 60 - Lexmark C532 | User's Guide - Page 60
jams just beyond Tray 1 If the paper did not feed from Tray 1 correctly, the jam is in the tray. 241.xx Paper Jam appears. 1 Open Tray 1. 2 Remove the jam. 3 Reinsert the tray. If the paper fed from Tray 1 and jammed just beyond the tray, 200.xx Paper Jam appears. 1 Open Tray 1. 2 Remove the jam - Lexmark C532 | User's Guide - Page 61
Tray 2 jams If the paper did not feed from Tray 2 correctly, the jam is in the tray. 242.xx Paper Jam appears. 1 Open Tray 2. 2 Remove the jam. 3 Reinsert the tray. If the paper fed from Tray 2, but is caught between Tray 1 and Tray 2, 242.xx Paper Jam may appear. 1 Open Tray 2. 2 Grasp the paper - Lexmark C532 | User's Guide - Page 62
is caught between Tray 1 and Tray 2, 200.xx Paper Jam may appear. 1 Open Tray 1. 2 Pull the paper up and then out of the tray. 3 Reinsert the tray. Clearing jams behind the inner door If the paper is jammed behind the inner door, but not under the photoconductors, 200.xx Paper Jam appears. Warning - Lexmark C532 | User's Guide - Page 63
" on page 51). Clear the jam, and then replace the photoconductors. 2 1 4 Close the lower door, and then close the upper door. Clearing jams under the fuser or fuser cover Jams under the fuser or fuser cover When paper is jammed under the fuser or the fuser cover, 201.xx Paper Jam appears. CAUTION - Lexmark C532 | User's Guide - Page 64
the fuser When paper jams both under the fuser and in the slot behind the fuser, 202.xx Paper Jam appears. CAUTION: The fuser and the inside of the printer near the fuser may be hot. Wait for the fuser to cool before clearing jams from this area. Warning: To avoid overexposing the photoconductors - Lexmark C532 | User's Guide - Page 65
Clearing jams between the fuser and the standard exit bin When the jammed paper is visible in the standard exit bin, 202.xx Paper Jam appears. Grasp the paper, and pull it away from the bin. Clearing jams in the standard exit bin When paper jams in the standard exit bin, 203.xx Paper Jam appears. - Lexmark C532 | User's Guide - Page 66
area When paper is jammed between the inner door and the lower door, 230.xx Paper Jam appears. 1 Open the upper door. 2 Pull the jammed paper straight up. Note: For more room to grasp the paper, pull the handle to open the lower door. 1 2 3 Remove the jam and close the door(s). Clearing jams 66 - Lexmark C532 | User's Guide - Page 67
paper jams entering Tray 1, 230.xx Paper Jam appears. 1 Remove Tray 1. 2 Pull the jammed paper down and out. 3 Replace the tray. When paper jams as shown in the following illustration, 200.xx Paper Jam or 230.xx Paper Jam appears. 1 Open Tray 1. 2 Pull the jammed paper straight up. Note: If no jam - Lexmark C532 | User's Guide - Page 68
Clearing jams in the manual feeder When paper is not placed far enough into the manual feeder, the display prompts you to insert paper. If the paper is pushed far enough into the manual feeder for the printer to sense it, but not far enough to feed properly, 200.xx Paper Jam appears. In either case, - Lexmark C532 | User's Guide - Page 69
and other held jobs" on page 45. Aligning the toner cartridges Sometimes replacing the transfer belt affects the alignment of the toner cartridges. For the best print quality, complete the following steps after replacing the transfer belt: 1 Make sure the printer is turned off. 2 From the - Lexmark C532 | User's Guide - Page 70
. For more information, see "Solving print quality problems" on page 87. Warning: To avoid overexposing the photoconductors, do not leave the inner door open longer than 10 minutes. 1 Open the upper and inner doors. 2 Remove all four toner cartridges. For more information, see "Removing the color - Lexmark C532 | User's Guide - Page 71
pages may be printed after one of the messages first appears. Once the printed text and graphics remain faded, replace the specified toner cartridge. The recommended toner cartridges specifically designed for your printer are: Part name Cyan Extra High Yield Return Program Toner Cartridge Part - Lexmark C532 | User's Guide - Page 72
transfer belt appears, replace the transfer belt immediately. Note: Because transfer belt life is affected by environment, duty cycle, and toner coverage, actual page count at the end of life may vary. For installation information, see the documentation that came with the transfer belt. Part - Lexmark C532 | User's Guide - Page 73
When Black PC Unit Life Warning or Cyan PC Unit Life Warning, Magenta PC Unit Life Warning, or Yellow PC Unit Life Warning appears, you need to order replacement photoconductor(s). Part number C53030X C53034X Part name Photoconductor Unit Photoconductor Unit, Multi-Pack Moving the printer Before - Lexmark C532 | User's Guide - Page 74
can be safely moved to another location by following these precautions: • Remove all printer options before moving the printer. • Any cart used to move the printer must have a surface able to support the full footprint of the printer. Any cart used to move the options must have a surface able to - Lexmark C532 | User's Guide - Page 75
using the printer, a support person may choose to lock the control panel menus to keep menu settings from being changed. 1 Make sure the printer is turned until Exit Config Menu appears, and then press . When Activating Menu Changes appears, the menus are disabled. Resetting the Printer appears - Lexmark C532 | User's Guide - Page 76
Exit Config Menu appears, and then press . When Activating Menu Changes appears, the menus are enabled. Resetting the Printer temperature. When the printer receives a print job, the pages print slowly at first, and then more quickly as the printer warms up. This appears. Administrative support 76 - Lexmark C532 | User's Guide - Page 77
at www.lexmark.com/publications. Encrypting the printer hard disk This functionality is only available when a printer hard disk is installed and working properly. Warning: All files and resources on the printer hard disk will be deleted. Resources residing in the printer flash memory or RAM will - Lexmark C532 | User's Guide - Page 78
Web Server. To lock control panel menus: 1 Open a Web browser. In the address line, enter the IP address of the printer or print server to be protected using the format: http://ip_address/. 2 Click Configuration. 3 Under Other Settings, click Security. 4 Click Menu Lockout Setup. Locking the entire - Lexmark C532 | User's Guide - Page 79
: 1 Open a Web browser. In the address line, enter the IP address of the printer or print server to be protected using the format: http://ip_address/. 2 Click Configuration. 3 Under Other Settings, click Security. 4 Click Confidential Print Setup. Supporting IPSec Internet Protocol Security (IPSec - Lexmark C532 | User's Guide - Page 80
as part of the credentials: 1 Open a Web browser. In the address line, enter the IP address of the printer or print server to be protected using the format: http://ip_address/. 2 Click Configuration. 3 Under Other Settings, click Network/Ports. 4 Click Certificate Management. Administrative support - Lexmark C532 | User's Guide - Page 81
using the Embedded Web Server: 1 Open a Web browser. In the address line, enter the IP address of the printer or print server to be protected using the format: http://ip_address. 2 Click Configuration. 3 Under Other Settings, click Network/Ports. 4 Click TCP/IP Port Access. Administrative support 81 - Lexmark C532 | User's Guide - Page 82
Test and Ready do not appear, turn the printer off and contact Customer Support. Error message about reading USB drive appears USB device may not be supported. For information regarding tested and approved USB flash memory devices, see the Lexmark Web site at www.lexmark.com. Troubleshooting 82 - Lexmark C532 | User's Guide - Page 83
of paper from the output (exit) bin, and then press . Specified tray is empty. Load media in the tray. Wrong printer software is installed. • Verify you are using the correct printer software with your printer. • If you are using a USB port, make sure you are running Windows 2000, Windows XP - Lexmark C532 | User's Guide - Page 84
sure the paper guides in the trays are set for the correct media size. • Make sure the Paper Size and Paper Type are set correctly in the Paper menu. • For more information, see "Tray linking" on page 36 or see the Menus and Messages Guide on the Software and Documentation CD. Troubleshooting 84 - Lexmark C532 | User's Guide - Page 85
and Messages Guide on the Software and Documentation CD. Job is too complex. Reduce the complexity of the print job by eliminating the number and size of fonts, the number and complexity of images, and the number of pages in the job. Printer does not have enough memory. Add printer memory or - Lexmark C532 | User's Guide - Page 86
is securely connected. Solving paper feed problems Paper frequently jams Cause Solution Media loaded does not meet the printer specifications. Use recommended paper and other specialty media. For detailed specifications, see the Card Stock & Label Guide available on the Lexmark Web site at www - Lexmark C532 | User's Guide - Page 87
pages print, press until Exit Config Menu appears, and then press . The information in the following topics may help you solve print quality problems. If these suggestions still do not correct the problem, contact Customer Support. You may have a printer part that requires adjustment or replacement - Lexmark C532 | User's Guide - Page 88
times down a page, a toner cartridge every: or photoconductor may be defective. • 33.5 mm (1.32 in.) • 35.7 mm (1.41 in.) Replace the photoconductor if the defects occur every: • 28.3 mm (1.11 in.) • 72.4 mm (2.85 in.) If marks occur down the page repeatedly in all Replace the fuser if the - Lexmark C532 | User's Guide - Page 89
. Resetting the Printer appears briefly, followed by a clock, and then Ready appears. Dark lines Example ABCDE ABCDE ABCDE Cause Toner cartridge(s), photoconductor, or transfer belt is defective. Solution • If the problem is on the front (print side) of the page: 1 Replace the toner cartridge - Lexmark C532 | User's Guide - Page 90
If media is stiff, try feeding from media. another tray. Toner cartridge is defective. Replace the toner cartridge causing the streaks. Transfer belt is defective. Replace the transfer belt. Print is too light Cause Solution Toner Darkness setting is too light, RGB Brightness setting is - Lexmark C532 | User's Guide - Page 91
. Transfer belt is worn or defective. Photoconductor is worn or defective. Fuser is worn or defective. Toner is in the paper path. Solution Reinstall or replace the cartridge. Replace the transfer belt. Replace the photoconductor. Replace the fuser. Call for customer service. Troubleshooting 91 - Lexmark C532 | User's Guide - Page 92
Replace the toner cartridge. Replace the photoconductor. Characters have jagged or uneven edges Cause Downloaded font is not supported. Solution If you are using downloaded fonts, verify the fonts are supported by the printer, the host computer, and the software application. Ghost images - Lexmark C532 | User's Guide - Page 93
. • Install a new toner cartridge. Replace the toner cartridge. Cause Photoconductor is installed incorrectly. Photoconductor is defective. Printer requires servicing. Solution Remove and then reinstall the photoconductor. Replace the photoconductor. Call for customer service. Troubleshooting 93 - Lexmark C532 | User's Guide - Page 94
the correct Media Type is selected. The Paper Weight setting in the Paper Menu is wrong Change the Paper Weight from Normal to Heavy. If for the type of media being used. necessary, change Paper Texture from Normal to Rough. The fuser is worn or defective. Replace the fuser. Troubleshooting 94 - Lexmark C532 | User's Guide - Page 95
Lines from the software program with a document open (applicable to Windows users), click File Œ Print, and then click Properties, Preferences, Options, or Setup. • To set Enhance Fine Lines using the Embedded Web Server, type the network printer IP address in a browser window. Troubleshooting 95 - Lexmark C532 | User's Guide - Page 96
get the desired printed output. Vivid CMYK • The easiest way to access a complete list of these pages Off-CMYK is by using the Embedded Web Server, a series of resident pages located in network printers. Type the IP address of the printer in a browser window to see these pages. Troubleshooting 96 - Lexmark C532 | User's Guide - Page 97
Manual Color Œ • RGB Image • RGB Text • RGB Graphics Manual Color Œ • CMYK Image a color conversion table that uses only black toner for neutral gray colors. • sRGB Vivid applies color conversion tables and allows None the printer to make adjustments for color variations in Troubleshooting 97 - Lexmark C532 | User's Guide - Page 98
, see the Menus and Messages Guide on the Software and Documentation CD. Make sure to print on the recommended type of color transparencies. For more information about the paper and media specifications, see the User's Guide on the Software and Documentation CD. What is manual color correction? The - Lexmark C532 | User's Guide - Page 99
examine the color samples pages and identify the box whose color is the closest to the desired color. The color combination labeled on the box can then be used for modifying the color of the object in a software program. For instructions, see the software program Help. Manual Color Correction may be - Lexmark C532 | User's Guide - Page 100
a series of resident pages stored in the network printer firmware. To access these pages, browse to the IP address of the network printer. Click Configuration Menu, and then click Detailed Color Samples. For more information about using the Embedded Web Server, see the User's Guide on the Software - Lexmark C532 | User's Guide - Page 101
In the U.S. or Canada, call (1-800-539-6275). For other countries/regions, visit the Lexmark Web site at www.lexmark.com. Troubleshooting 101 - Lexmark C532 | User's Guide - Page 102
Comments about this publication may be addressed to Lexmark International, Inc., Department F95/032-2, 740 West New Circle Road, Lexington, Kentucky 40550, U.S.A. In the United Kingdom and Eire, send to Lexmark International Ltd., Marketing and Services Department, Westhorpe House, Westhorpe, Marlow - Lexmark C532 | User's Guide - Page 103
the instructions, or service changes or modifications could void the user's authority to operate this equipment. Note: To assure compliance with FCC regulations on electromagnetic interference for a Class B computing device, use a properly shielded and grounded cable such as Lexmark part - Lexmark C532 | User's Guide - Page 104
32 dBA Values are subject to change. See www.lexmark.com for current values. Waste from Electrical and Electronic Equipment (WEEE at www.lexmark.com for your local sales office phone number. ENERGY STAR Applicable only to models with a duplexer installed. Laser notice The printer is certified in - Lexmark C532 | User's Guide - Page 105
user maintenance, or prescribed service condition. Laser advisory label A laser notice label may be affixed to this printer . Values are subject to change. See www.lexmark.com for current values. (in minutes): 30 minutes By using the configuration menus, the Power Saver Timeout can be modified - Lexmark C532 | User's Guide - Page 106
to the Remarketer or the Lexmark designated location. When warranty service involves the exchange of a product or part, the item replaced becomes the property of the Remarketer or Lexmark. The replacement may be a new or repaired item. The replacement item assumes the remaining warranty period - Lexmark C532 | User's Guide - Page 107
attachments -Accidents, misuse, abuse or use inconsistent with Lexmark user's guides, manuals, instructions or guidance -Unsuitable physical or operating environment -Maintenance by anyone other than Lexmark or a Lexmark authorized servicer -Operation of a product beyond the limit of its - Lexmark C532 | User's Guide - Page 108
Windows 46 I installing printer software 45 internal print server, installing 24 IPSec 79 J jam areas, accessing 58 jams avoiding 57 behind inner door 62 between fuser and standard exit bin 65 in manual feeder 68 in multipurpose feeder 67 in standard exit bin 65 in the duplex path 65 involving Tray - Lexmark C532 | User's Guide - Page 109
memory card 18 memory cards 15 port interface card 24 ordering fuser 73 photoconductors 73 toner cartridges 71 transfer belt 72 waste toner box 73 P paper capacities 44 letterhead 38 preprinted forms 38 setting size 35 setting type 35 storing 41 paper feed troubleshooting message remains after jam - Lexmark C532 | User's Guide - Page 110
waste toner box 73 system board accessing 15 reinstalling access cover 25 T toner cartridges aligning 69 ordering 71 removing 51 transfer belt ordering 72 transparencies guidelines 39 loading 30 tray linking 36 troubleshooting checking an unresponsive printer 82 contacting Customer Support 100 error
-
 1
1 -
 2
2 -
 3
3 -
 4
4 -
 5
5 -
 6
6 -
 7
7 -
8
-
9
-
10
-
11
-
12
-
13
-
14
-
15
-
16
-
17
-
18
-
19
-
20
-
21
-
22
-
23
-
24
-
25
-
26
-
27
-
28
-
29
-
30
-
31
-
32
-
33
-
34
-
35
-
36
-
37
-
38
-
39
-
40
-
41
-
42
-
43
-
44
-
45
-
46
-
47
-
48
-
49
-
50
-
51
-
52
-
53
-
54
-
55
-
56
-
57
-
58
-
59
-
60
-
61
-
62
-
63
-
64
-
65
-
66
-
67
-
68
-
69
-
70
-
71
-
72
-
73
-
74
-
75
-
76
-
77
-
78
-
79
-
80
-
81
-
82
-
83
-
84
-
85
-
86
-
87
-
88
-
89
-
90
-
91
-
92
-
93
-
94
-
95
-
96
-
97
-
98
-
99
-
100
-
101
-
102
-
103
-
104
-
105
-
106
-
107
-
108
-
109
-
110
 |
 |

C530, C532, and C534
User's Guide
July 2006
www.lexmark.com
Lexmark and Lexmark with diamond design are trademarks of Lexmark International, Inc., registered in the United States and/or other countries.
All other trademarks are the property of their respective owners.
© 2006 Lexmark International, Inc
All rights reserved.
740 West New Circle Road
Lexington, Kentucky 40550