Lexmark C532DN Help Menu Pages
Lexmark C532DN - C 532dn Color Laser Printer Manual
 |
UPC - 734646258494
View all Lexmark C532DN manuals
Add to My Manuals
Save this manual to your list of manuals |
Lexmark C532DN manual content summary:
- Lexmark C532DN | Help Menu Pages - Page 1
of 34 Color quality guide The Color quality guide helps users understand how operations available on the printer can be used to adjust and customize color output. Quality menu Menu item Print Mode Color Correction Print Resolution Toner Darkness Description Settings Specifies whether images are - Lexmark C532DN | Help Menu Pages - Page 2
, type the network printer IP address in a browser window. Reduces the amount of toner used for graphics and images. On The amount of toner used for text is not reduced. Off Notes: • Off is the default setting. • On overrides Toner Darkness settings. • Color Saver is not supported in PPDS, and - Lexmark C532DN | Help Menu Pages - Page 3
Color quality guide Page 3 of 34 Menu item Color Samples Manual Color Œ • RGB Image • RGB Text • RGB Graphics Manual Color Œ • CMYK Image • CMYK Text • CMYK Graphics Description Settings Prints sample pages for each of the RGB and CMYK color conversion tables used in the printer sRGB Display - Lexmark C532DN | Help Menu Pages - Page 4
yellow, and black inks or toners can be printed in various amounts to produce a large range of colors observed in nature. For example, cyan and yellow can be combined to create green. Printing presses, inkjet printers, and color laser printers create colors in this manner. CMYK color is a method of - Lexmark C532DN | Help Menu Pages - Page 5
and Messages Guide on the Software and Documentation CD. Make sure to print on the recommended type of color transparencies. For more information about the paper and media specifications, see the User's Guide on the Software and Documentation CD. What is manual color correction? The color conversion - Lexmark C532DN | Help Menu Pages - Page 6
color-matching problem depends on the Color Correction setting being used (Auto, Off, or Manual), the type of object being printed (text, graphics, or images), and how the color of the object is specified in the software program (RGB or CMYK combinations). When the printer Color Correction - Lexmark C532DN | Help Menu Pages - Page 7
close, but would like to scan more colors in a nearby area, the user can use the Detailed Color Samples to select the desired color values and a more specific increment. This provides a way to print multiple pages of colored boxes that surround a specific color of interest. There are nine conversion - Lexmark C532DN | Help Menu Pages - Page 8
Print quality guide Page 8 of 34 Print quality guide Many print quality problems can be solved by replacing a supply or maintenance item that is approaching the end of its intended life. Check the control panel for a message about a printer supply. Use the following table to find solutions to print - Lexmark C532DN | Help Menu Pages - Page 9
and reinstall the photoconductors. For more information about installing supplies, see the User's Guide on the Software and Documentation CD. Note: If you have not resolved the issue, adjust the color alignment again. Adjusting the color alignment 1 Make sure the printer is turned off. 2 From - Lexmark C532DN | Help Menu Pages - Page 10
Print quality guide Page 10 of 34 Streaked horizontal lines Example ABCDE ABCDE ABCDE Cause A toner cartridge is defective, empty, or worn. Fuser is defective or worn. Photoconductors may be defective. Solution Replace the toner cartridge. Replace the fuser. Replace the photoconductor units. - Lexmark C532DN | Help Menu Pages - Page 11
line Example ABCDE ABCDE Cause Toner cartridge is defective. Photoconductors are defective. Transfer belt is defective. Printhead lenses are dirty. Solution Replace the color cartridge causing the line. Replace the photoconductor units. Replace the transfer belt. Clean the printhead lenses - Lexmark C532DN | Help Menu Pages - Page 12
is worn or defective. Reinstall or replace the cartridge. Transfer belt is worn or defective. Replace the transfer belt. Photoconductor is worn or defective. Replace the photoconductor. Fuser is worn or defective. Replace the fuser. Toner is in the paper path. Call for customer service. - Lexmark C532DN | Help Menu Pages - Page 13
Ghost images Example Print quality guide Page 13 of 34 Cause Solution The photoconductors are not functioning properly. • Make sure the Paper Type setting is correct for the media you are using. • Replace the photoconductors. Toner is low. Replace the toner cartridge. Clipped images Cause - Lexmark C532DN | Help Menu Pages - Page 14
a new toner cartridge. Replace the toner cartridge. Solid color pages Cause Photoconductor is installed incorrectly. Photoconductor is defective. Printer requires servicing. Solution Remove and then reinstall the photoconductor. Replace the photoconductor. Call for customer service. Paper curl - Lexmark C532DN | Help Menu Pages - Page 15
in Tray 1. Proper paper loading prevents jams and facilitates trouble-free printing. Do not remove trays while a job prints or while Busy blinks on the display. Doing so may cause a jam. 1 Grasp the handle and pull the tray out. Remove the tray completely. 2 Squeeze the width guide tabs together as - Lexmark C532DN | Help Menu Pages - Page 16
level surface. 5 Load the paper stack with the recommended print side faceup. Load the stack toward the back of the tray as shown. When loading preprinted letterhead, place the header toward the front of the tray. 6 Squeeze the width guide tabs, and slide the width guide to lightly touch the side of - Lexmark C532DN | Help Menu Pages - Page 17
7 Align the tray, and insert it. Printing guide Page 17 of 34 8 If a different type of paper was loaded than the type previously loaded in the tray, change the Paper Type setting for the tray from the control panel. For more information, see "Setting the paper size and type" on page 17. Setting - Lexmark C532DN | Help Menu Pages - Page 18
. Note: Shake your new print cartridge gently before installing it into the printer to maximize its yield. The following table lists the part numbers for ordering supply items. Part number list Part name Part number Cyan Extra High Yield Return Program Toner Cartridge C5340CX Magenta Extra High - Lexmark C532DN | Help Menu Pages - Page 19
Black Toner Cartridge C5202KS Photoconductor Unit C53030X Photoconductor Unit, Multi-Pack C53034X Fuser (100V/50-60Hz) 40X3571 Fuser (120V/50-60Hz) [low voltage] 40X3569 Fuser (220-240V/50-60Hz) [high voltage] 40X3570 Transfer Belt 40X3572 Waste Toner Box C52025X For printer(s) C530 - Lexmark C532DN | Help Menu Pages - Page 20
Supplies guide Page 20 of 34 Ordering photoconductors When Black PC Unit Life Warning or Cyan PC Unit Life Warning, Magenta PC Unit Life Warning, or Yellow PC Unit Life Warning appears, you need to order replacement photoconductor(s). Part number Part name C53030X Photoconductor Unit C53034X - Lexmark C532DN | Help Menu Pages - Page 21
Page 21 of 34 Media guide The printer supports the following paper and other specialty media sizes. Select custom sizes up to the maximum specified for the Universal setting. Supported paper sizes -supported X-unsupported Paper size Dimensions Standard 250-sheet Optional 550-sheet Multipurpose - Lexmark C532DN | Help Menu Pages - Page 22
guide Page 22 of 34 Paper size Dimensions Standard 250-sheet Optional 550-sheet Multipurpose feeder tray (Tray 1) tray (Tray 2) or manual feeder 7 3/4 Envelope 98.4 x 190.5 mm X X (Monarch) (3.875 x 7.5 in.) Commercial 9 98.4 x 225.4 mm X X Envelope (3.875 x 8.9 in.) Commercial 10 - Lexmark C532DN | Help Menu Pages - Page 23
. • Do not load the manual feeder while the printer is printing. Wait for Load manual feeder with to appear. • Push all trays in firmly after loading media. • Make sure the guides in the trays are properly positioned and are not pressing too tightly against the paper. • Make sure all media sizes - Lexmark C532DN | Help Menu Pages - Page 24
that best matches the defects on the print job indicates which particular part is causing the defect. Change the photoconductor unit for the color that shows this defect. 72.4 mm (2.85 inches) 28.3 mm (1.11 inches) Change the toner cartridge for the color that shows this defect. 35.7 mm (1.41 - Lexmark C532DN | Help Menu Pages - Page 25
Yellow PC Unit Custom Types Print Fonts HTML Menu Black PC Unit Universal Setup Print Directory Image Menu Fuser Transfer Belt Security Network/Ports Help Max Invalid PIN TCP/IP Color Quality Job Expiration IPv6 Print Quality Wireless Printing Guide Standard Network Supplies Guide - Lexmark C532DN | Help Menu Pages - Page 26
Display 2 Select Description The display shows messages and pictures that communicate the status of the printer. Pressing initiates action on a menu item the printer status: • Off-The power is off. • Blinking green-The printer is warming up, processing data, or printing. • Solid green-The printer is - Lexmark C532DN | Help Menu Pages - Page 27
printer. Software and Documentation CD The Software and Documentation CD packaged with the printer includes a User's Guide and a Menus and Messages Guide. The User's Guide provides information about loading paper, ordering supplies, troubleshooting, and clearing jams. The Menus and Messages Guide - Lexmark C532DN | Help Menu Pages - Page 28
guide Windows instructions for a locally attached printer Note: When installing a locally attached printer, if the operating system is not supported by the Software and Documentation CD, the Add Printer Wizard must be used. Updates for the printer software may be available on the Lexmark - Lexmark C532DN | Help Menu Pages - Page 29
Connectivity guide Page 29 of 34 4 Specify the location of the printer software. The path should be similar to D:\Drivers\Print\Win_9xMe\, where D is the letter of your CD-ROM drive. 5 Click OK. Windows instructions for network attached printers What is network printing? In Windows environments, - Lexmark C532DN | Help Menu Pages - Page 30
computer you want to enable to print to the shared printer. • Using the point-and-print method Note: For more information, see the Lexmark Web site at www.lexmark.com. Look for a Knowledgebase article about 64-bit support. This method may be the best use of system resources. The computer attached to - Lexmark C532DN | Help Menu Pages - Page 31
used to install the necessary printer software. Note: A PPD for the printer is also available in a downloadable software package on the Lexmark Web site at www.lexmark.com. Creating a queue in the Print Center or Printer Setup Utility For local printing, you need to create a print queue: 1 Install - Lexmark C532DN | Help Menu Pages - Page 32
Connectivity guide Page 32 of 34 Mac instructions for network-attached printers Installing software for network printing To print to a network printer, each Macintosh user must install a custom PostScript Printer Description (PPD) file and create a print queue in the Print Center or Printer Setup - Lexmark C532DN | Help Menu Pages - Page 33
all cords and cables from the printer before moving it. • Remove all printer options before moving the printer. Warning: Damage to the printer caused by improper moving is not covered by the printer warranty. Setting the printer up in a new location When the printer is set up, allow clearance around - Lexmark C532DN | Help Menu Pages - Page 34
cart used to move the options must have a surface able to support the dimensions of the options. • Keep the printer in an upright position. • Avoid severe jarring movements. Shipping the printer When shipping the printer, use the original packaging or call the place of purchase for a relocation kit.
-
 1
1 -
 2
2 -
 3
3 -
 4
4 -
 5
5 -
 6
6 -
 7
7 -
8
-
9
-
10
-
11
-
12
-
13
-
14
-
15
-
16
-
17
-
18
-
19
-
20
-
21
-
22
-
23
-
24
-
25
-
26
-
27
-
28
-
29
-
30
-
31
-
32
-
33
-
34
 |
 |
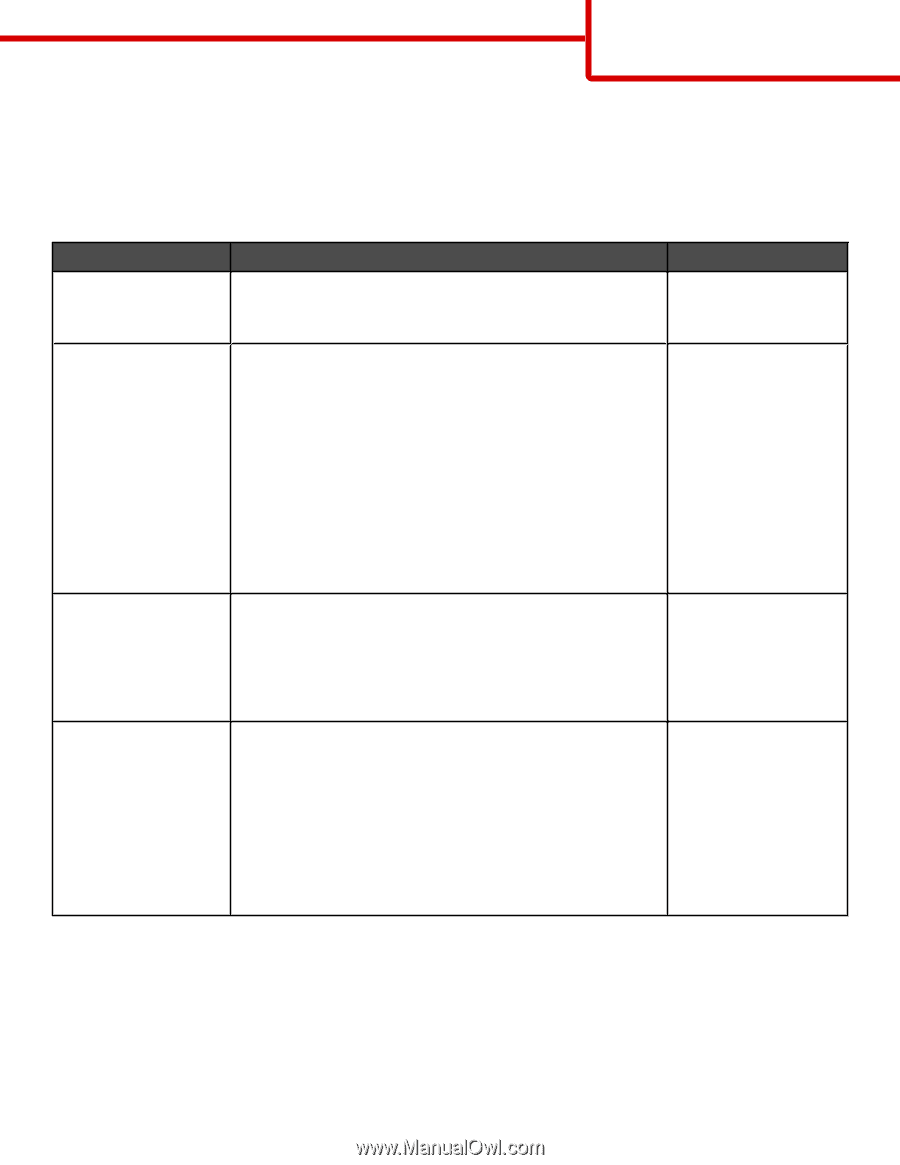
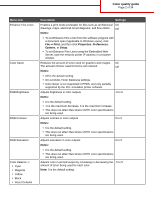
Color quality guide
The Color quality guide helps users understand how operations available on the printer can be used to adjust and
customize color output.
Quality menu
Menu item
Description
Settings
Print Mode
Specifies whether images are printed in monochrome grayscale
or in color
Note:
Color is the default setting.
Color
Black Only
Color Correction
Adjusts the color output on the printed page
Notes:
•
Due to the differences in additive and subtractive colors,
certain colors that appear on computer monitors are
impossible to duplicate on the printed page.
•
Auto is the default setting. Auto applies different color
conversion tables to each object on the printed page. It
looks at how the color for each object is defined.
•
Off turns off color correction.
•
Manual allows customization of the color tables using the
settings available under the Manual Color menu.
Auto
Off
Manual
Print Resolution
Specifies the printed output resolution
Notes:
•
4800 CQ is the default setting.
•
1200 dpi provides the highest resolution output. This setting
increases gloss.
1200 dpi
4800 CQ
Toner Darkness
Lightens or darkens the printed output
Notes:
•
4 is the default setting.
•
Selecting a smaller number can help conserve toner.
•
If Print Mode is set to Black Only, a setting of 5 increases
toner density and darkness to all print jobs.
•
If Print Mode is set to Color, a setting of 5 is the same as a
setting of 4.
1–5
Color quality guide
Page 1 of 34