Lexmark C736dtn Wireless Setup Guide
Lexmark C736dtn Manual
 |
View all Lexmark C736dtn manuals
Add to My Manuals
Save this manual to your list of manuals |
Lexmark C736dtn manual content summary:
- Lexmark C736dtn | Wireless Setup Guide - Page 1
Wireless Setup Guide © 2008 Lexmark International, Inc. All rights reserved. - Lexmark C736dtn | Wireless Setup Guide - Page 2
to you. This publication could include technical inaccuracies or typographical errors. Changes are periodically made to the information herein; these be made at any time. © 2008 Lexmark International, Inc. All rights reserved. UNITED STATES GOVERNMENT RIGHTS This software and any accompanying - Lexmark C736dtn | Wireless Setup Guide - Page 3
to a wireless network using Windows 14 Installing the printer on a wireless network (Windows 14 Connecting to a wireless network using Macintosh 16 Installing the printer on a wireless network (Macintosh 16 Setting up serial printing...19 Troubleshooting wireless setup 21 Connecting using - Lexmark C736dtn | Wireless Setup Guide - Page 4
4 - Lexmark C736dtn | Wireless Setup Guide - Page 5
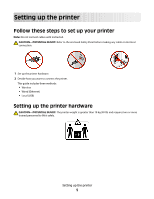
Note: Do not connect cables until instructed. CAUTION-POTENTIAL INJURY: Refer to the enclosed Safety Sheet before making any cable or electrical connection. 1 Set up the printer hardware. 2 Decide how you want to connect the printer. This guide includes three methods: • Wireless • Wired (Ethernet - Lexmark C736dtn | Wireless Setup Guide - Page 6
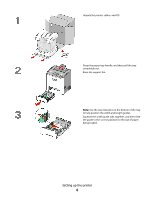
Unpack the printer, cables, and CD. Grasp the paper tray handle, and then pull the tray completely out. Raise the support bin. Note: Use the size indicators on the bottom of the tray to help position the width and length guides. Squeeze the width guide tabs together, and then slide the guide to the - Lexmark C736dtn | Wireless Setup Guide - Page 7
The length guide has a locking device. To unlock the tray, slide the button on top of the length guide to the left, as illustrated. To lock the tray once recommended print side faceup. Load the stack toward the back of the tray as shown. Align the tray, and then reinsert it. Setting up the printer 7 - Lexmark C736dtn | Wireless Setup Guide - Page 8
Grasp the handle, and pull forward to open the front door. Allow the front door to open completely. Pull the protective sheet straight out of the toner cartridge area to remove it. Pull each toner cartridge straight out of the printer, one at a time. Setting up the printer 8 - Lexmark C736dtn | Wireless Setup Guide - Page 9
. Remove the red packing material from each toner cartridge. Place each toner cartridge back into the printer. Pull out on each side of the packing strip, and then pull it forward to remove it from the transfer module. Remove the red packing strip from the top of each photoconductor. Setting up the - Lexmark C736dtn | Wireless Setup Guide - Page 10
Close the front door. Setting up the printer 10 - Lexmark C736dtn | Wireless Setup Guide - Page 11
Note: Do not connect cables until instructed. Connect to a wireless network using Windows For detailed steps, see "Information you will need to set up the printer on a wireless network" on page 12 and "Installing the printer on a wireless network (Windows)" on page 14. Connect to a wireless network - Lexmark C736dtn | Wireless Setup Guide - Page 12
networks)-The channel defaults to auto for infrastructure networks. Some ad hoc networks will also require the auto setting. Check with your system support person if you are .1X security, see the Networking Guide on the Software and Documentation CD. Adding the printer to a network using MAC address - Lexmark C736dtn | Wireless Setup Guide - Page 13
format: 00:04:12:34:56:78 Note: Print a network setup page if you cannot locate the printer MAC address. It will appear on the network setup page. Refer to the User's Guide on the Software and Documentation CD for more information on printing a network setup page. Preparing to connect wirelessly 13 - Lexmark C736dtn | Wireless Setup Guide - Page 14
then to a properly grounded electrical outlet, and then turn the printer on. Make sure the printer and computer are fully on and ready. Do not connect the USB cable until instructed to do so on the screen. 2 Insert the Software and Documentation CD. Connecting to a wireless network using Windows 14 - Lexmark C736dtn | Wireless Setup Guide - Page 15
printer. Note: After the printer is configured, the software will instruct you to disconnect the temporary USB cable so you can print wirelessly. 8 Follow the on-screen instructions printer, follow steps 2 through 6 and step 8 for each computer. Connecting to a wireless network using Windows 15 - Lexmark C736dtn | Wireless Setup Guide - Page 16
of the MAC address in the space provided below: MAC address 2 Connect the power cable to the printer and then to a properly grounded electrical outlet, and then turn the power on. Enter the printer information 1 Access the AirPort options. In Mac OS X version 10.5 a From the Finder desktop, click - Lexmark C736dtn | Wireless Setup Guide - Page 17
your wireless network. Configure your computer to use the printer wirelessly To print to a network printer, each Macintosh user must install a custom PostScript Printer Description (PPD) file and create a printer in the Print Center or Printer Setup Utility. 1 Install a PPD file on the computer - Lexmark C736dtn | Wireless Setup Guide - Page 18
, click Go ΠApplications. 2 Double-click the Utilities folder. 3 Locate and double-click Print Center or Printer Setup Utility. 4 From the Printer List, choose Add. 5 Choose the Default Browser tab. 6 Click More Printers. 7 From the first pop-up menu, choose AppleTalk. 8 From the second pop-up - Lexmark C736dtn | Wireless Setup Guide - Page 19
d Save the new settings. e Print a menu settings page. 2 Install the printer driver: a Insert the Software and Documentation CD. It launches automatically. If the CD does not launch automatically, do one of the following: In Windows Vista 1 Click . 2 In the Start Search box, type D:\setup.exe, where - Lexmark C736dtn | Wireless Setup Guide - Page 20
settings under the serial heading on the Menu Settings page you printed earlier. f Click OK, and then close all the windows. g Print a test page to verify printer installation. When a test page prints successfully, printer setup is complete. Connecting to a wireless network using Macintosh 20 - Lexmark C736dtn | Wireless Setup Guide - Page 21
, refer to the User's Guide on the Software and Documentation CD. Wireless troubleshooting checklist Before beginning to troubleshoot the wireless printer, verify that: • The printer is turned on and plugged in to a working outlet. • The SSID is correct. Print a network setup page to verify the SSID - Lexmark C736dtn | Wireless Setup Guide - Page 22
to the documentation that came with your printer for details on printing a network setup page. Make sure the SSID the printer is using matches the wireless network SSID. If you are not sure how to find the network SSID, use one of the following: Using Windows 1 Type the IP address of the wireless - Lexmark C736dtn | Wireless Setup Guide - Page 23
c Press Enter. • The "Default Gateway" entry is typically the network software. 2 Type your user name and password for the wireless access point when prompted. 3 Click OK. 4 On the main page, click Wireless or another selection . b Click Network. c Click AirPort. Troubleshooting wireless setup 23 - Lexmark C736dtn | Wireless Setup Guide - Page 24
typically the wireless access point. 2 Type your user name and password when prompted. 3 Click OK. 4 On the main page, click Wireless or another selection where settings are stored the printer over your wireless network. End your VPN session and try printing again. Troubleshooting wireless setup 24 - Lexmark C736dtn | Wireless Setup Guide - Page 25
there may be a problem with the cable. Try one or more of the following: • Make sure that the USB cable is not damaged. If there is any visible damage to the USB cable, try using a new one. • Attach the cable directly to the computer and the printer. Hubs, switch boxes, and docking stations - Lexmark C736dtn | Wireless Setup Guide - Page 26
2 Attach the small, square connector to the printer. WEP key or WPA pre-shared key not valid ERROR MADE WHEN ENTERING KEY • Carefully retype the key. • Verify that the , and channel (if ad hoc is selected) information. 4 Click Next and continue the installation. Troubleshooting wireless setup 26 - Lexmark C736dtn | Wireless Setup Guide - Page 27
the setup was unsuccessful on the last screen, but the printer will be configured correctly for the remote network. To , there is a problem with either the configuration of the computer or the wireless network. Contact your system support person, or refer issues. Troubleshooting wireless setup 27 - Lexmark C736dtn | Wireless Setup Guide - Page 28
point and the printer. • Interior support columns, or walls printer for the network, manually entering all network information. The printer printer does not have power. There is a problem with the USB connection • Verify that the installation cable is attached to both the computer and the printer - Lexmark C736dtn | Wireless Setup Guide - Page 29
than one instance of the printer installed, verify that the correct printer is selected. VERIFY THAT WINDOWS IS WORKING PROPERLY • Try restarting the computer. • Try installing the printer driver again. • Try uninstalling, and then reinstalling the printer driver. Troubleshooting wireless setup 29 - Lexmark C736dtn | Wireless Setup Guide - Page 30
working, but the printer will not print wirelessly, a firewall could be the problem. If there is a firewall (other than the Windows firewall) on the computer firewall for instructions on how to do this. • If programs request firewall access when you install the printer or try to print, make sure - Lexmark C736dtn | Wireless Setup Guide - Page 31
the WEP key or WPA passphrase when prompted. Note: You may be prompted to connect the printer to the computer again using the installation cable as part of the setup process. 5 Store the SSID and the WEP key or WPA passphrase in a safe place for future reference. Troubleshooting wireless setup 31 - Lexmark C736dtn | Wireless Setup Guide - Page 32
7 Connect the power cable to the printer and then to a properly grounded electrical outlet, and then turn the printer on. 8 Follow the on-screen instructions to complete the USB configuration. Note: For information on telephone and fax setup, see the User's Guide on the Software and Documentation CD - Lexmark C736dtn | Wireless Setup Guide - Page 33
turn the printer on. 3 Insert the Software and Documentation CD. 4 Click Install. 5 Click Agree. 6 Click Suggested. 7 Click Wired Network Attach. 8 Follow the on-screen instructions to complete the wired configuration. Note: For information on telephone and fax setup, see the User's Guide on the - Lexmark C736dtn | Wireless Setup Guide - Page 34
be specified on wireless routers or access points. A device that lets computers or printers talk to each other over a network. A device that connects multiple devices on a wired network. See "SSID (Service Set Identifier)" on page 35 A test to see if your computer can communicate with another device - Lexmark C736dtn | Wireless Setup Guide - Page 35
Service Set). An IP address assigned manually by you. A device similar to a network hub that can connect different networks together An address assigned to a network printer or print server by the manufacturer. To find the UAA, print a network setup page . WPA is not supported on ad hoc wireless
-
 1
1 -
 2
2 -
 3
3 -
 4
4 -
 5
5 -
 6
6 -
 7
7 -
8
-
9
-
10
-
11
-
12
-
13
-
14
-
15
-
16
-
17
-
18
-
19
-
20
-
21
-
22
-
23
-
24
-
25
-
26
-
27
-
28
-
29
-
30
-
31
-
32
-
33
-
34
-
35
 |
 |

Wireless Setup Guide
© 2008 Lexmark International, Inc.
All rights reserved.