Lexmark C772 Quick Reference
Lexmark C772 Manual
 |
View all Lexmark C772 manuals
Add to My Manuals
Save this manual to your list of manuals |
Lexmark C772 manual content summary:
- Lexmark C772 | Quick Reference - Page 1
the guide, and place it into the appropriate slot for the size paper you are loading. 5 Flex the sheets back and forth to loosen them, and then fan them. Do not fold or crease the paper. Straighten the edges of the stack on a level surface. 6 Place the paper against the back left corner of - Lexmark C772 | Quick Reference - Page 2
not load bent or wrinkled print media. 2 Squeeze the paper guide lever and slide the guide all the way toward the front of the printer. Note: Do not exceed the maximum stack height. Overfilling the feeder may cause jams. 6 Squeeze the paper guide lever and slide the guide until it lightly touches - Lexmark C772 | Quick Reference - Page 3
your job prints, it is deleted from printer memory. Printing from a USB flash memory device A USB Direct interface is located on the operator panel so you can insert a USB flash memory device and print PDF documents and supported graphic files. Printing a document from a USB flash memory device is - Lexmark C772 | Quick Reference - Page 4
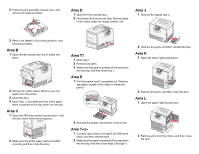
jams in the rollers under the image transfer unit. Area J 1 Remove the duplex tray J. 3 Return the feeder to its working position, and reload your paper. Area B 1 Open the left access door until it clicks into place. 2 Remove all visible paper. Remove any torn paper from the printer. 3 Close the
-
 1
1 -
 2
2 -
 3
3 -
 4
4
 |
 |

Lexmark™ C77x
Quick Reference
Loading paper and
specialty media
Loading 500-sheet trays
1
Remove the tray and place it on a flat, level
surface.
2
Squeeze the front guide lever and slide the
guide to the front of the tray.
3
Squeeze the side guide lever and slide the
guide to the correct position for the size paper
you are loading. Icons along the back of the tray
indicate paper sizes.
4
Flex the sheets back and forth to loosen them,
and then fan them. Do not fold or crease the
paper. Straighten the edges of the stack on a
level surface.
5
Place the paper in the tray as shown, print side
down.Do not load bent or wrinkled paper.
6
Squeeze the front guide lever and slide the
guide until it firmly touches the stack of paper.
7
Reinstall the tray.
8
Make sure the tray is pushed completely into
the printer.
Loading the 2000-sheet tray
1
Pull open the tray.
2
Squeeze the side guide lever, lift the guide, and
place it into the appropriate slot for the size
paper you are loading.
3
Squeeze the two front guide levers and slide the
guide to the correct position for the size paper
you are loading.
4
Slide the bottom support toward the front of the
tray until it touches the front guide.
5
Flex the sheets back and forth to loosen them,
and then fan them.
Do not fold or crease the paper. Straighten the
edges of the stack on a level surface.
6
Place the paper against the back left corner of
the tray, print side down.
Maximum stack height
indicator
LT.LG
LT.LG
EX
EX
A4
A4
B5
B5
A5
A5