Lexmark C925 Print Quality Guide
Lexmark C925 Manual
 |
View all Lexmark C925 manuals
Add to My Manuals
Save this manual to your list of manuals |
Lexmark C925 manual content summary:
- Lexmark C925 | Print Quality Guide - Page 1
the cartridge side-to-side and front-to-back several times to redistribute the toner. 3 Reinsert the toner cartridge. Note: If print quality does not improve, replace the toner cartridge. If the problem continues, the printer may need to be serviced. For more information, contact Customer Support. - Lexmark C925 | Print Quality Guide - Page 2
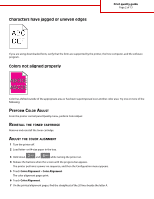
Characters have jagged or uneven edges Print quality guide Page 2 of 13 If you are using downloaded fonts, verify that the fonts are supported by the printer, the host computer, and the software program. Colors not aligned properly ABCDE ABCDE Color has shifted outside of the appropriate area or - Lexmark C925 | Print Quality Guide - Page 3
Print quality guide Page 3 of 13 8 From the printer control panel, touch the left or right arrow to select that number. 9 Repeat steps 9 and 10 to align sets B through L. 10 Touch Back > Exit Config Menu. Note: If necessary, adjust the color alignment again. Clipped images Try one or more of the - Lexmark C925 | Print Quality Guide - Page 4
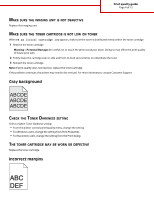
Print quality guide Page 4 of 13 MAKE SURE THE IMAGING UNIT IS NOT DEFECTIVE Replace the imaging unit. MAKE SURE THE TONER CARTRIDGE IS NOT LOW ON TONER When 88.xx [color] cartridge low appears, make sure the toner is distributed evenly within the toner cartridge. 1 Remove the toner cartridge. - Lexmark C925 | Print Quality Guide - Page 5
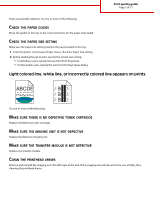
colored line appears on prints ABCDE ABCDE ABCDE ABCDE ABCDE Try one or more of the following: MAKE SURE THERE IS NO DEFECTIVE TONER CARTRIDGE Replace the defective toner cartridge. MAKE SURE THE IMAGING UNIT IS NOT DEFECTIVE Replace the defective imaging unit. MAKE SURE THE TRANSFER MODULE - Lexmark C925 | Print Quality Guide - Page 6
job, specify the correct paper type setting: • For Windows users, specify the paper type from Print Properties. • For Macintosh users, specify the paper type from the Print dialog. AVOID TEXTURED PAPER WITH ROUGH FINISHES MAKE SURE THERE IS NO DEFECTIVE TONER CARTRIDGE Replace the worn or defective - Lexmark C925 | Print Quality Guide - Page 7
transfer module is defective. Replace the transfer module if the defects occur every: • 38 mm (1.50 in.) An imaging unit is defective. Replace the imaging unit if the defects occur every: • 41.0 mm (1.61 in.) • 75.0 mm (2.95 in.) If marks occur down the page repeatedly in all colors: The fuser - Lexmark C925 | Print Quality Guide - Page 8
Solid color pages Print quality guide Page 8 of 13 Try one or more of the following: MAKE SURE THE IMAGING UNIT IS INSTALLED CORRECTLY AND IS NOT DEFECTIVE Remove and then reinstall the imaging unit. If the problem continues, the imaging unit may need to be replaced. MAKE SURE THE TONER CARTRIDGES - Lexmark C925 | Print Quality Guide - Page 9
visible toner from the paper path. If the problem persists, then contact Customer Support. Streaked vertical lines appear on prints ABCDE ABCDE ABCDE Try one or more of the following: SELECT ANOTHER TRAY OR FEEDER • From the printer control panel Paper menu, select Default Source • For Windows users - Lexmark C925 | Print Quality Guide - Page 10
Uneven print density Print quality guide Page 10 of 13 ABCDE ABCDE ABCDE Try one or more of the following: MAKE SURE THERE IS NO DEFECTIVE OR WORN TONER CARTRIDGE Replace the worn or defective toner cartridge. MAKE SURE THE IMAGING UNIT IS NOT DEFECTIVE Replace the defective imaging unit. Print is - Lexmark C925 | Print Quality Guide - Page 11
Paper Type setting. • For Windows users, check this setting from Print Properties. • For Macintosh users, check this setting from the Print dialog. MAKE SURE THERE IS NO DEFECTIVE TONER CARTRIDGE Replace the defective toner cartridge. Print is too light Print quality guide Page 11 of 13 Try one - Lexmark C925 | Print Quality Guide - Page 12
serviced. For more information, contact customer support. MAKE SURE THERE IS NO DEFECTIVE TONER CARTRIDGE Replace the defective toner cartridge. Transparency print quality is poor Try one or more of the following: CHECK THE TRANSPARENCIES Use only transparencies that meet the printer specifications - Lexmark C925 | Print Quality Guide - Page 13
in the paper path. Printer may not have recalibrated recently. Application may specify an off-white background. Solution Reinstall or replace the toner cartridge. Replace the transfer module. Replace the imaging unit. Replace the fuser. Call for service. Perform color adjust from the Quality menu
-
 1
1 -
 2
2 -
 3
3 -
 4
4 -
 5
5 -
 6
6 -
 7
7 -
8
-
9
-
10
-
11
-
12
-
13
 |
 |

Print quality guide
Many print quality problems can be solved by replacing a supply or maintenance item approaching the end of its intended
life. Check the printer control panel for a message about a printer supply.
Isolating print quality problems
Print the print quality test pages to help isolate print quality problems.
1
Turn the printer off.
2
Load letter- or A4-size paper in the tray or feeder.
3
Hold down
and
6
MNO
while turning the printer on.
4
Release the buttons when the screen with the progress bar appears.
The printer performs a power-on sequence, and then the Configuration menu appears.
5
Touch
Print Quality Pages
>
Print Quality Pages
.
The print quality test pages print.
6
Touch
Back
>
Exit Config Menu
.
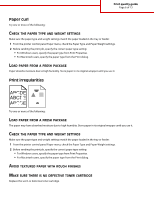
Printer is printing blank pages
Try one or more of the following:
M
AKE
SURE
THERE
IS
NO
PACKING
MATERIAL
LEFT
ON
THE
TONER
CARTRIDGE
Remove the toner cartridge and make sure the packing material is properly removed. Reinstall the toner cartridge.
M
AKE
SURE
THE
TONER
CARTRIDGE
IS
NOT
LOW
ON
TONER
When
88.xx [color] cartridge low
appears, make sure the toner is distributed evenly within the toner cartridge:
1
Remove the toner cartridge.
2
Firmly shake the cartridge side-to-side and front-to-back several times to redistribute the toner.
3
Reinsert the toner cartridge.
Note:
If print quality does not improve, replace the toner cartridge.
If the problem continues, the printer may need to be serviced. For more information, contact Customer Support.
Print quality guide
Page 1 of 13