Lexmark C950 Print Quality Guide
Lexmark C950 Manual
 |
View all Lexmark C950 manuals
Add to My Manuals
Save this manual to your list of manuals |
Lexmark C950 manual content summary:
- Lexmark C950 | Print Quality Guide - Page 1
the toner. 3 Reinsert the toner cartridge. Note: If print quality does not improve, replace the toner cartridge. If the problem continues, the printer may need to be serviced. For more information, contact Customer Support. Characters have jagged or uneven edges If you are using downloaded fonts - Lexmark C950 | Print Quality Guide - Page 2
Weight settings. 2 Before sending the job to print, specify the correct type setting: • For Windows users, specify the type from Print Properties. • For Macintosh users, specify the type from the Print dialog. MAKE SURE THE PHOTOCONDUCTOR UNIT IS NOT DEFECTIVE Replace the defective photoconductor - Lexmark C950 | Print Quality Guide - Page 3
Print quality guide Page 3 of 12 MAKE SURE THE TONER CARTRIDGE IS NOT LOW ON TONER When 88.xx [color] cartridge low appears, make sure the toner is distributed evenly within the toner cartridge. 1 Remove the toner cartridge. Warning-Potential Damage: Be careful not to touch the photoconductor drum. - Lexmark C950 | Print Quality Guide - Page 4
, or incorrectly colored line appears on prints ABCDE ABCDE ABCDE ABCDE ABCDE Try one or more of the following: MAKE SURE THERE IS NO DEFECTIVE TONER CARTRIDGE Replace the defective toner cartridge. MAKE SURE THE PHOTOCONDUCTOR UNIT IS NOT DEFECTIVE Replace the defective photoconductor unit. MAKE - Lexmark C950 | Print Quality Guide - Page 5
Make sure the paper type and weight settings match the paper loaded in the tray or feeder: 1 From the printer control panel Paper menu, check the Paper Type and Paper Weight settings. 2 Before sending the print job, specify the correct paper type setting: • For Windows users, specify the paper type - Lexmark C950 | Print Quality Guide - Page 6
Print quality guide Page 6 of 12 THE TONER MAY BE LOW When 88 Cartridge Low appears or when the print becomes faded, replace the toner cartridge. THE FUSER MAY BE WORN OR DEFECTIVE Replace the fuser. Repeating defects appear on a page Try one or more of the following: MAKE SURE THE PHOTOCONDUCTOR - Lexmark C950 | Print Quality Guide - Page 7
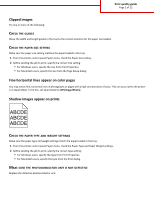
paper feed rollers. Solid color pages MAKE SURE THE PHOTOCONDUCTOR IS NOT DEFECTIVE AND IS INSTALLED CORRECTLY Remove and then reinstall the photoconductor. If the problem continues, then the photoconductor may need to be replaced. Streaked horizontal lines appear on prints ABCDE ABCDE ABCDE Try - Lexmark C950 | Print Quality Guide - Page 8
visible toner from the paper path. If the problem persists, then contact Customer Support. Streaked vertical lines appear on prints ABCDE ABCDE ABCDE Try one or more of the following: SELECT ANOTHER TRAY OR FEEDER • From the printer control panel Paper menu, select Default Source • For Windows users - Lexmark C950 | Print Quality Guide - Page 9
type setting matches the paper loaded in the tray or feeder: • From the printer control panel Paper menu, check the Paper Type setting. • For Windows users, check this setting from Print Properties. • For Macintosh users, check this setting from the Print dialog. Print is too light Try one or more - Lexmark C950 | Print Quality Guide - Page 10
Print quality guide Page 10 of 12 CHECK THE DARKNESS, BRIGHTNESS, AND CONTRAST SETTINGS The Toner Darkness setting may be too light, the Brightness setting may be too light, or the Contrast setting may be too low. • Change these settings from the printer control panel Quality menu. • For Windows - Lexmark C950 | Print Quality Guide - Page 11
Print quality guide Page 11 of 12 Toner specks Try one or more of the following: MAKE SURE THERE IS NO DEFECTIVE TONER CARTRIDGE Replace the defective or worn cartridges. MAKE SURE THE PHOTOCONDUCTOR UNIT IS NOT DEFECTIVE Replace the defective photoconductor unit. CALL CUSTOMER SUPPORT Toner fog or - Lexmark C950 | Print Quality Guide - Page 12
Toner rubs off Print quality guide Page 12 of 12 Try one or more of the following: CHECK THE PAPER TYPE AND WEIGHT SETTINGS Make sure the paper type and weight settings match the paper loaded in the tray or feeder: 1 From the printer control panel Paper menu, check the Paper Type and Paper Weight
-
 1
1 -
 2
2 -
 3
3 -
 4
4 -
 5
5 -
 6
6 -
 7
7 -
8
-
9
-
10
-
11
-
12
 |
 |

Print quality guide
Many print quality problems can be solved by replacing a supply or maintenance item that is approaching the end of its intended
life. Check the printer control panel for a message about a printer supply.
This section provides solutions to print quality problems.
Printer is printing blank pages
Try one or more of the following:
M
AKE
SURE
THERE
IS
NO
PACKING
MATERIAL
LEFT
ON
THE
TONER
CARTRIDGE
Remove the toner cartridge and make sure the packing material is properly removed. Reinstall the toner cartridge.
M
AKE
SURE
THE
TONER
CARTRIDGE
IS
NOT
LOW
ON
TONER
When
88.xx [color] cartridge low
appears, make sure the toner is distributed evenly within the toner cartridge:
1
Remove the toner cartridge.
2
Firmly shake the cartridge side-to-side and front-to-back several times to redistribute the toner.
3
Reinsert the toner cartridge.
Note:
If print quality does not improve, replace the toner cartridge.
If the problem continues, the printer may need to be serviced. For more information, contact Customer Support.
Characters have jagged or uneven edges
If you are using downloaded fonts, verify that the fonts are supported by the printer, the host computer, and the software
program.
Print quality guide
Page 1 of 12