Lexmark CS510 Quick Reference
Lexmark CS510 Manual
 |
View all Lexmark CS510 manuals
Add to My Manuals
Save this manual to your list of manuals |
Lexmark CS510 manual content summary:
- Lexmark CS510 | Quick Reference - Page 1
Mode. 5 Stop or Cancel button Stop all printer activity. Use the 6 Indicator light 7 USB port To Check the status of the printer. Connect a USB a flash drive to the printer. Note: Only the front USB port supports flash drives. Understanding the colors of the indicator and Sleep button lights - Lexmark CS510 | Quick Reference - Page 2
To • Show the current printer status such as Ready or Busy. • Show printer conditions such as Imaging unit low or Cartridge Low. • Show intervention messages and the instructions on how to clear them. • Show a printer warning or error message whenever the printer requires intervention to continue - Lexmark CS510 | Quick Reference - Page 3
or height, and then touch . Loading the 250 and 550‑sheet tray The printer has one 250-sheet tray (Tray 1) with an integrated manual feeder. The 250-sheet tray, the 650-sheet duo tray, and the 550-sheet tray support the same paper sizes and types and are loaded in the same way - Lexmark CS510 | Quick Reference - Page 4
. 8 Insert the tray. 1 Length guide tab 2 Paper size indicator 3 Width guide tab 9 From the printer control panel, set the paper size and type in the Paper menu to match the paper loaded in the tray. Note: Mixing paper sizes or types in a tray may cause jams. 4 3 2 Open the multipurpose feeder - Lexmark CS510 | Quick Reference - Page 5
maximum paper fill indicator located on the paper guides. 2 1 4 Prepare the paper for printer control panel, set the paper size and type in the Paper menu to match the paper loaded in the tray. Loading the manual feeder The standard 250‑sheet tray has an integrated manual feeder that can be used - Lexmark CS510 | Quick Reference - Page 6
the right side of the paper guide. 2 Feed paper into the manual feeder only to the point where its leading edge can contact the paper guides. Note: To achieve the best possible print quality, use only high‑quality media designed for laser printers. 3 Adjust the paper guides to the width of the - Lexmark CS510 | Quick Reference - Page 7
. Using Max Speed and Max Yield Max Speed and Max Yield let you choose between a faster print speed or a higher toner yield. Max Yield is the factory default setting. • Max Speed-This lets you print in either black or color depending on what is set in the printer driver. The printer prints in color - Lexmark CS510 | Quick Reference - Page 8
, select the print job you want to cancel, and then click Delete. Clearing jams Avoiding jams Load paper properly • Make sure paper lies flat in the tray. Correct loading of paper Incorrect loading of paper • Do not remove a tray while the printer is printing. • Do not load a tray while the - Lexmark CS510 | Quick Reference - Page 9
Jam Recovery is set to On or Auto, the printer reprints jammed pages. However, Auto does not guarantee that the page will print. 1 2 3 5 4 76 Jam location Message on the display What to do 1 Standard bin [x]‑page jam, clear Remove the jammed standard bin. [203.xx] paper. 2 Fuser [x]‑page jam - Lexmark CS510 | Quick Reference - Page 10
front door. 3 Hold down the fuser cover, and then remove the jammed paper. Note: Make sure all paper fragments are removed. 2 Firmly grasp the jammed paper on each side, and then gently pull it out. Note: Make sure all paper fragments are removed. 5 From the printer control panel, touch to clear - Lexmark CS510 | Quick Reference - Page 11
the surface to cool before touching it. 3 Close the front door. 2 Firmly grasp the jammed paper on each side, and then gently pull it out. Note: Make sure all paper fragments are removed. 4 From the printer control panel, touch to clear the message and continue printing. For non‑touch‑screen - Lexmark CS510 | Quick Reference - Page 12
feeder. 1 Pull out the standard 250-sheet tray (Tray 1) and manual feeder. 1 3 Reload paper into the multipurpose feeder. 2 2 Grasp the jammed paper on each side, and then gently pull it out. Note: Make sure all paper fragments are removed. 2 Flex the sheets of paper back and forth to loosen - Lexmark CS510 | Quick Reference - Page 13
4 Slide the paper guide until it rests lightly against the edge of the paper stack. 5 From the printer control panel, touch to clear the message and continue printing. For non‑touch‑screen printer models, select Next > > Clear the jam, press OK > . 13 - Lexmark CS510 | Quick Reference - Page 14
in fuser area 9 in manual feeder 12 in multipurpose feeder 12 in standard bin 9 Tray 1 11 Tray 2 11 paper size setting 2 paper type setting 2 print job canceling, from computer 8 printer control panel indicator light 1 parts 1 Sleep button light 1 using 1 printer messages [x]‑page jam, clear manual
-
 1
1 -
 2
2 -
 3
3 -
 4
4 -
 5
5 -
 6
6 -
 7
7 -
8
-
9
-
10
-
11
-
12
-
13
-
14
 |
 |
Quick Reference
Learning about the printer
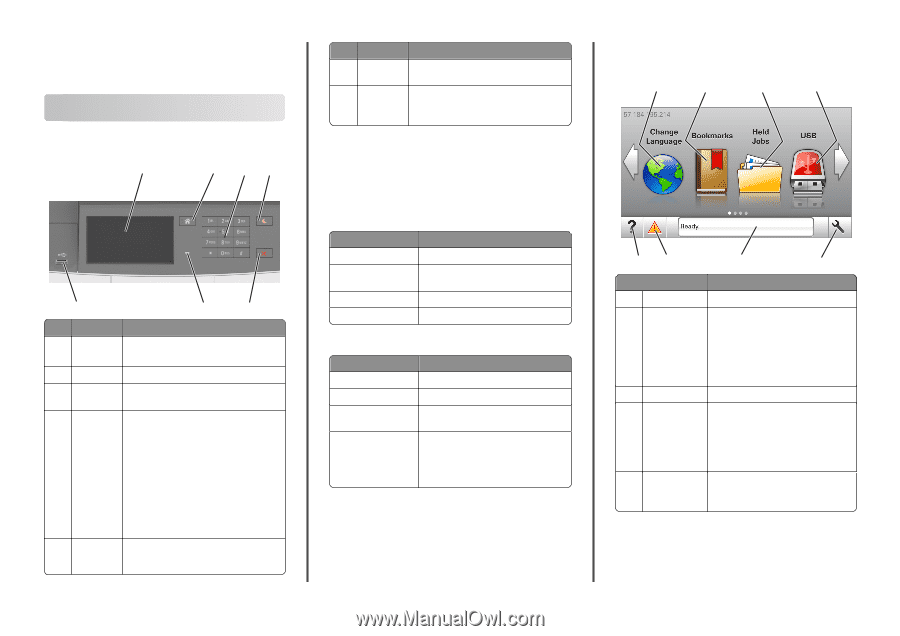
Using the printer control panel
2
1
3
4
6
5
7
Use the
To
1
Display
•
Show the status of the printer.
•
Set up and operate the printer.
2
Home button
Go to the home screen.
3
Keypad
Enter numbers, letters, or symbols on the
printer.
4
Sleep button
Enable Sleep mode or Hibernate mode.
Notes:
•
Pressing any hard button, touching the
printer control panel, attaching a device to
a USB port, sending a print job, or
performing a power-on reset with the
main power switch wakes the printer from
Sleep mode.
•
Pressing the Sleep button or the power
switch causes the printer to wake from
Hibernate Mode.
5
Stop or
Cancel
button
Stop all printer activity.
Use the
To
6
Indicator
light
Check the status of the printer.
7
USB port
Connect a USB a flash drive to the printer.
Note:
Only the front USB port supports flash
drives.
Understanding the colors of the indicator
and Sleep button lights
The colors of the indicator and Sleep button lights on the printer control
panel signify a certain printer status or condition.
Indicator light color and its corresponding printer status
Indicator light
Printer status
Off
The printer is off or in Hibernate mode.
Blinking green
The printer is warming up, processing data,
or printing.
Solid green
The printer is on, but idle.
Blinking red
The printer requires user intervention.
Sleep button light color and its corresponding printer status
Sleep button light
Printer status
Off
The printer is idle or in Ready state.
Solid amber
The printer is in Sleep mode.
Blinking amber
The printer is waking from or entering
Hibernate mode.
Blinking amber for 0.1
second, then goes
completely off for 1.9
seconds in pulsing
pattern
The printer is in Hibernate mode.
Understanding the home screen
When the printer is turned on, the display shows a basic screen,
referred to as the home screen. Use the home screen buttons and icons
to initiate an action.
Note:
Your home screen may vary depending on your home screen
customization settings, administrative setup, and active embedded
solutions.
1
2
3
4
5
6
7
8
Touch
To
1
Change Language
Change the primary language of the printer.
2
Bookmarks
Create, organize, and save a set of
bookmarks (URLs) into a tree view of folders
and file links.
Note:
The tree view does not include
bookmarks created within Forms and
Favorites, and the ones in the tree are not
usable in Forms and Favorites.
3
Held Jobs
Display all current held jobs.
4
USB
View, select, or print photos and documents
from a flash drive.
Note:
This icon appears only when you
return to the home screen while a memory
card or flash drive is connected to the
printer.
5
Menus
Access printer menus.
Note:
These menus are available only
when the printer is in ready state.
1