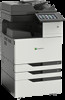
Lexmark CX924 Menus Guide
Lexmark CX924 Manual
 |
View all Lexmark CX924 manuals
Add to My Manuals
Save this manual to your list of manuals |
Lexmark CX924 manual content summary:
- Lexmark CX924 | Menus Guide - Page 1
Menus Guide August 2017 www.lexmark.com - Lexmark CX924 | Menus Guide - Page 2
and verification of operation in conjunction with other products, programs, or services, except those expressly designated by the manufacturer, are the user's responsibility. For Lexmark technical support, visit http://support.lexmark.com. For information on supplies and downloads, visit www - Lexmark CX924 | Menus Guide - Page 3
Remote Operator Panel...10 Notifications...11 Power Management...13 Information Sent to Lexmark...14 Accessibility...14 Restore Factory Defaults...15 Maintenance...15 Visible Home Screen Icons...20 About this Printer...20 Print...21 Layout...21 Finishing...22 Setup...23 Quality...24 Job Accounting - Lexmark CX924 | Menus Guide - Page 4
...35 Fax...39 Fax Mode...39 Analog Fax Setup...39 Fax Server Setup...49 E-mail...52 E‑mail Setup...52 E‑mail Defaults...53 Web Link Setup...58 FTP...59 FTP Defaults...59 USB Drive...64 Flash Drive Scan...64 Flash Drive Print...68 Network/Ports 71 Network Overview...71 Wireless...71 Ethernet...74 - Lexmark CX924 | Menus Guide - Page 5
...85 Login Restrictions...88 Confidential Print Setup...88 Disk Encryption...89 Erase Temporary Data Files...89 Solutions LDAP Settings...90 Mobile Services Management...90 Miscellaneous...90 Reports...91 Menu Settings Page...91 Device...91 Print...91 Shortcuts...91 Fax...92 Network...92 Help...93 - Lexmark CX924 | Menus Guide - Page 6
Contents 6 - Lexmark CX924 | Menus Guide - Page 7
printer model and printer firmware level. • For more information on updating the printer firmware, go to http://support.lexmark.com/firmware or contact your Lexmark • IPSec • Accessibility • Restore Factory Defaults • Maintenance • Visible Home Screen Icons • About This Printer • PDF • PostScript • PCL - Lexmark CX924 | Menus Guide - Page 8
Reports Help Troubleshooting • Login Methods • Schedule USB Devices • Security Audit Log • Login Restrictions • Confidential Print Setup • Menu Settings Page • Device • Print • Print All Guides • Color Quality Guide • Connection Guide • Copy Guide • E‑mail Guide • Fax Guide Print Quality Test - Lexmark CX924 | Menus Guide - Page 9
Time Manually Set Date and Time Date Format Time Format Time Zone UTC (GMT) Offset DST Start DST End DST Offset Network Time Protocol Enable NTP NTP Server Enable Authentication Key ID Password Configure the printer date . Note: An asterisk (*) next to a value indicates the factory default setting. - Lexmark CX924 | Menus Guide - Page 10
or before the printer logs off a user account automatically. Note: An asterisk (*) next to a value indicates the factory default setting. Remote Operator the authentication type when accessing the VNC client server. VNC Password Specify the password to connect to the VNC client server. Note: This - Lexmark CX924 | Menus Guide - Page 11
printer requires user intervention. Error Lighting Off* printer error occurs. Note: This menu item appears only in some printer printer to send e‑mail alerts to a list of contacts when the printer requires user intervention. Error Prevention Jam Assist Off On* Set the printer the printer continue processing - Lexmark CX924 | Menus Guide - Page 12
printer can perform. Error Prevention Auto Reboot Auto Reboot Window 1-525600 (720*) Set the number of seconds before the printer Reset Auto Reboot Counter Cancel Continue Reset Auto Reboot Counter. Error Prevention Display Short Paper Error On Auto‑clear* Set the printer Set the printer to - Lexmark CX924 | Menus Guide - Page 13
to Energy or Paper may affect printer performance, but not print quality. Schedule Power Modes Schedules Schedule the printer to enter Sleep or Hibernate mode. Note: This menu item appears only in some printer models. Note: An asterisk (*) next to a value indicates the factory default setting. - Lexmark CX924 | Menus Guide - Page 14
* to the printer. On Speak Passwords/PINs Off* On Set the printer to read out loud passwords or personal identification numbers. Note: This menu item appears only when headphones or speakers are attached to the printer. Note: An asterisk (*) next to a value indicates the factory default setting. - Lexmark CX924 | Menus Guide - Page 15
settings Description Restore the printer factory default settings. Note: The default value is the value selected during the initial setup. Maintenance Configuration Menu Menu item Description USB Configuration USB PnP 1* 2 Change the USB driver mode of the printer to improve its compatibility - Lexmark CX924 | Menus Guide - Page 16
Print reports about printer menu settings, status, and event logs. Supply Usage And Counters Clear Supply Usage History Reset the supply usage history, such as number of pages and days remaining, to the factory shipped level. Supply Usage And Counters Reset Maintenance Counter Reset the counter - Lexmark CX924 | Menus Guide - Page 17
the PPDS data stream. Fax Configuration Fax Low Power Support Disable Sleep Permit Sleep Auto* Set fax to enter Sleep mode whenever the printer determines that it should. Fax Configuration Fax Storage Location Server. Note: An asterisk (*) next to a value indicates the factory default setting. - Lexmark CX924 | Menus Guide - Page 18
the printer Toner patch sensor setup Full calibration Run the full color calibration. Toner patch sensor setup Print TPS information page Print a diagnostic page that contains information on toner patch sensor calibration. Note: An asterisk (*) next to a value indicates the factory default - Lexmark CX924 | Menus Guide - Page 19
the Lexmark Embedded Solutions (LES) applications. Notes: • This menu item is available only in some printer printer margins may need to be reset. Scanner Configuration Scanner Manual Registration Front ADF Registration Rear ADF Registration Flatbed Registration Manually factory default setting. - Lexmark CX924 | Menus Guide - Page 20
Device 20 Out of Service Erase Menu item Description Memory Last Sanitized Sanitize all information on nonvolatile memory Erase all printer and network settings Erase all apps and app settings Erase all shortcuts and shortcut settings Clear all settings and applications that are stored in the - Lexmark CX924 | Menus Guide - Page 21
edge) is bound when performing two‑sided printing. Note: Depending on the option selected, the printer automatically offsets each printed information of the page to bind the job correctly. Blank Pages Print Do orientation. Note: An asterisk (*) next to a value indicates the factory default setting. - Lexmark CX924 | Menus Guide - Page 22
Punch Mode 2 holes 3 holes 4 holes Set the hole punch mode for the printed output. Notes: • 3 holes is the U.S. factory default setting. 4 holes is the international factory default setting. • This menu item appears only when a staple, hole punch finisher is installed. Note: An asterisk (*) next to - Lexmark CX924 | Menus Guide - Page 23
factory default setting. Setup Menu item Description Printer Language PCL Emulation PS Emulation* Set the printer language. Note: Setting a printer language default a printer hard disk is installed. Printer Usage Max Speed Max Yield* Select between a faster print speed and a higher toner yield - Lexmark CX924 | Menus Guide - Page 24
selected. Note: An asterisk (*) next to a value indicates the factory default setting. Quality Menu item Description Print Mode Black and White Color* printed output. Note: The values may vary depending on your printer model. Toner Darkness 1 to 5 (5*) Determine the lightness or darkness of - Lexmark CX924 | Menus Guide - Page 25
Reset Defaults Start Adjust the amount of toner being used for each color. Color Correction Off Auto* Manual Modify the color settings used to print documents. Notes: • Off sets the printer indicates the factory default setting. Job Accounting Note: This menu appears only when a printer hard disk - Lexmark CX924 | Menus Guide - Page 26
the e‑mail address to which the printer sends job accounting logs. Log File Prefix Specify the prefix for the log file name. Note: The current host name defined in the TCP/IP menu is used as the default log file prefix. Note: An asterisk (*) next to a value indicates the factory default setting. - Lexmark CX924 | Menus Guide - Page 27
(*) next to a value indicates the factory default setting. PDF Menu item Description Scale to default setting. PostScript Menu item Description Print PS Error Off* On Print a page that describes the PostScript® error. Note: When an error occurs, processing of the job stops, the printer - Lexmark CX924 | Menus Guide - Page 28
the hard disk and flash option are not password‑protected. Font Name [List of available fonts] Choose a font from the specified font source. Notes: • Courier is the factory default setting. • The available fonts may vary depending on your printer model. Symbol Set [List of available symbol set - Lexmark CX924 | Menus Guide - Page 29
Tray [x] 0-201 (200*) Assign Manual Paper 0-201 (200*) Assign Manual Envelope 0-201 (200*) Configure the printer to work with print drivers or applications that use different source assignments for the trays or feeders. Note: An asterisk (*) next to a value indicates the factory default setting. - Lexmark CX924 | Menus Guide - Page 30
Print 30 Menu item Description Tray Renumber View Factory Defaults Restore Defaults Show or restore the factory default setting assigned to each tray or feeder. Print Timeout Off On* Set the printer to end a print job after it has been idle for the specified amount of time. Note: When set to - Lexmark CX924 | Menus Guide - Page 31
. Orientation Portrait* Landscape Reverse Portrait Reverse Landscape Specify the orientation of text and graphics on the page. Note: An asterisk (*) next to a value indicates the factory default setting. - Lexmark CX924 | Menus Guide - Page 32
to Manual, the printer treats the multipurpose feeder like a manual feeder. • When set to First, the printer picks paper from the multipurpose feeder until it is empty, regardless of the required paper source or paper size. Note: An asterisk (*) next to a value indicates the factory default setting - Lexmark CX924 | Menus Guide - Page 33
Short Edge* Long Edge Set the printer to pick paper from the short edge or long edge direction. Note: Long Edge appears only when the longest edge is shorter than the maximum width supported. Note: An asterisk (*) next to a value indicates the factory default setting. Custom Scan Sizes Menu item - Lexmark CX924 | Menus Guide - Page 34
Orientation Off 1 sided printing only Duplex Send to Bin Disabled* Standard Bin Bin [x] Note: An asterisk (*) next to a value indicates the factory default setting. Bin Configuration Menu item Description Output Bin Standard Bin* Bin [x] Specify the output bin. Configure Bins Mailbox* Link Link - Lexmark CX924 | Menus Guide - Page 35
Copy 35 Copy Copy Defaults Menu item Description Content Type Text Text/Photo* Photo Graphics Improve the output result based on the content of the number of page images to print on one side of a sheet of paper. Note: An asterisk (*) next to a value indicates the factory default setting. - Lexmark CX924 | Menus Guide - Page 36
sizes] Set the paper size of the original document. Notes: • Letter is the U.S. factory default setting. A4 is the international factory default setting. • This menu item may vary depending on your printer model. "Copy to" Source Tray [x] (1*) Multipurpose Feeder Auto Size Match Specify the - Lexmark CX924 | Menus Guide - Page 37
None* Red Green Blue Adjust the amount of toner being used in each color. Specify which color to drop during scanning, and adjust the dropout setting for that color. Default Red Threshold 0-255 (128*) Default Green Threshold 0-255 (128*) Default Blue Threshold 0-255 (128*) Auto Color Detect - Lexmark CX924 | Menus Guide - Page 38
scanning of the original document. Sharpness 1-5 (3*) Adjust the sharpness of a scanned image. Note: An asterisk (*) next to a value indicates the factory default setting. Admin Controls Menu item Description Allow Color Copies Off On* Print copies in color. Allow Priority Copies Off On - Lexmark CX924 | Menus Guide - Page 39
Note: An asterisk (*) next to a value indicates the factory default setting. Analog Fax Setup General Fax Settings Menu item Description fax recipients of your fax name or fax number. Enable Manual Fax Off* On Set the printer to fax manually. Notes: • This setting requires a line splitter and - Lexmark CX924 | Menus Guide - Page 40
is monitored continuously after turning on the printer. Optimize Fax Compatibility Configure the printer fax functionality for optimal compatibility with other fax machines. Note: An asterisk (*) next to a value indicates the factory default setting. Fax Send Settings Menu item Description - Lexmark CX924 | Menus Guide - Page 41
darkness of the scanned image. Behind a PABX Off* On Set the printer to dial a fax number without waiting to recognize the dial tone. a value indicates the factory default setting. Advanced Imaging Menu item Description Color Balance ‑4 to 4 (0*) Adjust the amount of toner used for each color - Lexmark CX924 | Menus Guide - Page 42
during scanning, and adjust the dropout setting for that color. Default Red Threshold 0-255 (128*) Default Green Threshold 0-255 (128*) Default Blue Threshold 0-255 (128*) Contrast Best for Content* or redder output. Note: An asterisk (*) next to a value indicates the factory default setting. - Lexmark CX924 | Menus Guide - Page 43
at the printer. Driver to Fax Off On* Allow the print driver to send fax. Allow Save as Shortcut Off On* Save fax numbers as shortcuts in the printer default. Scan Preview Off* On Enable previews for scanned documents. Enable Color Fax Scans Off by default* On by default - Lexmark CX924 | Menus Guide - Page 44
Prefix Rule [x] Establish a dialing prefix rule. Note: An asterisk (*) next to a value indicates the factory default setting. Fax Receive Settings Menu item Description Fax Job Waiting None* Toner Toner and Supplies Remove fax jobs that request specific unavailable resources from the print queue - Lexmark CX924 | Menus Guide - Page 45
Held Fax Mode Off* Always On Manual Scheduled Hold received faxes from printing until they are released. Note: An asterisk (*) next to a value indicates the factory default setting. Admin Controls Menu item Description Enable Fax Receive Off On* Set the printer to receive fax. Enable Color - Lexmark CX924 | Menus Guide - Page 46
distinctive ring pattern for incoming fax. Auto Answer Off On* Set the printer to receive fax automatically. Manual Answer Code 0-9 (9*) Manually enter a code on the telephone number pad to begin receiving fax. fax. Note: An asterisk (*) next to a value indicates the factory default setting. - Lexmark CX924 | Menus Guide - Page 47
Message Field Off* On Message: Include Logo Off* On Include Footer [x] Off* On Footer [x] Note: An asterisk (*) next to a value indicates the factory default setting. Fax Log Settings Menu item Description Transmission Log Print log* Do Not Print Log Print Only For Error Print a log for - Lexmark CX924 | Menus Guide - Page 48
Log Output Bin Standard Bin* Bin [x] Specify the output bin for printed logs. Note: An asterisk (*) next to a value indicates the factory default setting. Speaker Settings Menu item Description Speaker Mode Always Off Always On On until Connected* Set the fax speaker mode. Speaker Volume Low - Lexmark CX924 | Menus Guide - Page 49
Subject Specify the fax subject and message. Message Enable analog receive Off* On Set the printer to receive analog faxes. Note: An asterisk (*) next to a value indicates the factory default setting. Fax Server E‑mail Settings Menu item Description Primary SMTP Gateway Type the IP address - Lexmark CX924 | Menus Guide - Page 50
E‑mail None* Use Device SMTP Credentials Use Session User ID and Password Use Session E‑mail address and Password Prompt user Specify whether credentials are required for user‑initiated e‑mail. set up" error message. Note: An asterisk (*) next to a value indicates the factory default setting. - Lexmark CX924 | Menus Guide - Page 51
sizes] Set the paper size of the original document. Notes: • Mixed Sizes is the U.S. factory default setting. A4 is the international factory default setting. • This setting may vary depending on your printer model. Use Multi‑Page TIFF Off On* Choose between single‑ and multiple‑page TIFF files - Lexmark CX924 | Menus Guide - Page 52
before the printer times out if the SMTP server does not respond. Reply Address Specify a reply address in the e‑mail. Always use SMTP default Reply Address On* Off Always use the default reply address in Credentials Note: An asterisk (*) next to a value indicates the factory default setting. - Lexmark CX924 | Menus Guide - Page 53
Credentials Use Session User ID and Password Use Session E‑mail address and Password Prompt user Use Active Directory Device . Note: An asterisk (*) next to a value indicates the factory default setting. E‑mail Defaults Menu item Description Subject Specify the e‑mail subject and message. - Lexmark CX924 | Menus Guide - Page 54
Laser Inkjet Photo/Film Magazine Newspaper Press Other Improve the output result based on the original document. Note: An asterisk (*) next to a value indicates the factory default setting. - Lexmark CX924 | Menus Guide - Page 55
graphics when scanning a two‑sided document. Note: An asterisk (*) next to a value indicates the factory default setting. Advanced Imaging Menu item Description Color Balance -4 to 4 (0*) Adjust the amount of toner being used for each color. Color Dropout Color Dropout None* Red Green Blue - Lexmark CX924 | Menus Guide - Page 56
Detect Color Sensitivity 1-9 (5*) Area Sensitivity 1-9 (5*) Set the amount of color that the printer detects from the original document. Note: This menu item appears only when Color is generate a cooler or warmer output. Note: An asterisk (*) next to a value indicates the factory default setting. - Lexmark CX924 | Menus Guide - Page 57
factory default printer sends when an e‑mail exceeds its allowable file size. Note: You can type up to 1024 characters. Limit Destinations Limit sending of e‑mail only to the specified list of domain names. Note: Use a comma to separate each domain. Send Me a Copy Never appears* On by Default - Lexmark CX924 | Menus Guide - Page 58
mail. Reset E-mail Information After Sending Off On* Restore the default e-mail information after sending an e-mail. Note: An asterisk (*) next to a value indicates the factory default setting. Web Link Setup Menu item Server Login Password Path File Name Web Link Description Set the printer to - Lexmark CX924 | Menus Guide - Page 59
Defaults Menu item Description Format PDF (.pdf)* TIFF (.tif) JPEG (.jpg) XPS (.xps) TXT (.txt) RTF (.rtf) DOCX (.docx) Specify the file format for the scanned image. Note: The menu items may vary depending on your printer : An asterisk (*) next to a value indicates the factory default setting. - Lexmark CX924 | Menus Guide - Page 60
of paper sizes] Set the paper size of the original document. Notes: • Letter is the U.S. factory default setting. A4 is the international factory default setting. • The menu items may vary depending on your printer model. Sides Off* Long Edge Short Edge Specify the page orientation of text and - Lexmark CX924 | Menus Guide - Page 61
item Description Color Balance -4 to 4 (0*) Adjust the amount of toner used for each color in scan output. Color Dropout Color Dropout None* Red Green Blue Default Red Threshold 0-255 (128*) Default Green Threshold 0-255 (128*) Default Blue Threshold 0-255 (128*) Specify which color to drop - Lexmark CX924 | Menus Guide - Page 62
to include blank pages. Note: An asterisk (*) next to a value indicates the factory default setting. Admin Controls Menu item Description Text Default 5-95 (75*) Set the quality of text on a scanned image. Text/Photo Default 5-95 (75*) Set the quality of text or photo image on a scanned - Lexmark CX924 | Menus Guide - Page 63
only when Color is set to Gray. Custom Job Scanning Off* On Turn on scanning of custom jobs by default. Note: This menu item appears only when a hard disk is installed. Scan Preview Off On* Show a as shortcuts. Note: An asterisk (*) next to a value indicates the factory default setting. - Lexmark CX924 | Menus Guide - Page 64
the file format for the scanned image. Note: The settings may vary depending on your printer model. Global OCR Settings Recognized Languages Auto Rotate Despeckle Auto Contrast Enhance Configure the settings for document. Note: An asterisk (*) next to a value indicates the factory default setting. - Lexmark CX924 | Menus Guide - Page 65
of paper sizes] Set the paper size of the original document. Notes: • Letter is the U.S. factory default setting. A4 is the international factory default setting. • This menu item may vary depending on your printer model. Sides Off* Long edge Short edge Specify the page orientation of text and - Lexmark CX924 | Menus Guide - Page 66
Advanced Imaging Menu item Description Color Balance Adjust the amount of toner used for each color. Color Dropout Color Dropout None* Red Green Blue Default Red Threshold 0-255 (128*) Default Green Threshold 0-255 (128*) Default Blue Threshold 0-255 (128*) Specify which color to drop during - Lexmark CX924 | Menus Guide - Page 67
to include blank pages. Note: An asterisk (*) next to a value indicates the factory default setting. Admin Controls Menu item Description Text Default 5-95 (75*) Set the quality of text on a scanned image. Text/Photo Default 5-95 (75*) Set the quality of text or photo on a scanned image - Lexmark CX924 | Menus Guide - Page 68
asterisk (*) next to a value indicates the factory default setting. Flash Drive Print Menu item Description Number of Copies 1-9999 (1*) Set the number of copies. Paper Source Tray [x] (1*) Multipurpose Feeder Manual Paper Manual - Lexmark CX924 | Menus Guide - Page 69
Mode 2 holes 3 holes 4 holes Set the hole punch mode for the printed output. Notes: • 3 holes is the U.S. factory default setting. 4 holes is the international factory default setting. • This menu item appears only when a multiposition staple, hole punch finisher is installed. Offset Pages None - Lexmark CX924 | Menus Guide - Page 70
Paper menu. Blank Pages Do Not Print* Print Specify whether to include blank pages in a print job. Note: An asterisk (*) next to a value indicates the factory default setting. - Lexmark CX924 | Menus Guide - Page 71
Addresses Show all IPv6 addresses. Reset Print Server Start Reset all active network connections to the printer. Note: This setting removes all printer cancels a network print job. Banner Page Off On* Print a banner page. Note: An asterisk (*) next to a value indicates the factory default - Lexmark CX924 | Menus Guide - Page 72
settings of the access point. Specify the network mode. Note: Preferred Channel Number only appears if BSS Type is set to Ad hoc. Set the printer to connect directly to Wi-Fi devices. Specify the wireless standard for the wireless network. Note: 802.11a/b/g/n and 802.11a/n are selectable only if - Lexmark CX924 | Menus Guide - Page 73
printer. Note: This menu item appears only if Wireless Security Mode is set to WEP. Specify a WEP password for default printer language. Note: If PS SmartSwitch is off, then the printer does not examine incoming data and uses the default printer language specified in the Setup menu. Set the printer - Lexmark CX924 | Menus Guide - Page 74
printer LAA manually. PCL SmartSwitch Off On* Set the printer to switch automatically to PCL emulation when a print job requires it, regardless of the default printer printer does not receive data from the Ethernet network. Note: An asterisk (*) next to a value indicates the factory default - Lexmark CX924 | Menus Guide - Page 75
Specify the current DDNS settings. Default TTL DDNS Refresh Time Enable mDNS Off On* Update multicast DNS settings. WINS Server Address Specify a server address for Windows Internet Name Service (WINS). Enable BOOTP Off* On Allow the BOOTP to assign a printer IP address. Restricted Server - Lexmark CX924 | Menus Guide - Page 76
factory default setting. IPv6 Note: This menu appears only in network printers or printers that are attached to print servers. Menu item Description Enable IPv6 Off On* Enable IPv6 in the printer server address. Manually Assigned IPv6 Address Assign the IPv6 address. Manually Assigned IPv6 - Lexmark CX924 | Menus Guide - Page 77
, Privacy* Privacy Algorithm DES AES‑128* Configure SNMP version 3 to install and update the printer security. Note: An asterisk (*) next to a value indicates the factory default setting. IPSec Note: This menu appears only in network printers or printers that are attached to print servers. - Lexmark CX924 | Menus Guide - Page 78
menu item, access the Embedded Web Server. Note: An asterisk (*) next to a value indicates the factory default setting. LPD Configuration Note: This menu appears only in network printers or printers that are attached to print servers. Menu item Description LPD Timeout 0-65535 seconds (90*) Set - Lexmark CX924 | Menus Guide - Page 79
to the first position on the same line. Note: An asterisk (*) next to a value indicates the factory default setting. HTTP/FTP Settings Note: This menu appears only in network printers or printers attached to print servers. Menu item Description Enable HTTP Server Off On* Access the Embedded Web - Lexmark CX924 | Menus Guide - Page 80
default printer language. Note: If PCL SmartSwitch is off, then the printer does not examine incoming data and uses the default printer default printer language. Note: If PS SmartSwitch is off, then the printer does not examine incoming data and uses the default printer the printer to process printer - Lexmark CX924 | Menus Guide - Page 81
for data transmission. Note: An asterisk (*) next to a value indicates the factory default setting. USB Note: This menu appears only in some printer models. Menu item Description PCL SmartSwitch Off On* Set the printer to switch to PCL emulation when a print job received through a USB port - Lexmark CX924 | Menus Guide - Page 82
Off On* Enable the standard USB port. Note: An asterisk (*) next to a value indicates the factory default setting. Google Cloud Print Menu item Description Registration Register Register the printer to the Google Cloud server. Options Enable Google Cloud Print Off On* Print directly from - Lexmark CX924 | Menus Guide - Page 83
Protocol (IPP) B/W Print Color Print Administrative Menus Control access to the printer menus. Security Menu Network/Ports Menu Paper Menu Reports Menu Function Configuration Panel Lock Import / Export All Settings Out of Service Erase Control access to the printer management options. - Lexmark CX924 | Menus Guide - Page 84
Management Apps Admin Control group or user access to the printer functions, applications, and security settings. Add User User Name/Password User Name Password PIN Create local accounts to manage access to the printer functions. User Name/Password Accounts Add User User Name Accounts Add User - Lexmark CX924 | Menus Guide - Page 85
(514*) Remote Syslog Method Normal UDP* Stunnel Specify a syslog method to transmit logged events to a remote server. Note: An asterisk (*) next to a value indicates the factory default setting. - Lexmark CX924 | Menus Guide - Page 86
Use 5 (local5) 22 ‑ Local Use 6 (local6) 23 ‑ Local Use 7 (local7) Specify a facility code that the printer uses when sending log events to a remote server. Severity of Events to Log 0 ‑ Emergency 1 ‑ Alert 2 ‑ Critical Note: An asterisk (*) next to a value indicates the factory default setting. - Lexmark CX924 | Menus Guide - Page 87
audit logs. Export Log Syslog (RFC 5424) Syslog (RFC 3164) CSV Export a security log to a flash drive. Note: An asterisk (*) next to a value indicates the factory default setting. - Lexmark CX924 | Menus Guide - Page 88
10*) Note: An asterisk (*) next to a value indicates the factory default setting. Confidential Print Setup Menu item Description Max Invalid PIN 2- 1 Hour 4 Hours 24 Hours 1 Week Set the expiration time that the printer prints a copy for the user to examine its quality, before printing the - Lexmark CX924 | Menus Guide - Page 89
to hold all print jobs. Off* On Note: An asterisk (*) next to a value indicates the factory default setting. Disk Encryption Note: This menu appears only when a printer hard disk is installed. Menu item Description Status Enabled Disabled Determine whether Disk Encryption is enabled. Start - Lexmark CX924 | Menus Guide - Page 90
of LDAP certificates. Mobile Services Management Use AirPrint Print Scan reset has no effect on the printer security configuration. Minimum Password Length 0-32 (0*) Specify the minimum characters that are allowed for a password. Note: An asterisk (*) next to a value indicates the factory default - Lexmark CX924 | Menus Guide - Page 91
Asset Report Description Print a report that contains information about the printer. Print a report about printer usage and supply status. Print a list of profiles that are stored in the printer. Print a report that contains the printer serial number and model name. Print Menu item Print Fonts PCL - Lexmark CX924 | Menus Guide - Page 92
item appears only when Enable Job Log is set to On. Description Print a page that shows the configured network and wireless settings on the printer. Note: This menu item appears only in network - Lexmark CX924 | Menus Guide - Page 93
Quality Guide Connection Guide Copy Guide E‑mail Guide Fax Guide Scan Guide Information Guide Media Guide Moving Guide Print Quality Guide Supplies Guide 93 Description Prints all the guides Provides information about solving color quality issues Provides information about connecting the printer - Lexmark CX924 | Menus Guide - Page 94
Troubleshooting 94 Troubleshooting Troubleshooting Menu item Print Quality Test Pages Description Print sample pages to identify and correct print quality defects. - Lexmark CX924 | Menus Guide - Page 95
90 Mobile Services Management 90 Network 92 Network Overview 71 Notifications 11 Out of Service Erase 20 Troubleshooting 94 Universal Setup 33 USB 81 Web Link Setup 58 XPS 27 menu map 7 menus About this Printer 20 Disk Encryption 89 Information Sent to Lexmark 14 Restore Factory Defaults
-
 1
1 -
 2
2 -
 3
3 -
 4
4 -
 5
5 -
 6
6 -
 7
7 -
8
-
9
-
10
-
11
-
12
-
13
-
14
-
15
-
16
-
17
-
18
-
19
-
20
-
21
-
22
-
23
-
24
-
25
-
26
-
27
-
28
-
29
-
30
-
31
-
32
-
33
-
34
-
35
-
36
-
37
-
38
-
39
-
40
-
41
-
42
-
43
-
44
-
45
-
46
-
47
-
48
-
49
-
50
-
51
-
52
-
53
-
54
-
55
-
56
-
57
-
58
-
59
-
60
-
61
-
62
-
63
-
64
-
65
-
66
-
67
-
68
-
69
-
70
-
71
-
72
-
73
-
74
-
75
-
76
-
77
-
78
-
79
-
80
-
81
-
82
-
83
-
84
-
85
-
86
-
87
-
88
-
89
-
90
-
91
-
92
-
93
-
94
-
95
 |
 |
Menus Guide
August 2017
www.lexmark.com