Lexmark Color Laser Clearing Jams Sheet
Lexmark Color Laser Manual
 |
View all Lexmark Color Laser manuals
Add to My Manuals
Save this manual to your list of manuals |
Lexmark Color Laser manual content summary:
- Lexmark Color Laser | Clearing Jams Sheet - Page 1
printer covers, doors, and trays are closed, and then press Go to resume printing. Area A 1 If you are using the multipurpose feeder, release the levers on each side of the feeder to open it flat. Area C 1 If you have one fuser area) 201 Paper Jam 202 Paper Jam Area J Duplex tray into the tray. b - Lexmark Color Laser | Clearing Jams Sheet - Page 2
transfer unit, mailbox, or output expander jams. Clearing finisher jams (Areas 1-6) Refer to the Finisher Setup & User's Guide for instructions on clearing finisher jams. 2 Reinstall the duplex mechanism in the printer. 2 Remove any jams, and then close the door. If you still need help 1 Turn the
-
 1
1 -
 2
2
 |
 |
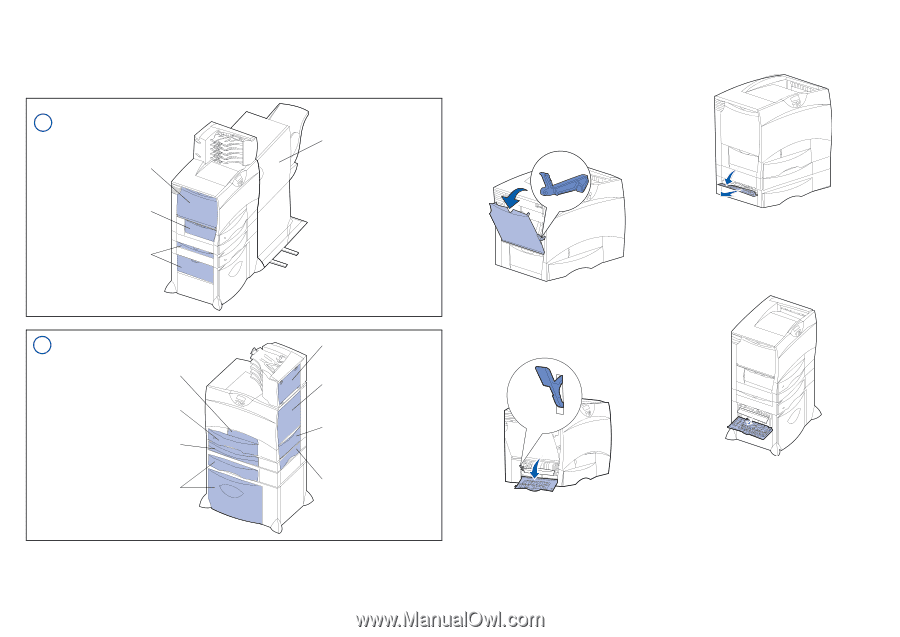
Clearing Jams
Access doors and trays
The following illustrations show areas in the printer where jams can
occur.
Area A
Multipurpose feeder
200 Paper Jam
250 Paper Jam
Area B
Left access door (beside Tray 1)
200 Paper Jam
Area C
Paper input options:
500-sheet drawer or 2000-sheet drawer
24<x> Paper Jam
1
Areas 1–6
Finisher
28<x> Paper Jam
Area M
Mailbox or output expander
27<x> Paper Jam
Area L
Upper right access door (redrive area)
201 Paper Jam
202 Paper Jam
Area K
Lower right access door (fuser area)
201 Paper Jam
202 Paper Jam
Area J
Duplex tray
230 Paper Jam
Area D
Front access door
201 Paper Jam
Area T1
Standard tray (Tray 1)
200 Paper Jam
Area E
Duplex mechanism
230 Paper Jam
2
Area T<x>
Paper input options:
500-sheet drawer or 2000-sheet drawer
24<x> Paper Jam
P/N 15G1996
© 2003 Lexmark International, Inc.
Printed in China
E.C. 3G0049
All rights reserved.
6/03
Clearing the entire paper path
When a paper jam occurs, the printer stops operating and
displays
2<xx> Paper Jam
and a message to clear certain
printer areas.
After you have cleared the following areas, make sure all
printer covers, doors, and trays are closed, and then press
Go
to resume printing.
Area A
1
If you are using the multipurpose feeder, release the
levers on each side of the feeder to open it flat.
2
Remove any jams and return the feeder to its working
position.
Area B
1
Open the left access door.
2
Pull down the lever until it stops.
3
Remove the jam.
4
Return the lever to its upright position.
5
Close the door.
Area C
1
If you have one or more optional 500-sheet drawers:
a
Open the 500-sheet drawer access door. Hold the
door down while removing jams.
Note:
Make sure the entire paper stack is loaded
correctly and pushed all the way down into
the tray.
b
Close the door.
2
If you have an optional 2000-sheet drawer:
a
Open the 2000-sheet drawer access door. Pull the
jam down and out of the rollers.
b
Close the door.