Lexmark E238 Quick Reference
Lexmark E238 Manual
 |
View all Lexmark E238 manuals
Add to My Manuals
Save this manual to your list of manuals |
Lexmark E238 manual content summary:
- Lexmark E238 | Quick Reference - Page 1
for instructions. 2 guides. 3 Adjust the paper guides to the print media width. 4 Hold both sides of the print media close to the manual feeder and push it into the printer Printer, or Setup, depending on the application) to view the printer driver Lexmark International, Inc., All rights reserved. P/N - Lexmark E238 | Quick Reference - Page 2
stop) Unsupported print cartridge Change cartridge invalid refill Cartridge region mismatch Cancel job / Reset printer Service error Printer error * Paper jam printer error * Paper jam at the input sensor † Paper jam in the manual feeder Paper jam under the toner cartridge Paper jam as a printed
-
 1
1 -
 2
2
 |
 |

Quick Reference
Loading paper or other print media
To help prevent jams:
•
Flex all stacks of print media back and forth to loosen them, and
then fan them before loading. Do not fold or crease the print
media. Straighten the edges of the stack on a level surface.
•
Do not exceed the maximum stack height.
•
Never mix media types within a tray.
Loading the 250-sheet or 550-sheet tray
1
Remove the tray.
Note:
If you are going to load legal or folio size paper, you
have to extend the length of the paper tray. See
”Extending the tray for legal or folio size paper” for
instructions.
2
Prepare a stack of paper for loading by flexing or fanning it back
and forth. Straighten the edges on a level surface.
3
Load the paper in the tray with the print side facing down.
Note:
Load letterhead paper with the design side facing
down. The top edge of the sheet with the logo should
be placed at the front of the tray.
Make sure the paper is below the maximum fill lines on the side
guides. Overloading may cause jams.
4
Slide the two side guides and the back guide until they fit snugly
against the stack of paper.
5
Insert the tray.
Extending the tray for legal or folio size paper
1
Press down on the pressure point at the back of the tray.
2
Expand the tray until the extender locks into place.
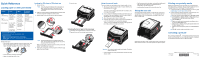
Using the manual feeder
The manual feeder can only feed one sheet of print media at a time.
1
Send your print job to the printer (see to the
User’s Reference
on
the publications CD for help).
The printer Load Paper
light blinks when it is ready for the
print media to be loaded.
2
Place a sheet of the selected print media, print side facing up, at
the center of the manual feeder, but only to the point where its
leading edge can contact the paper guides.
3
Adjust the paper guides to the print media width.
4
Hold both sides of the print media close to the manual feeder and
push it into the printer until it automatically engages.
There is a brief pause between the time the printer engages the
print media and when it feeds into the printer.
Warning:
Do not force the print media into the feeder. Forcing the
media causes jams.
•
Insert envelopes with the flap side face down and with the stamp
area as shown.
•
Hold transparencies by the edges, and avoid touching the print
side. Oils from your fingers that are deposited on the
transparency can affect print quality.
•
Load letterhead face-up, with the top of the sheet first.
Using the rear exit
The single-sheet rear exit provides a straight-through paper path to
help reduce curling and potential jams. This is especially useful for
specialty media, such as transparencies, envelopes, labels, card
stock, or index cards.
When the rear exit door is open, all print media comes out the rear exit.
When closed, all media is sent to the output bin on top of the printer.
Printing on specialty media
Follow these instructions to print on media such as transparencies,
card stock, labels, or envelopes. The type of print media you want to
use determines which tray or feeder it should be fed from.
1
Load the print media as specified for the tray you are using. See
Loading paper or other print media
for help.
2
From the computer software application, set the paper type, size,
and source according to the media you loaded.
a
From the computer software application, select
File
ニ
Print
.
b
Click
Properties
(or
Options
,
Printer
, or
Setup
, depending on
the application) to view the printer driver settings.
c
Click the
Paper
tab.
d
Select your media type (transparencies, envelopes, and so
on) from the
Form Type
list box.
e
Select the tray or feeder containing the specialty media from
the
Form Source
list box.
f
Select the size of the specialty media from the
Form Size
list
box.
g
Click
OK
, and then send your print job as usual.
Canceling a print job
Press and release
Cancel
on the printer operator panel to cancel
the job currently printing. The Cancel job light sequence is displayed
on the operator panel while the job is being canceled.
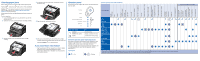
Source
Sizes
Types
Capacity
1
(sheets)
Tray 1
(250-sheet tray)
A4, A5, JIS B5,
letter, legal,
executive, folio,
statement,
Universal
2
Plain paper,
paper labels,
transparencies
250 paper;
50 labels;
50 transparencies
Tray 2*
(550-sheet tray)
Plain paper,
paper labels,
transparencies
550 paper;
50 labels;
50 transparencies
Manual feeder
A4, A5, JIS B5,
letter, legal,
executive, folio,
statement,
Universal
2
Plain paper,
paper labels,
transparencies,
card stock
1
7¾, 9, 10, DL,
C5, B5, other
Envelopes
* Tray 2 not available on all models.
1
Capacity for 20 lb print media, unless otherwise noted.
2
Universal size ranges:
–
Tray 1
: 89–216 x 210–356 mm (3.5–8.5 x 8.27–14.0 in.)
–
Tray 2
: 148–216 x 210–356 mm (5.83–8.5 x 8.27–14.0 in.)
–
Manual feeder
: 76–216 x 127–356 mm (3.0–8.5 x 5.0–14.0 in.) (includes
3 x 5 in. cards)
© 2005 Lexmark International, Inc., All rights reserved.
P/N 28S1821
E.C. 28S014
*28S1821*
Printed in China
6/05