Lexmark E250DN Quick Reference
Lexmark E250DN - Govt Laser 30PPM Special Build Mono Taa Manual
 |
UPC - 734646062992
View all Lexmark E250DN manuals
Add to My Manuals
Save this manual to your list of manuals |
Lexmark E250DN manual content summary:
- Lexmark E250DN | Quick Reference - Page 1
Quick Reference Printer Overview 7 6 5 4 1 1 150-sheet output bin 2 250-sheet tray 3 550-sheet drawer (optional) 4 Manual feeder 5 Front door 6 Control panel 7 Paper support 2 3 1 2 3 4 5 6 7 1 Rear exit 2 Power button 3 Power cord connect 4 Dust cover (not available for some models) 5 USB - Lexmark E250DN | Quick Reference - Page 2
5 7 6 1 Error 5 Ready 2 Paper Jam 6 Cancel button 3 Load Paper 7 Continue button 4 Toner Low / Replace PC Kit Following a common error light sequence: • Press and release Continue to resume printing. until all of the lights come on to reset the printer. Overview of the control panel 2 - Lexmark E250DN | Quick Reference - Page 3
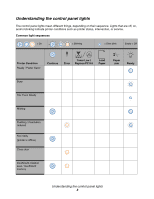
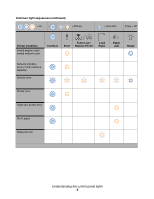
. Lights that are off, on, and/or blinking indicate printer conditions such as printer status, intervention, or service. Common light sequences = On = Blinking = Slow blink Empty = Off Printer Condition Ready / Power Saver Continue Toner Low / Error Replace PC Kit Load Paper Paper Jam - Lexmark E250DN | Quick Reference - Page 4
Replace PC Kit Load Paper Paper Jam Ready Cancel job/ Reset printer Load print media Load manual feeder Toner low Toner cartridge region mismatch Photoconductor kit life warning Replace photoconductor (printer hard stop) Programming engine code/ Programming system code Understanding the - Lexmark E250DN | Quick Reference - Page 5
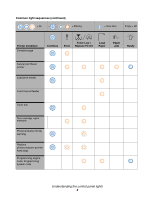
Condition Invalid engine code / Invalid network code Continue Toner Low / Error Replace PC Kit Load Paper Paper Jam Ready Network interface errors / Host interface disabled Service error Printer error Paper jam printer error Short paper Output bin full Understanding the control panel - Lexmark E250DN | Quick Reference - Page 6
Cancel. 7 Press Continue until the control panel cycles through all the lights. The Load Paper, Toner Low / Replace PC Kit, Ready and Continue lights appear. 8 Release the Continue button. 9 Turn the printer off and back on. Factory defaults have been reset. Printing the menu settings and network - Lexmark E250DN | Quick Reference - Page 7
, select Start Æ All Programs Æ Lexmark Æ Local Printer Settings Utility. If you selected the Custom install path from your drivers CD, you must go back to your drivers CD and click View Documentation for instructions on installing and using the Local Printer Settings Utility. You can change the - Lexmark E250DN | Quick Reference - Page 8
What types of print media can be loaded? Get the most from your printer by properly loading the trays. Never mix media types within a tray. Source 250-sheet tray 550-sheet drawer Manual feeder Sizes A4, A5, A6 (grain long only), JIS B5, letter, legal, executive, folio, statement A4, A5, JIS B5, - Lexmark E250DN | Quick Reference - Page 9
printer? Your printer has two standard paper sources: a 250-sheet tray and a single-sheet manual feeder. Use the 250-sheet tray for most print jobs. Use the manual card stock, or index cards. Loading the 250-sheet tray Follow these instructions to load paper in the 250-sheet tray. 1 Remove the 250- - Lexmark E250DN | Quick Reference - Page 10
the print media size you will be loading. Note: There should be a slight gap between the rear paper guide and the paper stack. 4 Insert the paper stack with the print side facing down. Note: Make sure the paper stack is laying flat in the - Lexmark E250DN | Quick Reference - Page 11
5 Adjust the side paper guides to fit lightly against the paper stack. 6 Insert the 250-sheet tray. 7 Extend the paper support on the output bin. Loading the 250-sheet tray 11 - Lexmark E250DN | Quick Reference - Page 12
-size paper To load legal- or folio-size paper, extend the tray. You may also attach a dust cover (if available on your printer model) on the back of the printer to protect the tray while it is extended. 1 Press down on the latch at the back of the tray, and expand the - Lexmark E250DN | Quick Reference - Page 13
paper jams and print-quality problems. To load the manual feeder: 1 Place a sheet of the selected print media, print side facing up, at the center of the manual feeder, but only to the point where its leading edge can contact the paper guides. Otherwise, the printer will engage the print media - Lexmark E250DN | Quick Reference - Page 14
door is open, all print media comes out the rear exit. When closed, all media is sent to the output bin on top of the printer. Note: If you print a multiple-page job with the rear exit door open, the print speed may slow down. Canceling a print job A print job can - Lexmark E250DN | Quick Reference - Page 15
job from a computer running Mac OS 9 When you send a job to print, the printer icon for your selected printer appears on the desktop. 1 Double-click the printer icon on your desktop. A list of print jobs appears in the printer window. 2 Select the print job you want to cancel. 3 Click the trash can - Lexmark E250DN | Quick Reference - Page 16
stops and the control panel Paper Jam and Continue lights come on. For more information, see the Software and Documentation CD that came with your printer. We recommend clearing the entire paper path when a paper jam occurs. 1 Remove all paper from the 150-sheet output bin. 2 If you are feeding - Lexmark E250DN | Quick Reference - Page 17
4 With the tray removed, press down on the green duplex flap to remove the jammed pages from the duplex area. 5 Install the 250-sheet tray. 6 Open the front door, and remove the print cartridge assembly. 1 2 3 Clearing jams 17 - Lexmark E250DN | Quick Reference - Page 18
be hot. 8 Open the rear exit door, and remove the jammed pages. 9 After you have cleared the jammed pages, reinstall the print cartridge assembly, and securely close all the printer doors. 10 Press Continue to resume printing. Note: Jam recovery is set to Auto by default. When jam recovery is set to
-
 1
1 -
 2
2 -
 3
3 -
 4
4 -
 5
5 -
 6
6 -
 7
7 -
8
-
9
-
10
-
11
-
12
-
13
-
14
-
15
-
16
-
17
-
18
 |
 |

Quick Reference
1
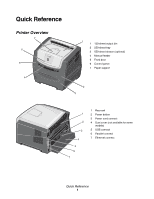
Quick Reference
Printer Overview
1
2
3
4
5
6
7
1
150-sheet output bin
2
250-sheet tray
3
550-sheet drawer (optional)
4
Manual feeder
5
Front door
6
Control panel
7
Paper support
1
2
3
6
7
5
4
1
Rear exit
2
Power button
3
Power cord connect
4
Dust cover (not available for some
models)
5
USB connect
6
Parallel connect
7
Ethernet connect