Lexmark E320 Quick Reference Guide
Lexmark E320 - Printer - B/W Manual
 |
UPC - 734646511162
View all Lexmark E320 manuals
Add to My Manuals
Save this manual to your list of manuals |
Lexmark E320 manual content summary:
- Lexmark E320 | Quick Reference Guide - Page 1
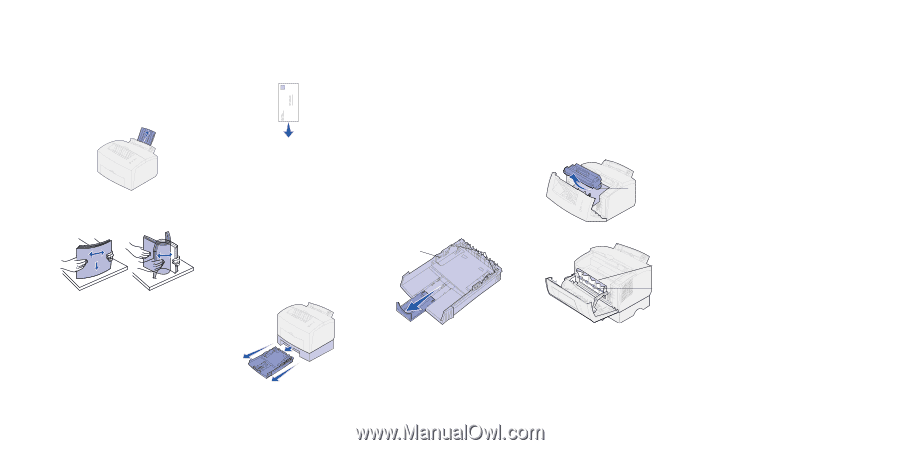
Lexmark™ E320/E322 Quick Reference Loading tray 1 1 Extend the rear paper support until you hear a click. 2 Flex the sheets back and forth to loosen them, then fan them. Straighten the edges on a level surface. Note: Not flexing and fanning the paper may cause paper feed problems and jams. 3 Load: • - Lexmark E320 | Quick Reference Guide - Page 2
press to display the secondary error code. Refer to the Lexmark Publications CD to resolve the problem. The printer is out of media, or the media did not feed properly. The printer prompts you to load a single sheet of media in the manual feed. Push the operator panel button to print the page
-
 1
1 -
 2
2
 |
 |
Lexmark™ E320/E322
Quick Reference
Loading tray 1
1
Extend the rear paper support until you
hear a click.
2
Flex the sheets back and forth to loosen
them, then fan them. Straighten the
edges on a level surface.
Note:
Not flexing and fanning the paper may
cause paper feed problems and jams.
3
Load:
•
letterhead paper with the top of the
page pointing down, facing you.
•
envelopes in the center of the tray.
Load them vertically, flap side down,
with the stamp area in the top left
corner.
4
Extend the front paper support on the
paper output bin.
5
Slide the paper guides flush against the
edges of the media.
6
Open the front output door if you’re
printing on special media.
7
Choose the paper size and type from
your software application.
8
Start your print job.
Loading the optional
tray 2
Grasp the tabs on either side of the tray and
pull it completely out of the printer.
1
If loading:
•
letterhead paper, insert letterhead
face down with the top of the page
entering the printer first.
•
A4 or legal size paper, extend the
paper support.
2
Make sure the metal plate is pressed
down before inserting it into the printer.
Note:
After the tray is inserted, the metal plate
springs back up so the paper can feed
into the printer.
3
Do not exceed the stack height indicator;
overfilling the tray may cause jams.
4
Slide the paper guides against the edges
of the paper.
5
Make sure the paper is under both
corner bucklers and is flat in the tray.
6
Reinstall the tray, making sure the tray is
pushed all the way in.
7
Select the paper size and type from your
software application.
8
Start your print job.
Clearing jams
The Paper Jam light prompts you to clear the
paper path.
1
Open the printer cover.
2
Remove the print cartridge (it may be
warm) and cover it.
Note:
Exposing the photoconductor to light
may damage the print cartridge.
3
Gently pull out the media.
Caution!
The fuser may be hot!
4
If the media is jammed tightly behind the
roller, or if you can’t get a grip on it, close
the cover, open the front output door,
and pull out the paper.
5
Make sure there is no more media in the
printer.
6
Reinstall the print cartridge.
7
Close the printer cover to resume
printing.
If the jam occurs as it exits tray 2 into the
printer:
1
Open the printer cover.
2
Remove the print cartridge (the print
cartridge may be warm).
3
Gently pull the paper toward you.
4
Reinstall the print cartridge.
5
Close the printer cover to resume
printing.
If you cannot reach the paper easily:
1
Turn off the printer. (You will lose the rest
of the print job.)
2
Lift the printer off the 250-sheet drawer.
3
Remove the paper.
4
Reinstall the drawer.
5
Turn on the printer.
6
Resend your print job.
If the jam occurs just after the paper feeds
from tray 2:
1
Pull the tray all the way out.
2
Gently pull the paper toward you.
3
Reinstall the tray to resume printing.
Stack height
indicator
Corner
bucklers
Photoconductor
Fuser
Roller