Lexmark E360d Quick Reference
Lexmark E360d Manual
 |
View all Lexmark E360d manuals
Add to My Manuals
Save this manual to your list of manuals |
Lexmark E360d manual content summary:
- Lexmark E360d | Quick Reference - Page 1
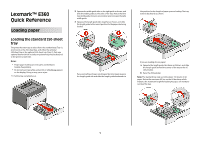
Lexmark™ E360 Quick Reference Loading paper Loading the standard 250-sheet tray The printer has two trays to select from: the standard tray (Tray 1), also known as the 250-sheet tray, and either the optional 250-sheet tray or the optional 550-sheet tray (Tray 2). Only one optional drawer (which - Lexmark E360d | Quick Reference - Page 2
for the tray from the printer control panel. For more information, see "Setting the Paper Size and Paper Type" on page 5. Note: The difference between the standard 250-sheet tray and the optional 250- and 550-sheet trays is that the standard tray accommodates A6-size paper, so the width guides slide - Lexmark E360d | Quick Reference - Page 3
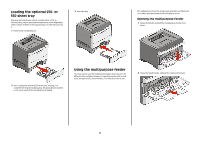
250-sheet tray" on page 1 to complete the steps for loading a tray. An optional tray is loaded in the same way that the standard tray is loaded. Using the multipurpose feeder You may want to use the multipurpose feeder when you print on different sizes and types of papers or specialty media - Lexmark E360d | Quick Reference - Page 4
the multipurpose feeder. Overfilling may cause jams. • Do not exceed the maximum stack height by forcing paper or specialty media under the stack height limiters which are located on the guides. • Hold transparencies by the edges, and then fan them. Straighten the edges on a level surface. Note - Lexmark E360d | Quick Reference - Page 5
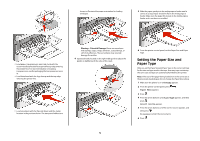
width guide to adjust the guides to lightly touch the sides of the stack. 6 From the printer control panel, set the Paper Size and Paper Type. Setting the Paper Size and Paper Type After you set the Paper Size and Paper Type to the correct settings for the size and type used in the trays, then - Lexmark E360d | Quick Reference - Page 6
kit The printer automatically notifies you before the photoconductor kit reaches a page maximum by showing 84 PC Kit life warning or 84 Replace PC Kit on the display. You can also see the status of the photoconductor kit by printing a menu settings page. When 84 PC Kit life warning or 84 Replace PC - Lexmark E360d | Quick Reference - Page 7
the toner cartridge into the photoconductor kit by aligning the rollers on the toner cartridge with the tracks. Push the toner cartridge until it clicks into place. 7 After you replace the photoconductor kit, reset the photoconductor counter. To reset the counter, see the instruction sheet that - Lexmark E360d | Quick Reference - Page 8
5 Install the new toner cartridge by aligning the rollers on the toner cartridge with the arrows on the tracks of the photoconductor kit. Push the toner cartridge in as far as it will go. The cartridge clicks into place when correctly installed. Cleaning the exterior of the printer 1 Make sure that
-
 1
1 -
 2
2 -
 3
3 -
 4
4 -
 5
5 -
 6
6 -
 7
7 -
8
 |
 |

Lexmark™ E360
Quick Reference
Loading paper
Loading the standard 250-sheet
tray
The printer has two trays to select from: the standard tray (Tray 1),
also known as the 250-sheet tray, and either the optional
250-sheet tray or the optional 550-sheet tray (Tray 2). Only one
optional drawer (which includes an optional tray) may be attached
to the printer at one time.
Notes:
•
Proper paper loading prevents jams and facilitates
trouble-free printing.
•
Do not remove trays while a job prints or while
Busy
appears
on the display. Doing so may cause a jam.
1
Pull the tray completely out.
2
Squeeze the width guide tabs on the right guide as shown, and
slide the width guides to the sides of the tray. Notice that the
two width guides move in unison when you move just the right
width guide.
3
Squeeze the length guide tabs together as shown, and slide
the length guide to the correct position for the paper size being
loaded.
If you are loading a longer size of paper like A4 or legal, squeeze
the length guide tab and slide the length guide backwards to
the position for the length of paper you are loading. The tray
extends backwards as shown.
If you are loading A6-size paper:
a
Squeeze the length guide tab shown as follows, and slide
the length guide toward the center of the tray to the A5
size position.
b
Raise the A6 backstop.
Note:
The standard tray only accommodates 150 sheets of A6
paper. Notice the maximum fill line on the A6 backstop which
indicates the maximum height for loading A6 paper. Do not try to
overload the tray.
1