Lexmark E360d Service Manual - Page 65
Diagnostic aids, Accessing service menus, Printing menus
 |
View all Lexmark E360d manuals
Add to My Manuals
Save this manual to your list of manuals |
Page 65 highlights
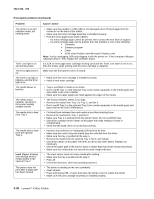
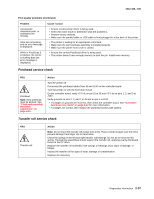
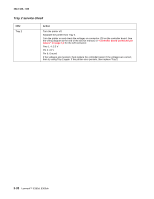
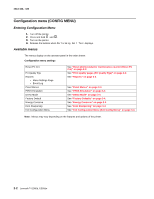
3. Diagnostic aids 4513-420, -430 Accessing service menus There are two different test menus that can be accessed during POR to identify problems with the printer. Configuration Menu Diagnostics Mode 1. Turn off the printer. 2. Press and hold and . 3. Turn on the printer. 4. Release the buttons when Performing Self Test displays. 5. The message CONFIG MENU displays on the top line of the operator panel. 1. Turn off the printer. 2. Press and hold and . 3. Turn on the printer. 4. Release the buttons when Performing Self Test displays. The Configuration menu group contains a set of menus, settings, and operations which are infrequently required by a user. Generally, the options made available in this menu group are used to configure a printer for operation. See "Available menus" on page 3-2. The Diagnostic menu group contains the settings and operations used while manufacturing and servicing the printer. See "Menus may vary depending on the features and options of the printer." on page 3-5. Printing menus To print a listing of the states and settings of the printer: 1. At the Ready prompt, press under Menu until Utilities appears. 2. Press . 3. Press until Print Menus appears. 4. Press . Diagnostic aids 3-1
-
 1
1 -
2
-
3
-
4
-
5
-
6
-
7
-
8
-
9
-
10
-
11
-
12
-
13
-
14
-
15
-
16
-
17
-
18
-
19
-
20
-
21
-
22
-
23
-
24
-
25
-
26
-
27
-
28
-
29
-
30
-
31
-
32
-
33
-
34
-
35
-
36
-
37
-
38
-
39
-
40
-
41
-
42
-
43
-
44
-
45
-
46
-
47
-
48
-
49
-
50
-
51
-
52
-
53
-
54
-
55
-
56
-
57
-
58
-
59
-
 60
60 -
 61
61 -
 62
62 -
 63
63 -
 64
64 -
 65
65 -
 66
66 -
 67
67 -
 68
68 -
 69
69 -
 70
70 -
71
-
72
-
73
-
74
-
75
-
76
-
77
-
78
-
79
-
80
-
81
-
82
-
83
-
84
-
85
-
86
-
87
-
88
-
89
-
90
-
91
-
92
-
93
-
94
-
95
-
96
-
97
-
98
-
99
-
100
-
101
-
102
-
103
-
104
-
105
-
106
-
107
-
108
-
109
-
110
-
111
-
112
-
113
-
114
-
115
-
116
-
117
-
118
-
119
-
120
-
121
-
122
-
123
-
124
-
125
-
126
-
127
-
128
-
129
-
130
-
131
-
132
-
133
-
134
-
135
-
136
-
137
-
138
-
139
-
140
-
141
-
142
-
143
-
144
-
145
-
146
-
147
-
148
-
149
-
150
-
151
-
152
-
153
-
154
-
155
-
156
-
157
-
158
-
159
-
160
-
161
-
162
-
163
-
164
-
165
-
166
-
167
-
168
-
169
-
170
 |
 |