Lexmark E360d Service Manual - Page 69
Diagnostics menu, Entering Diagnostics menu, Available tests
 |
View all Lexmark E360d manuals
Add to My Manuals
Save this manual to your list of manuals |
Page 69 highlights
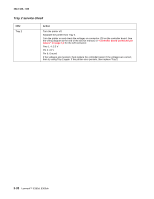
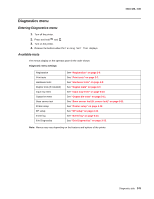
4513-420, -430 Diagnostics menu Entering Diagnostics menu 1. Turn off the printer. 2. Press and hold and . 3. Turn on the printer. 4. Release the buttons when Performing Self Test displays. Available tests The menus display on the operator panel in the order shown: Diagnostic menu settings Registration Print tests Hardware tests Duplex tests (if installed) Input tray tests Output bin tests Base sensor test Printer setup EP setup Event log Exit Diagnostics See "Registration" on page 3-6. See "Print tests" on page 3-7. See "Hardware tests" on page 3-8. See "Duplex tests" on page 3-9. See "Input tray tests" on page 3-10. See "Output bin tests" on page 3-11. See "Base sensor test (B. sensor test)" on page 3-11. See "Printer setup" on page 3-12. See "EP setup" on page 3-13. See "Event log" on page 3-14. See "Exit Diagnostics" on page 3-15. Note: Menus may vary depending on the features and options of the printer. Diagnostic aids 3-5
-
 1
1 -
2
-
3
-
4
-
5
-
6
-
7
-
8
-
9
-
10
-
11
-
12
-
13
-
14
-
15
-
16
-
17
-
18
-
19
-
20
-
21
-
22
-
23
-
24
-
25
-
26
-
27
-
28
-
29
-
30
-
31
-
32
-
33
-
34
-
35
-
36
-
37
-
38
-
39
-
40
-
41
-
42
-
43
-
44
-
45
-
46
-
47
-
48
-
49
-
50
-
51
-
52
-
53
-
54
-
55
-
56
-
57
-
58
-
59
-
60
-
61
-
62
-
63
-
 64
64 -
 65
65 -
 66
66 -
 67
67 -
 68
68 -
 69
69 -
 70
70 -
 71
71 -
 72
72 -
 73
73 -
 74
74 -
75
-
76
-
77
-
78
-
79
-
80
-
81
-
82
-
83
-
84
-
85
-
86
-
87
-
88
-
89
-
90
-
91
-
92
-
93
-
94
-
95
-
96
-
97
-
98
-
99
-
100
-
101
-
102
-
103
-
104
-
105
-
106
-
107
-
108
-
109
-
110
-
111
-
112
-
113
-
114
-
115
-
116
-
117
-
118
-
119
-
120
-
121
-
122
-
123
-
124
-
125
-
126
-
127
-
128
-
129
-
130
-
131
-
132
-
133
-
134
-
135
-
136
-
137
-
138
-
139
-
140
-
141
-
142
-
143
-
144
-
145
-
146
-
147
-
148
-
149
-
150
-
151
-
152
-
153
-
154
-
155
-
156
-
157
-
158
-
159
-
160
-
161
-
162
-
163
-
164
-
165
-
166
-
167
-
168
-
169
-
170
 |
 |