Lexmark E450DN User's Guide - Page 43
Maintenance kit, Scheduled Maintenance - replace
 |
View all Lexmark E450DN manuals
Add to My Manuals
Save this manual to your list of manuals |
Page 43 highlights
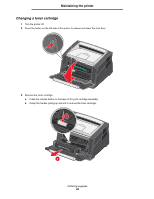
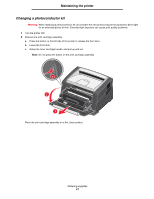
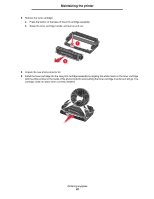
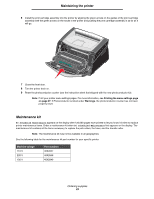
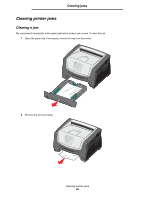
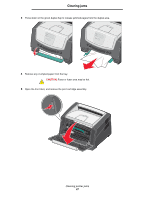
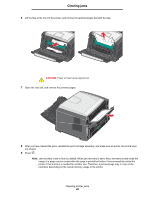
Maintaining the printer 6 Install the print cartridge assembly into the printer by aligning the green arrows on the guides of the print cartridge assembly with the green arrows on the tracks in the printer and pushing the print cartridge assembly in as far as it will go. 7 Close the front door. 8 Turn the printer back on. 9 Reset the photoconductor counter (see the instruction sheet that shipped with the new photoconductor kit). Note: Print your printer menu settings pages. For more information, see Printing the menu settings page on page 27. If Photoconductor is listed under Warnings, the photoconductor counter has not been properly reset. Maintenance kit 80 Scheduled Maintenance appears on the display after 120,000 pages have printed to let you know it is time to replace printer maintenance items. Order a maintenance kit when 80 Scheduled Maintenance first appears on the display. The maintenance kit contains all the items necessary to replace the pick rollers, the fuser, and the transfer roller. Note: The maintenance kit may not be available in all geographies. See the following table for the maintenance kit part number for your specific printer. Machine voltage 110 V 220 V 100 V Part numbers 40X2847 40X2848 40X2849 Ordering supplies 43
-
 1
1 -
2
-
3
-
4
-
5
-
6
-
7
-
8
-
9
-
10
-
11
-
12
-
13
-
14
-
15
-
16
-
17
-
18
-
19
-
20
-
21
-
22
-
23
-
24
-
25
-
26
-
27
-
28
-
29
-
30
-
31
-
32
-
33
-
34
-
35
-
36
-
37
-
 38
38 -
 39
39 -
 40
40 -
 41
41 -
 42
42 -
 43
43 -
 44
44 -
 45
45 -
 46
46 -
 47
47 -
 48
48 -
49
-
50
-
51
-
52
-
53
-
54
-
55
-
56
-
57
-
58
-
59
-
60
-
61
-
62
-
63
-
64
-
65
-
66
-
67
-
68
-
69
-
70
 |
 |
