Lexmark E460 IPDS Emulation User's Guide - Page 35
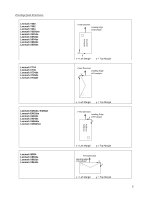
Examples of tray mapping, Tray Mapping 2, Tray 2, IPDS 0, Paper Size/Type, Paper Menu, Paper, Menu.
 |
View all Lexmark E460 manuals
Add to My Manuals
Save this manual to your list of manuals |
Page 35 highlights
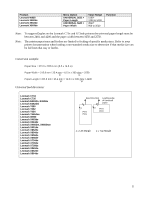
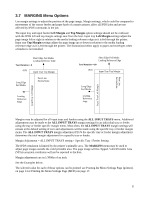
Important: For MAP INPUT TRAYS to work correctly, the Paper Size/Type for each printer input tray must be set differently in the printer's Paper Menu. See example 1 below. The only time you set the PAPER TYPE the same for more than one input tray is when you want to link the input trays involved. See example 2. Examples of tray mapping Example 1 - Making a higher capacity input tray the default tray You may want to use one of the higher capacity input trays for IPDS 0. To swap the IPDS tray selection number for Tray 1 and Tray 2, you will need to do the following: 1. Set Tray Mapping 2 for Tray 2 to IPDS 0. 2. Set Tray Mapping 1 for Tray 1 to IPDS 1. This will give you: Tray Mapping 1 = Tray Mapping 2 = IPDS 1 mapped to Tray 1 IPDS 0 mapped to Tray 2 Note: You must set the Paper Size/Type for the high capacity tray to a different value from all other trays. For instance, you could choose a different custom paper type. This setting is found in the printer's Paper Menu. Example 2 - Linking input trays To link multiple input trays as one big input tray, you need to make changes under the printer's Paper Menu. You need to set the same Paper Size/Type for each of the trays you want to link to the same value. For example, the host expects colored paper in Tray 1 and you want to link Tray 2 and Tray 3, which have plain paper. Do the following: Leave the MAP INPUT TRAYS at their defaults: Tray Mapping 1 = IPDS 0 mapped to Tray 1 Tray Mapping 2 = IPDS 1 mapped to Tray 2 Tray Mapping 3 = IPDS 2 mapped to Tray 3 Insert letter-size colored paper in Tray 1. Insert letter-size plain paper in Trays 2 and 3. The paper size is detected by the printer: Tray 1 Size = Letter Tray 2 Size = Letter Tray 3 Size = Letter Set the paper type for each tray. In this example, you would configure the three trays as follows: Tray 1 Type = Colored Paper Tray 2 Type = Plain Paper Tray 3 Type = Plain Paper The printer will feed paper from Tray 3 when Tray 2 is empty. 35
-
 1
1 -
2
-
3
-
4
-
5
-
6
-
7
-
8
-
9
-
10
-
11
-
12
-
13
-
14
-
15
-
16
-
17
-
18
-
19
-
20
-
21
-
22
-
23
-
24
-
25
-
26
-
27
-
28
-
29
-
 30
30 -
 31
31 -
 32
32 -
 33
33 -
 34
34 -
 35
35 -
 36
36 -
 37
37 -
 38
38 -
 39
39 -
 40
40 -
41
-
42
-
43
-
44
-
45
-
46
-
47
-
48
-
49
-
50
-
51
-
52
-
53
-
54
-
55
-
56
-
57
-
58
-
59
-
60
-
61
-
62
-
63
-
64
-
65
-
66
-
67
-
68
-
69
-
70
-
71
-
72
-
73
-
74
-
75
-
76
-
77
-
78
-
79
-
80
-
81
-
82
-
83
-
84
-
85
-
86
-
87
-
88
-
89
-
90
-
91
-
92
-
93
-
94
-
95
-
96
-
97
-
98
-
99
-
100
-
101
-
102
-
103
-
104
-
105
-
106
-
107
-
108
-
109
-
110
-
111
-
112
-
113
-
114
-
115
-
116
-
117
-
118
-
119
 |
 |