Lexmark E460 Printing guide
Lexmark E460 Manual
 |
View all Lexmark E460 manuals
Add to My Manuals
Save this manual to your list of manuals |
Lexmark E460 manual content summary:
- Lexmark E460 | Printing guide - Page 1
setting the Paper Size and Paper Type, and linking and unlinking trays. Loading trays 1 Pull the tray completely out. Note: Do not remove trays while a job prints or while Busy appears on the display. Doing so may cause a jam. 2 Squeeze and slide the guides to the correct position for the paper size - Lexmark E460 | Printing guide - Page 2
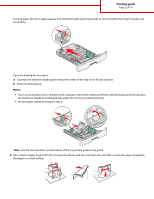
Page 2 of 10 For long paper like A4 or legal, squeeze and slide the length guide backwards to accommodate the length of paper you are loading. If you are loading A6-size paper: a Squeeze and slide the length guide toward the center of the tray to the A5 size position. b Raise the A6 backstop. Notes - Lexmark E460 | Printing guide - Page 3
the recommended print side facedown. Note: The maximum fill line on the width guide indicates the maximum height for loading paper. Do not load A6-size paper to the maximum fill line; the tray holds only 150 sheets of A6-size paper. 1 Maximum fill line Load letterhead with the top edge of the sheet - Lexmark E460 | Printing guide - Page 4
6 Insert the tray. Printing guide Page 4 of 10 7 If the paper type you loaded differs from the type that was previously loaded in the tray, then change the Paper Size/Type setting on the Paper menu. Using the multipurpose feeder You may want to use the multipurpose feeder when you print on - Lexmark E460 | Printing guide - Page 5
2 Grasp the raised handle, and pull the extension forward. Printing guide Page 5 of 10 3 Grasp the handle, and pull the extension so it flips forward. 4 Guide the extension down gently so the multipurpose feeder is extended fully and open. - Lexmark E460 | Printing guide - Page 6
tab located on the right width guide, and move the guides out fully. Printing guide Page 6 of 10 2 Prepare the paper or specialty media for loading. • Flex sheets of paper or paper labels helps them feed properly to avoid jams. Do not fold or crease envelopes. 3 Load the paper or specialty media. - Lexmark E460 | Printing guide - Page 7
may cause jams. • Do not exceed the maximum stack height by forcing paper or specialty media under the stack height limiters which are located on the guides. • Load paper, transparencies, and card stock with the recommended print side faceup and the top edge entering the printer first. For - Lexmark E460 | Printing guide - Page 8
, snaps, windows, coated linings, or self-stick adhesives. These envelopes may severely damage the printer. 4 Squeeze the tab located on the right width guide to adjust the guides to lightly touch the sides of the stack. 5 Slide the paper gently into the multipurpose feeder until it comes to a stop - Lexmark E460 | Printing guide - Page 9
for help if needed: • "Loading trays" on page 1 • "Using the multipurpose feeder" on page 4 2 From the printer control panel, set the Paper Type and Paper Size according to the specialty media you loaded. 3 From the computer software application, set the paper type, size, and source according to - Lexmark E460 | Printing guide - Page 10
> Page Setup. b From the Paper pop-up menu, choose a paper size or create a custom size to match the loaded paper. c Click OK. 2 Customize the settings as needed in the Print dialog: a With a document open, choose File > Print. b Select a Paper Source option, and then choose the tray loaded with
-
 1
1 -
 2
2 -
 3
3 -
 4
4 -
 5
5 -
 6
6 -
 7
7 -
8
-
9
-
10
 |
 |

Printing guide
This section explains how to load the 250-sheet tray, the 550-sheet tray, and the multipurpose feeder. It also includes
information about paper orientation, setting the Paper Size and Paper Type, and linking and unlinking trays.
Loading trays
1
Pull the tray completely out.
Note:
Do not remove trays while a job prints or while
Busy
appears on the display. Doing so may cause a jam.
2
Squeeze and slide the guides to the correct position for the paper size you are loading.
Printing guide
Page 1 of 10