Lexmark Forms Printer 2580 Quick Reference
Lexmark Forms Printer 2580 Manual
 |
View all Lexmark Forms Printer 2580 manuals
Add to My Manuals
Save this manual to your list of manuals |
Lexmark Forms Printer 2580 manual content summary:
- Lexmark Forms Printer 2580 | Quick Reference - Page 1
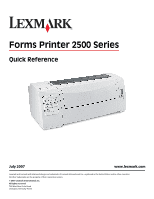
Forms Printer 2500 Series Quick Reference July 2007 www.lexmark.com Lexmark and Lexmark with diamond design are trademarks of Lexmark International, Inc., registered in the United States and/or other countries. All other trademarks are the property of their respective owners. © 2007 Lexmark - Lexmark Forms Printer 2580 | Quick Reference - Page 2
- Lexmark Forms Printer 2580 | Quick Reference - Page 3
in push mode 31 Setting Top-Of-Form for continuous forms in pull mode 32 Setting Top-Of-Form for a cut form or an envelope ...32 Setting Top-Of-Form in a macro ...33 Paper and specialty media guide 34 Paper types and sizes supported by the printer...34 Changing tractor positions 35 Push tractor - Lexmark Forms Printer 2580 | Quick Reference - Page 4
...41 Main menu options...41 Forms Macro options...42 Data options ...43 Control options...45 Emulation options ...46 Interface options...47 Maintaining the printer 48 Ordering supplies...48 Removing the ribbon cartridge...48 Cleaning the printer...48 Recycling Lexmark products...49 Contents 4 - Lexmark Forms Printer 2580 | Quick Reference - Page 5
the model you have chosen, your printer may look slightly different from the printer illustrated. Printer front view 1 2 A 3 8 7 6 5 4 Part name 1 Forms thickness lever 2 Ribbon access cover 3 Power switch 4 Paper select lever 5 Paper guides 6 Manual feeder 7 Front cover 8 Control panel - Lexmark Forms Printer 2580 | Quick Reference - Page 6
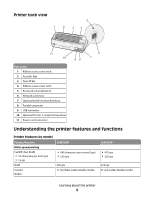
Printer back view 5 1 2 3 4 11 10 Part name 1 Ribbon access cover latch 2 Acoustic flap 3 Tear off bar 4 Ribbon access cover latch 5 Recessed network button 6 Network connector 7 Optional serial interface knockout 8 Parallel connector 9 USB connector 10 Optional Tractor 2 connector knockout 11 - Lexmark Forms Printer 2580 | Quick Reference - Page 7
Resolution of up to 360 x 360 dpi Note: This feature supports existing square inch (dpi) graphics programs. Multiple-part forms Prints original plus five copies (six-part Prints original plus three copies forms) (four-part forms) Feature/function Control panel Font lock Pitch lock All models - Lexmark Forms Printer 2580 | Quick Reference - Page 8
the potential that untrained operators may accidentally change forms settings Ribbon cartridge Contains the inked fabric ribbon Printer tests • Power-on Self Test • Printer test page-Determines whether your machine has print problems • Demonstration Print Box and line drawings Prints tables - Lexmark Forms Printer 2580 | Quick Reference - Page 9
. Allows the printer to work with all computers with compatible interface connections Both parallel and USB interfaces are standard. The internal serial interface (RS-232) is optional for the 2580/2581 and 2590/2591 models. The Network option is standard on the 2580n/2581n and 2590n/2591n models - Lexmark Forms Printer 2580 | Quick Reference - Page 10
Off, and taking the printer online/offline. • macro and change printer menu settings. to the next Top-Of-Form 3 Tractor Alternates between Form or unloads paper to a parked position 5 Font Selects one of the resident font styles Note: Repeatedly pressing the Font button cycles through the printer - Lexmark Forms Printer 2580 | Quick Reference - Page 11
printer operation. Feeds the paper downward in small incremental movements. Press and hold to select continuous feed. Sets the character pitch to: 10 cpi, 12 cpi, 15 cpi, 17 cpi, 20 cpi, or proportional spacing Notes: • On 2590/2591 models, you can also select 24 cpi. • Fast Draft supports only 10 - Lexmark Forms Printer 2580 | Quick Reference - Page 12
hold to select continuous feed. 7 Set TOF Sets the Top-Of-Form, which is the position of the first print line on the page Understanding Unload. One of the printer resident fonts is selected. Off A downloaded font is selected. Font Lock On Font Lock is active. Printer resident fonts are locked - Lexmark Forms Printer 2580 | Quick Reference - Page 13
You can also use the Load/Unload button to load continuous forms into the printer when the paper path is clear, or to change one type of pre-printed form to another. Locking and unlocking the control panel To restrict the use of printer functions to the Start/Stop, FormFeed, Tear Off, and Load/ - Lexmark Forms Printer 2580 | Quick Reference - Page 14
) sheet 2 Continuous forms 3 Envelope 4 Labels Setting the forms thickness lever Use the forms thickness lever to make adjustments for printing on various forms depending on the paper thickness. When setting this lever, see one of the following tables depending on your printer model: Loading paper - Lexmark Forms Printer 2580 | Quick Reference - Page 15
may cause poor print quality, depending on the paper used. • Printing speed becomes slower when the forms thickness lever setting is 4 or higher. Forms thickness for 2590/2591 Paper type Single forms (cut or continuous) Paper thickness Thin Normal Thick Paper weight 56 g/m2 (15 lb) 65 g/m2 - Lexmark Forms Printer 2580 | Quick Reference - Page 16
the front or the bottom of the printer. Front loading paper Bottom loading paper Using the Tear Off function Pressing the Tear Off button advances the perforation of a continuous form to the tear off position. You can set the Tear Off function to automatic or manual by adjusting the Auto Tear Off - Lexmark Forms Printer 2580 | Quick Reference - Page 17
remains at the current Tear Off position until you send another job to the printer. The paper moves from the Tear Off position to the Top-Of-Form and begins printing. Loading continuous paper Loading continuous forms using the push tractor You can load continuous paper utilizing four different paper - Lexmark Forms Printer 2580 | Quick Reference - Page 18
2 Make sure the paper path is clear. Note: If a cut form or envelope is loaded in the printer, press FormFeed to remove it. 3 Set the forms thickness lever to a setting corresponding with the paper thickness you are using. 4 Pull the front cover up. 5 Move the paper select lever down to the - Lexmark Forms Printer 2580 | Quick Reference - Page 19
printed on the rear plate. Note: The distance from the [A symbol to the left edge of the paper determines the width of the left margin. 10 Push the left tractor locking lever down to lock the tractor in place. 11 Remove slack from the paper, and then lock the right locking - Lexmark Forms Printer 2580 | Quick Reference - Page 20
paper loading instructions. 1 Turn the printer on. 2 Make sure the paper path is clear. Note: If a cut form or envelope is loaded in the printer, press FormFeed to remove it. 3 Set the forms thickness lever to a setting corresponding with the paper thickness you are using. 4 Remove the ribbon access - Lexmark Forms Printer 2580 | Quick Reference - Page 21
6 Pull the left and right tractor locking levers up to unlock the tractors. 7 Open the left and right tractor doors. 8 Open the front cover. 9 Insert paper into the front of the printer between the metal and plastic plates. Loading paper 21 - Lexmark Forms Printer 2580 | Quick Reference - Page 22
the paper path until it passes the printhead. 10 Close the front cover. 11 Place the paper holes over the tractor pins. If necessary, move the left or right tractor to adjust the tractors to the paper width. Note: If you have trouble moving the right tractor to the paper width, roll - Lexmark Forms Printer 2580 | Quick Reference - Page 23
lines (located on the platen) with the Top-Of-Form you want. 19 Press Set TOF to set the Top-Of-Form. Note: Top-Of-Form is not saved if the printer is turned off or runs out of paper when using 2 Feeder, see the documentation that came with the option for paper loading instructions. Loading paper 23 - Lexmark Forms Printer 2580 | Quick Reference - Page 24
1 Turn the printer on. 2 Make sure the paper path is clear. Note: If a cut form or envelope is loaded in the printer, press FormFeed to remove it. 3 Set the forms thickness lever to 7. 4 Move the paper select lever down to the position. Loading paper 24 - Lexmark Forms Printer 2580 | Quick Reference - Page 25
5 Remove the ribbon access cover. 6 Pull the left and right tractor locking levers up to unlock the tractors. Loading paper 25 - Lexmark Forms Printer 2580 | Quick Reference - Page 26
7 Open the left and right tractor doors. 8 Insert the paper through the bottom slot of the printer. Push or pull the paper through the paper path until it passes the printhead. 9 Place the paper holes over the tractor pins. Loading paper 26 - Lexmark Forms Printer 2580 | Quick Reference - Page 27
paper width. Note: If you have trouble moving the right tractor to the paper lock the right tractor. 10 Close the left and right tractor doors. 11 Replace the ribbon access cover. 12 Move the Form you want to use. 17 Press Set TOF to set the Top-Of-Form. Note: Top-Of-Form is not saved if the printer - Lexmark Forms Printer 2580 | Quick Reference - Page 28
are placed one at a time into the manual feeder. Loading a cut form or envelope manually Note: If you have installed the optional Auto Sheet Feeder or Tractor 2 Feeder, see the documentation that came with the option, for paper loading instructions. 1 Turn the printer on. 2 Make sure the paper path - Lexmark Forms Printer 2580 | Quick Reference - Page 29
the printed side up. 9 Move the right paper guide so the guide aligns with the right edge of the cut form or envelope. 1 2 3 A 1 Left paper guide 2 Cut form or envelope 3 Right paper guide 10 Insert the cut form or envelope into the printer until the Paper Out light stops blinking. Loading paper - Lexmark Forms Printer 2580 | Quick Reference - Page 30
position of the tractor unit. • For the purposes of these instructions, the tractor is shown in the push position with continuous paper. 1 Locate the left margin for continuous forms by locating the [A symbol on the printer. 1 2 1 Tractor (in push position) 2 Right locking lever 2 Continue to load - Lexmark Forms Printer 2580 | Quick Reference - Page 31
cover. 9 To verify the new Top-Of-Form, press Load/Unload to unload the continuous forms paper, and then press FormFeed to reload the continuous forms paper. The continuous forms paper loads to the current Top-Of-Form setting. 10 Press Start/Stop to set the printer online. Note: If Auto Tear Off is - Lexmark Forms Printer 2580 | Quick Reference - Page 32
printer online. Setting Top-Of-Form for a cut form or an envelope Top-Of-Form can range from minus one inch to plus 22 inches from the top of a cut form. envelope through the manual feeder. • If Auto Cut Sheet is set to On, the printer will move the paper or envelope to the current Top-Of-Form. • If - Lexmark Forms Printer 2580 | Quick Reference - Page 33
mode. 6 Press Set TOF to set and save your Top-Of-Form. 7 Close the control panel cover. 8 Press Start/Stop to put the printer online. Setting Top-Of-Form in a macro Each macro has a separate Top-Of-Form setting. To set Top-Of-Form in a macro, you must first select that macro. 1 Open the control - Lexmark Forms Printer 2580 | Quick Reference - Page 34
Paper and specialty media guide Paper types and sizes supported by the printer The printer supports paper weights of 56-90 g/m2 (15-24 lb) and envelope weights of 75-90 g/m2 (20-24 lb). Width Paper types Single Multiple part Envelopes Cut Forms 76 mm (3.0 in.) to 297 mm 76 mm (3.0 in.) to - Lexmark Forms Printer 2580 | Quick Reference - Page 35
most convenient way to load continuous forms, and allows you to use the Tear Off feature of the printer. Pull tractor position The front tractor unit can be removed and installed at the top of the printer. It then functions as a pull tractor and supports front and bottom paper loading. Converting - Lexmark Forms Printer 2580 | Quick Reference - Page 36
and out of the way. 4 Hold down the latching levers while you lift and pull the tractor unit out of the printer. 1 2 1 Tractor unit 2 Latching levers 5 Remove the ribbon access cover. 6 Turn the tractor unit around so that the latching levers are upright, facing you. 7 Place the tractor against the - Lexmark Forms Printer 2580 | Quick Reference - Page 37
. b Continue holding down the latching levers, and tilt the tractor feeder toward the front of the printer until the hooks at the end of the latching levers fit around the posts on the printer frame. c Release the latching levers. Note: The tractor unit fits into place at a 40° angle. Converting - Lexmark Forms Printer 2580 | Quick Reference - Page 38
5 Make sure the paper select lever is set to the position. 6 While holding down the latching levers, fit the left and right locks onto the posts in the printer. 7 Release the latching levers. 8 Close the front cover. Changing tractor positions 38 - Lexmark Forms Printer 2580 | Quick Reference - Page 39
length. Using Setup mode Note: Make sure continuous forms are loaded in the printer when using Setup mode. 1 Open the control panel to access layer 2. 1 2 3 4 Power Set TOF LineFeed Macro Micro Micro Setup Pitch Lock 10 20 12 24 15 17 1 2 3 4 Power Set TOF LineFeed Macro - Lexmark Forms Printer 2580 | Quick Reference - Page 40
using Setup mode, load more paper into the Tractor pins, and then press Setup to continue. Changing menu settings (an example) Note: Make sure continuous forms are loaded in the printer when using Setup mode. The following is an example of how to change the Menu Language setting. 1 With the - Lexmark Forms Printer 2580 | Quick Reference - Page 41
French. Menu Language To Select Press No Change Set TOF English LineFeed French Macro German Micro Italian Micro (More) Setup Return to Main menu Pitch Printer menus now print in French. 6 Press Pitch to return to the Main menu or press Set TOF (No Change) to go back one menu and - Lexmark Forms Printer 2580 | Quick Reference - Page 42
with the program. Interface Options Interface Options define how information is transferred from the computer to the printer. Forms Macro options Note: Use Setup mode to configure the printer according to your needs. To print a list of all default settings, press LineFeed from the Main menu - Lexmark Forms Printer 2580 | Quick Reference - Page 43
when the printer is turned on. For more information, see the Technical Reference available on the Lexmark Web site at www.lexmark.com. - - On-Continuous forms automatically advance to the Tear Off bar position. - Off-You can manually advance the perforation of a continuous form to the Tear Off - Lexmark Forms Printer 2580 | Quick Reference - Page 44
Disabled-Uses the entire buffer as a receive buffer Note: Enabled is the factory default setting. Download (available for 2590/2591 models only) • Enabled-Reserves a portion of the receive buffer for downloading fonts • Disabled-Uses the entire buffer as a receive buffer Note: Enabled is the factory - Lexmark Forms Printer 2580 | Quick Reference - Page 45
Out Alarm • Enabled-An alarm sounds when the printer runs out of paper. • Disabled-No alarm sounds when the printer runs out of paper. Note: Enabled is the Top-Of-Form before printing begins on continuous forms • Disabled-Does not verify the Top-Of-Form before printing on continuous forms Note: - Lexmark Forms Printer 2580 | Quick Reference - Page 46
Lexmark Web site at www.lexmark.com/publications. IBM mode Proprinter III, available only on 2580/2581 printers, enables compatibility with the Proprinter III. • On-The printer emulates a Proprinter III. • Off-The printer operates with added capabilities. AGM, available only on 2590/2591 supported, - Lexmark Forms Printer 2580 | Quick Reference - Page 47
list items outline and explain the Interface options and settings you can use with the printer: Interface Selection Unless turned off, the Auto setting automatically selects the printer interface from the available connection cables. The following connection cables are available: parallel cable, USB - Lexmark Forms Printer 2580 | Quick Reference - Page 48
) 1038693 (50-foot cable) Printer ribbon • 11A3540 (2400/2500 series standard re-inking ribbon) • 11A3550 (2500 series high yield re-inking ribbon) Note: Printer ribbons can be ordered from the Lexmark Web site at www.lexmark.com. Removing the ribbon cartridge 1 Turn the printer off. 2 Lift the - Lexmark Forms Printer 2580 | Quick Reference - Page 49
. Recycling Lexmark products To return Lexmark products to Lexmark for recycling: 1 Visit our Web site at www.lexmark.com/recycle. 2 Find the product type you want to recycle, and then select your country from the list. 3 Follow the instructions on the computer screen. Maintaining the printer 49
-
 1
1 -
 2
2 -
 3
3 -
 4
4 -
 5
5 -
 6
6 -
 7
7 -
8
-
9
-
10
-
11
-
12
-
13
-
14
-
15
-
16
-
17
-
18
-
19
-
20
-
21
-
22
-
23
-
24
-
25
-
26
-
27
-
28
-
29
-
30
-
31
-
32
-
33
-
34
-
35
-
36
-
37
-
38
-
39
-
40
-
41
-
42
-
43
-
44
-
45
-
46
-
47
-
48
-
49
 |
 |
Forms Printer 2500 Series
Quick Reference
July 2007
www.lexmark.com
Lexmark and Lexmark with diamond design are trademarks of Lexmark International, Inc., registered in the United States and/or other countries.
All other trademarks are the property of their respective owners.
© 2007 Lexmark International, Inc.
All rights reserved.
740 West New Circle Road
Lexington, Kentucky 40550