Lexmark Interpret S400 Fax Guide
Lexmark Interpret S400 Manual
 |
View all Lexmark Interpret S400 manuals
Add to My Manuals
Save this manual to your list of manuals |
Lexmark Interpret S400 manual content summary:
- Lexmark Interpret S400 | Fax Guide - Page 1
Fax Getting Started Guide April 2009 www.lexmark.com - Lexmark Interpret S400 | Fax Guide - Page 2
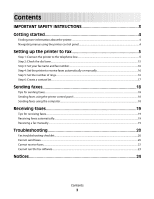
sending faxes...18 Sending faxes using the printer control panel...18 Sending faxes using the computer...18 Receiving faxes 19 Tips for receiving faxes...19 Receiving faxes automatically...19 Receiving a fax manually...19 Troubleshooting 20 Fax troubleshooting checklist...20 Cannot send faxes...20 - Lexmark Interpret S400 | Fax Guide - Page 3
IMPORTANT SAFETY INSTRUCTIONS Connect the power cord to an electrical outlet that is near the product and easily accessible not use the telephone to report a gas leak in the vicinity of the leak. See the product User's Guide for additional safety information. SAVE THESE INSTRUCTIONS. IMPORTANT SAFETY - Lexmark Interpret S400 | Fax Guide - Page 4
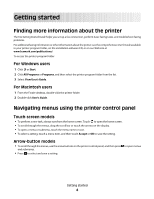
basic faxing tasks, and troubleshoot faxing problems. For additional faxing information or other information about the printer, see the comprehensive User's Guide available in your printer program folder, on the installation software CD, or on our Web site at www.lexmark.com/publications/. To access - Lexmark Interpret S400 | Fax Guide - Page 5
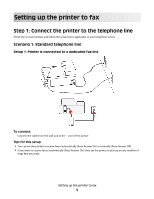
telephone service. Scenario 1: Standard telephone line Setup 1: Printer is connected to a dedicated fax line To connect: Connect the cable from the wall jack to the port of the printer. Tips for this setup: • You can set the printer to receive faxes automatically (Auto Answer On) or manually (Auto - Lexmark Interpret S400 | Fax Guide - Page 6
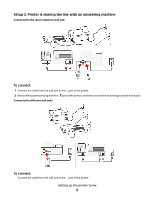
Setup 2: Printer is sharing the line with an answering machine Connected to the same telephone wall jack To connect: 1 Connect the cable from the wall jack to the port of the printer. 2 Remove the protective plug from the port of the printer, and then connect the answering machine to the port. - Lexmark Interpret S400 | Fax Guide - Page 7
sure that you set the correct ring pattern for the printer. Otherwise, the printer will not receive faxes even if you have set it to receive faxes automatically. Setup 3: Printer is sharing the line with a telephone subscribed to voice mail service To connect: 1 Connect the cable from the wall jack - Lexmark Interpret S400 | Fax Guide - Page 8
the telephone and you hear fax tones, press *9* or the manual answer code on the telephone to receive the fax. • You can also set the printer to receive faxes automatically (Auto Answer On), but you need to turn off the voice mail service when you are expecting a fax. This setting works best if - Lexmark Interpret S400 | Fax Guide - Page 9
to the printer, remove the protective plug from the port of the printer and then connect the telephone to the port. Scenario 3: VoIP telephone service To connect: protective plug from the port of the printer, and then connect the telephone to the port. Tips for this setup: • To make sure that the - Lexmark Interpret S400 | Fax Guide - Page 10
Scenario 4: Digital telephone service through a cable provider Setup 1: Printer is connected directly to a cable modem Follow this setup if you normally connect your telephone to a cable modem. To connect: 1 Connect one end of a telephone cable to the port of the printer. 2 Connect the other end of - Lexmark Interpret S400 | Fax Guide - Page 11
Setup 2: Printer is connected to a wall jack; cable modem is installed elsewhere in the house Follow this setup if your cable provider activated the wall jacks in your house so that you do not have to plug your devices into the cable modem. Your cable telephone service comes from the wall jacks. To - Lexmark Interpret S400 | Fax Guide - Page 12
jack To connect: 1 Connect one end of a telephone cable to the port of the printer. 2 Connect the other end of the cable to the RJ-11 adapter, and then Do not remove the wrap plug from the port of the printer. • The printer may not come with an RJ-11 adapter in your country or region. Setting up the - Lexmark Interpret S400 | Fax Guide - Page 13
remove the wrap plug and connect the device to the port of the printer. Connecting the printer in countries that use serial connection In some countries or regions, you a telephone or answering machine into the port of the printer. This is called serial connection. Austria Belgium Denmark France - Lexmark Interpret S400 | Fax Guide - Page 14
To connect: Connect the cable from the wall jack to the port of the printer. Connecting the printer to a wall jack in Germany The German wall jack has two kinds of ports. The N ports are for fax machines, modems, and answering machines. The F port is for telephones. Setting up the printer to fax 14 - Lexmark Interpret S400 | Fax Guide - Page 15
connect: 1 Connect one end of a telephone cable to the port of the printer. 2 Connect the other end of the cable to the RJ-11 adapter, A dial tone lets you know if the telephone line is working or if the printer is properly connected to the telephone line. Make sure the telephone line and the wall - Lexmark Interpret S400 | Fax Guide - Page 16
dial tone, then review Step 1 or see the "Fax troubleshooting checklist" on page 20. Step 3: Set your fax name service, then set the printer to receive faxes manually. To set the printer to receive faxes automatically or manually: 1 From the printer control panel, navigate to Auto Answer: > Fax Setup - Lexmark Interpret S400 | Fax Guide - Page 17
the Fax Setup Utility or the AIO Setup Utility for your printer. 3 Click the Contacts tab. • To add contacts, click the Individuals tab. • To add fax groups, click the Groups tab. For more information, click Help or to view the help information for the fax software. Setting up the printer to fax - Lexmark Interpret S400 | Fax Guide - Page 18
the paper guide on the instructions on the computer screen. For Macintosh users 1 With a document open, choose File > Print. 2 From the Printer pop-up menu, select the fax version of your printer. Note: In order to see the fax options on the Print dialog, you must use the fax driver for your printer - Lexmark Interpret S400 | Fax Guide - Page 19
: Do not touch the cables or the and ports while actively receiving a fax. Receiving a fax manually 1 Make sure Auto Answer is off: a From the printer control panel, navigate to Auto Answer: > Fax Setup > Ringing and Answering > Auto Answer b Turn off Auto Answer, and then save the setting. 2 When - Lexmark Interpret S400 | Fax Guide - Page 20
. Cannot send faxes If the "Fax troubleshooting checklist" does not solve the problem, then try one or more of the following: MAKE SURE THAT YOU HAVE REGISTERED YOUR USER INFORMATION IN THE PRINTER If you did not enter your user information during initial setup, then enter your fax name and fax - Lexmark Interpret S400 | Fax Guide - Page 21
that the receiving machine can support. To make sure that automatic fax conversion is enabled: 1 From the printer control panel, navigate to Auto Fax Convert: > Fax Setup > Dialing and Sending > Auto Fax Convert 2 Turn on automatic fax conversion, and then save the setting. Troubleshooting 21 - Lexmark Interpret S400 | Fax Guide - Page 22
the setting. Cannot receive faxes If the "Fax troubleshooting checklist" does not solve the problem, then try one or more of the following: MAKE SURE THAT YOU HAVE CONFIGURED THE CORRECT SETTINGS FOR YOUR SETUP The fax settings depend on whether the printer is connected to its own fax line or shares - Lexmark Interpret S400 | Fax Guide - Page 23
navigate to Manual Answer Code or Manual Pickup Code: > Fax Setup > Ringing and Answering > Manual Answer Code or Manual Pickup Code 2 Copy the manual answer code that appears on the display. Cannot run the fax software The printer must be connected to a telephone, DSL, VoIP, or cable service before - Lexmark Interpret S400 | Fax Guide - Page 24
include technical inaccuracies or typographical errors. Changes are periodically made services, except those expressly designated by the manufacturer, are the user's responsibility. For Lexmark technical support, visit support.lexmark.com. For information on supplies and downloads, visit www.lexmark
-
 1
1 -
 2
2 -
 3
3 -
 4
4 -
 5
5 -
 6
6 -
 7
7 -
8
-
9
-
10
-
11
-
12
-
13
-
14
-
15
-
16
-
17
-
18
-
19
-
20
-
21
-
22
-
23
-
24
 |
 |

Fax Getting Started Guide
April 2009
www.lexmark.com