Lexmark MS510 User's Guide - Page 212
Large jobs do not collate, Unexpected breaks occur, Step 1, Settings, General Settings, Timeouts
 |
View all Lexmark MS510 manuals
Add to My Manuals
Save this manual to your list of manuals |
Page 212 highlights
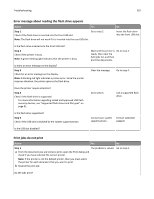
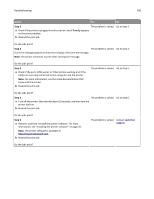
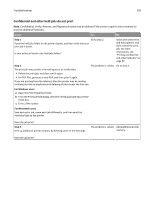
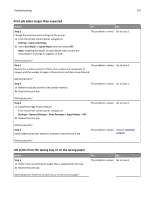
Troubleshooting 212 Action Yes No a From the printer control panel, set the paper size and type in the Paper The problem is solved. Contact customer menu to match the paper loaded in the trays to be linked. support. Note: The paper size and type must match for trays to be linked. b Resend the print job. Do the trays link correctly? Large jobs do not collate Action Yes No Step 1 a From the Finishing menu on the printer control panel, set Collate to (1,2,3) (1,2,3). b Resend the print job. The problem is solved. Go to step 2. Did the job print and collate correctly? Step 2 a From the printer software, set Collate to (1,2,3) (1,2,3). Note: Setting Collate to (1,1,1) (2,2,2) in the software overrides the setting in the Finishing menu. b Resend the print job. The problem is solved. Go to step 3. Did the job print and collate correctly? Step 3 The problem is solved. Reduce the complexity of the print job by eliminating the number and size of fonts, the number and complexity of images, and the number of pages in the job. Contact customer support. Did the job print and collate correctly? Unexpected page breaks occur Action Step 1 Adjust the print timeout settings. a From the printer control panel, navigate to: Settings > General Settings > Timeouts > Print Timeout b Select a higher setting and then, depending on your printer model, Yes No The problem is solved. Go to step 2. select or Submit. c Resend the print job. Did the file print correctly?
-
 1
1 -
2
-
3
-
4
-
5
-
6
-
7
-
8
-
9
-
10
-
11
-
12
-
13
-
14
-
15
-
16
-
17
-
18
-
19
-
20
-
21
-
22
-
23
-
24
-
25
-
26
-
27
-
28
-
29
-
30
-
31
-
32
-
33
-
34
-
35
-
36
-
37
-
38
-
39
-
40
-
41
-
42
-
43
-
44
-
45
-
46
-
47
-
48
-
49
-
50
-
51
-
52
-
53
-
54
-
55
-
56
-
57
-
58
-
59
-
60
-
61
-
62
-
63
-
64
-
65
-
66
-
67
-
68
-
69
-
70
-
71
-
72
-
73
-
74
-
75
-
76
-
77
-
78
-
79
-
80
-
81
-
82
-
83
-
84
-
85
-
86
-
87
-
88
-
89
-
90
-
91
-
92
-
93
-
94
-
95
-
96
-
97
-
98
-
99
-
100
-
101
-
102
-
103
-
104
-
105
-
106
-
107
-
108
-
109
-
110
-
111
-
112
-
113
-
114
-
115
-
116
-
117
-
118
-
119
-
120
-
121
-
122
-
123
-
124
-
125
-
126
-
127
-
128
-
129
-
130
-
131
-
132
-
133
-
134
-
135
-
136
-
137
-
138
-
139
-
140
-
141
-
142
-
143
-
144
-
145
-
146
-
147
-
148
-
149
-
150
-
151
-
152
-
153
-
154
-
155
-
156
-
157
-
158
-
159
-
160
-
161
-
162
-
163
-
164
-
165
-
166
-
167
-
168
-
169
-
170
-
171
-
172
-
173
-
174
-
175
-
176
-
177
-
178
-
179
-
180
-
181
-
182
-
183
-
184
-
185
-
186
-
187
-
188
-
189
-
190
-
191
-
192
-
193
-
194
-
195
-
196
-
197
-
198
-
199
-
200
-
201
-
202
-
203
-
204
-
205
-
206
-
 207
207 -
 208
208 -
 209
209 -
 210
210 -
 211
211 -
 212
212 -
 213
213 -
 214
214 -
 215
215 -
 216
216 -
 217
217 -
218
-
219
-
220
-
221
-
222
-
223
-
224
-
225
-
226
-
227
-
228
-
229
-
230
-
231
-
232
-
233
-
234
-
235
-
236
-
237
-
238
-
239
-
240
-
241
-
242
-
243
-
244
-
245
-
246
-
247
-
248
-
249
-
250
-
251
-
252
-
253
-
254
-
255
 |
 |
