Lexmark MS510 User's Guide - Page 78
Loading paper and specialty media, Setting the paper size and type, Configuring Universal paper settings, Using the standard bin and paper stop
 |
View all Lexmark MS510 manuals
Add to My Manuals
Save this manual to your list of manuals |
Page 78 highlights
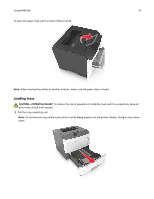
Using MS610de 78 - If a "JVM Out of Memory" error occurs, then repeat the export process until the configuration file is saved. • To import a configuration from a file, click Import, and then browse to the saved configuration file that was exported from a previously configured printer. Notes: - Before importing the configuration file, you can choose to preview it first or load it directly. - If a timeout occurs and a blank screen appears, then refresh the Web browser, and then click Apply. Loading paper and specialty media The selection and handling of paper and specialty media can affect how reliably documents print. For more information, see "Avoiding jams" on page 176 and "Storing paper" on page 113. Setting the paper size and type From the home screen navigate to: > Paper Menu > Paper Size/Type > select a tray > select the paper size or type > Configuring Universal paper settings The Universal paper size is a user‑defined setting that lets you print on paper sizes that are not preset in the printer menus. Notes: • The smallest Universal paper size is 6 x 127 mm (3 x 5 inches), and is supported only from the multipurpose feeder. • The largest Universal paper size is 216 x 355.6 mm (8.5 x 14 inches), and is supported from all paper sources. 1 From the printer control panel, navigate to: > Paper Menu > Universal Setup > Units of Measure > select a unit of measure > 2 Touch Portrait Width or Portrait Height. 3 Select the width or height, and then touch . Using the standard bin and paper stop The standard bin holds up to 150 sheets of 20‑lb paper. It collects prints facedown. The standard bin includes a paper stop that keeps paper from sliding out the front of the bin as it stacks.
-
 1
1 -
2
-
3
-
4
-
5
-
6
-
7
-
8
-
9
-
10
-
11
-
12
-
13
-
14
-
15
-
16
-
17
-
18
-
19
-
20
-
21
-
22
-
23
-
24
-
25
-
26
-
27
-
28
-
29
-
30
-
31
-
32
-
33
-
34
-
35
-
36
-
37
-
38
-
39
-
40
-
41
-
42
-
43
-
44
-
45
-
46
-
47
-
48
-
49
-
50
-
51
-
52
-
53
-
54
-
55
-
56
-
57
-
58
-
59
-
60
-
61
-
62
-
63
-
64
-
65
-
66
-
67
-
68
-
69
-
70
-
71
-
72
-
 73
73 -
 74
74 -
 75
75 -
 76
76 -
 77
77 -
 78
78 -
 79
79 -
 80
80 -
 81
81 -
 82
82 -
 83
83 -
84
-
85
-
86
-
87
-
88
-
89
-
90
-
91
-
92
-
93
-
94
-
95
-
96
-
97
-
98
-
99
-
100
-
101
-
102
-
103
-
104
-
105
-
106
-
107
-
108
-
109
-
110
-
111
-
112
-
113
-
114
-
115
-
116
-
117
-
118
-
119
-
120
-
121
-
122
-
123
-
124
-
125
-
126
-
127
-
128
-
129
-
130
-
131
-
132
-
133
-
134
-
135
-
136
-
137
-
138
-
139
-
140
-
141
-
142
-
143
-
144
-
145
-
146
-
147
-
148
-
149
-
150
-
151
-
152
-
153
-
154
-
155
-
156
-
157
-
158
-
159
-
160
-
161
-
162
-
163
-
164
-
165
-
166
-
167
-
168
-
169
-
170
-
171
-
172
-
173
-
174
-
175
-
176
-
177
-
178
-
179
-
180
-
181
-
182
-
183
-
184
-
185
-
186
-
187
-
188
-
189
-
190
-
191
-
192
-
193
-
194
-
195
-
196
-
197
-
198
-
199
-
200
-
201
-
202
-
203
-
204
-
205
-
206
-
207
-
208
-
209
-
210
-
211
-
212
-
213
-
214
-
215
-
216
-
217
-
218
-
219
-
220
-
221
-
222
-
223
-
224
-
225
-
226
-
227
-
228
-
229
-
230
-
231
-
232
-
233
-
234
-
235
-
236
-
237
-
238
-
239
-
240
-
241
-
242
-
243
-
244
-
245
-
246
-
247
-
248
-
249
-
250
-
251
-
252
-
253
-
254
-
255
 |
 |