Lexmark MX6500e Quick Reference
Lexmark MX6500e Manual
 |
View all Lexmark MX6500e manuals
Add to My Manuals
Save this manual to your list of manuals |
Lexmark MX6500e manual content summary:
- Lexmark MX6500e | Quick Reference - Page 1
enter numbers, letters, or symbols on the display 5 USB port Lets you insert a USB flash drive to send data or to save scanned images. For instructions on how to use the USB port, see "Printing from a flash drive" on page 18. 6 Submit Lets you submit changes made in the scanner settings - Lexmark MX6500e | Quick Reference - Page 2
is in Ready state. 9 Bookmarks Create, organize, and save a set of bookmarks (URL) into a tree view of folders and file links. Note: The tree view supports only bookmarks created from this function, and not from any other application. 10 USB Drive View, select, print, scan, or e‑mail photos and - Lexmark MX6500e | Quick Reference - Page 3
Your home screen may vary, depending on your home screen customization settings, administrative setup, and active applications. Some applications are supported only in select printer models. • There may be additional solutions and applications available for purchase. For more information, inquire at - Lexmark MX6500e | Quick Reference - Page 4
2 Open a Web browser, and then type the scanner IP address in the address field. 3 Press Enter. Note: If you are using a proxy server, then temporarily disable it to load the Web page correctly. Customizing the home screen 1 Open a Web browser, and then type the scanner IP address in the address - Lexmark MX6500e | Quick Reference - Page 5
IP address of the computer" on page 3. 5 4 Click Apply. To use the application, touch Multi Send on the scanner home screen, and then follow the instructions on the scanner display. Setting up Scan to Network Use To Scan a document and send it to a shared network folder. You can define up to - Lexmark MX6500e | Quick Reference - Page 6
with a border around it. 5 Click Apply. To use the application, touch ADF Card Copy on the scanner home screen, and then follow the instructions. Setting up Scan to Sharepoint Use To • Securely scan documents to Web sites housed on SharePoint servers. • Allow Web site navigation, folder creation - Lexmark MX6500e | Quick Reference - Page 7
Discovery from the scanner home screen, and then follow the instructions on the scanner display. Exporting and importing a configuration You paper sizes that are not preset in the printer menus. 7 Notes: • The smallest supported Universal size is 70 x 127 mm (2.76 x 5 inches) for one‑sided printing - Lexmark MX6500e | Quick Reference - Page 8
being loaded until it clicks into place. Note: Use the paper size indicators at the bottom of the tray to help position the guides. 3 Unlock the length guide, then squeeze, and then slide the guide to the correct position for the size of the paper being loaded. 1 2 3 Notes: • Lock the length - Lexmark MX6500e | Quick Reference - Page 9
Without an optional staple finisher With an optional staple finisher ABC • Do not slide the paper into the tray. Load paper as shown in the illustration. One‑sided printing ABC One‑sided printing 4 Flex the sheets back and forth to loosen them, and then fan them. Do not fold or crease the paper. - Lexmark MX6500e | Quick Reference - Page 10
is the alternate paper fill indicator. Warning-Potential Damage: Overfilling the tray can cause paper jams. 6 For custom‑ or Universal‑size paper, adjust the paper guides to lightly touch the sides of the stack, and then lock the length - Lexmark MX6500e | Quick Reference - Page 11
Set the correct paper size and type to avoid paper jams and print quality problems. Loading the 2100‑sheet tray CAUTION-POTENTIAL INJURY: To reduce the risk of equipment 2 Adjust the width and length guides. b Squeeze and slide the length guide to the position for A5 until it clicks into place. 1 2 - Lexmark MX6500e | Quick Reference - Page 12
position for the size of the paper being loaded. 1 LGLOFCFOLLITOR A4 A5 2 LGLOFCFOLLITOR A4 A5 b If the A5 length guide is still attached to the length guide, then remove it from its place. If the A5 length guide is not attached, then proceed to step d. LGLOFCFOLILOTR A4 A5 c Put the A5 length - Lexmark MX6500e | Quick Reference - Page 13
d Squeeze the length guide and slide it to the correct position for the size of the paper being loaded until it clicks into place. 3 Flex the sheets back and - Lexmark MX6500e | Quick Reference - Page 14
correct paper size and type to avoid paper jams and print quality problems. Loading the multipurpose feeder 1 Pull down the multipurpose feeder door. Note or close the multipurpose feeder while a job is printing. Note: Guide the extender gently so that the multipurpose feeder is fully extended and - Lexmark MX6500e | Quick Reference - Page 15
• Flex the stack of envelopes back and forth to loosen them. Straighten the edges on a level surface. • Load envelopes with the flap side down and on the left of the multipurpose feeder. EXECB5 A 4 LTR A5 4 Prepare the paper or specialty media for loading. • Flex sheets of paper back and forth - Lexmark MX6500e | Quick Reference - Page 16
paper fill indicator. Loading business cards into the ADF 1 Move the ADF guides to the A8 paper size position. 2 Load the business cards facedown, and print quality problems. Note: Make sure the last edge of the business card is aligned with the A8 mark on the ADF guide. Linking and unlinking - Lexmark MX6500e | Quick Reference - Page 17
Notes: • View the scanner IP address on the scanner home screen. The IP address appears as four sets of numbers separated by periods, such as 123.123.123.123. • If you are using a proxy server, then temporarily disable it to load the Web page correctly. 2 Click Settings > Paper Menu. 3 Change the - Lexmark MX6500e | Quick Reference - Page 18
the File Allocation Table (FAT) system. Devices formatted with New Technology File System (NTFS) or any other file system are not supported. Recommended flash drives File type Many flash drives are tested and approved for use with Documents: the printer. For more information, contact the place - Lexmark MX6500e | Quick Reference - Page 19
2 If you are loading a document into the ADF, then adjust the paper guides. 3 From the scanner control panel, touch Copy It. Copying using the ADF 1 the ADF. Place these items on the scanner glass. 2 Adjust the paper guides. 3 From the home screen, navigate to: Copy > change the copy settings - Lexmark MX6500e | Quick Reference - Page 20
glass. 2 If you are loading a document into the ADF, then adjust the paper guides. 3 On the home screen, touch Fax. 4 Enter the fax number or a recipient fax number in the "Fax number(s)" field. Fax numbers can be entered manually or by using the Phone Book feature. 4 If necessary, enter a prefix in - Lexmark MX6500e | Quick Reference - Page 21
information, see the "Activating the home screen applications" section of the User's Guide. Using Scan to Network Scan to Network lets you scan your documents to network destinations specified by your system support person. After the destinations (shared network folders) have been established on the - Lexmark MX6500e | Quick Reference - Page 22
loading a document into the ADF tray, then adjust the paper guides. 3 From the scanner control panel, press # on the to scan your documents. 7 Review the instructions on the Scan Profile screen. a up Scan to Computer Notes: • This feature is supported only in Windows Vista or later. • Make sure - Lexmark MX6500e | Quick Reference - Page 23
is below the maximum paper fill indicator. • Do not slide the paper into the tray. Load paper as shown in the illustration. • Make sure the guides in the tray or the multipurpose feeder are properly positioned and are not pressing tightly against the paper or envelopes. • Push the tray firmly into - Lexmark MX6500e | Quick Reference - Page 24
the remove multipurpose cartridge. [200- feeder, then 201] remove the toner cartridge and the imaging unit, and then remove the jammed paper. [x]‑page jam, clear manual feeder. [250] Remove all paper from the multipurpose feeder, and then remove the jammed paper. - Lexmark MX6500e | Quick Reference - Page 25
. Warning-Potential Damage: Do not expose the imaging unit to direct light for more than 10 minutes. Extended exposure to light may cause print quality problems. 6 Pull the jammed paper gently to the right, and then remove it from the printer. Note: Make sure all paper fragments are removed. 25 - Lexmark MX6500e | Quick Reference - Page 26
Damage: The jammed paper may be covered with toner which can stain garments and skin. 7 Install the imaging unit. Notes: • Align the arrows on the guides of the toner cartridge with the arrows in the printer. • Make sure the cartridge is fully pushed in. 9 Close the multipurpose feeder door and the - Lexmark MX6500e | Quick Reference - Page 27
4 From the scanner control panel, touch Done to clear the message and continue printing. [x]‑page jam, open upper and lower rear door. [231-234] CAUTION-HOT SURFACE: The inside of the printer might be hot. To reduce the risk of injury from a hot component, allow the surface to cool before touching. - Lexmark MX6500e | Quick Reference - Page 28
2 From the scanner control panel, touch Done to clear the message and continue printing. [x]‑page jam, remove tray 1 to clear duplex. [235-239] 1 Pull out the tray. Note: Lift the tray slightly, and then pull it out completely. 2 3 1 2 Push down the front duplex flap, then firmly grasp the jammed - Lexmark MX6500e | Quick Reference - Page 29
4 Slide the paper guide until it rests lightly against the edge of the paper. 3 Insert the tray. 4 From the scanner control panel, touch Done to clear the message and continue printing. [x]‑page jam, clear manual feeder. [250] 1 From the multipurpose feeder, firmly grasp the jammed paper on each - Lexmark MX6500e | Quick Reference - Page 30
[x]‑page jam, remove paper, open mailbox rear door. Leave paper in bin. [41y.xx] 1 Open the mailbox rear door. 2 Firmly grasp the jammed paper on each side, and then gently pull it out. Note: Make sure all paper fragments are removed. 5 From the scanner control panel, touch Done to clear the - Lexmark MX6500e | Quick Reference - Page 31
2 Open the stapler door. 4 Use the metal tab to lift the staple guard, and then remove any loose staples. 3 Close the staple finisher rear door. 4 From the scanner control panel, touch Done to clear the message and continue printing. [x]‑page jam, remove paper, open stapler door. Leave paper in - Lexmark MX6500e | Quick Reference - Page 32
6 Press the staples against the metal bracket. [x]‑page jam, remove paper, open expander rear door. Leave paper in bin. [43y.xx] 1 Open the output expander rear door. Note: If the staples are at the rear of the cartridge, then shake the cartridge downward to bring the staples near the metal - Lexmark MX6500e | Quick Reference - Page 33
ADF tray. 4 Close the ADF cover. 5 Straighten the edges of the original documents, then load the documents into the ADF, and then adjust the paper guides. 6 From the scanner control panel, touch Done to clear the message and continue printing. 33
-
 1
1 -
 2
2 -
 3
3 -
 4
4 -
 5
5 -
 6
6 -
 7
7 -
8
-
9
-
10
-
11
-
12
-
13
-
14
-
15
-
16
-
17
-
18
-
19
-
20
-
21
-
22
-
23
-
24
-
25
-
26
-
27
-
28
-
29
-
30
-
31
-
32
-
33
 |
 |

Quick Reference
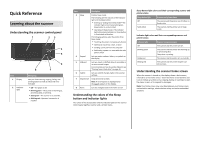
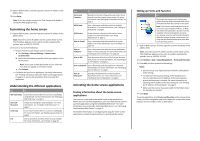
Learning about the scanner
Understanding the scanner control panel
Item
Description
1
Display
Lets you view scanning, copying, faxing, and
printing options as well as status and error
messages
2
Indicator
light
•
Off
—The power is off.
•
Blinking green
—The scanner is warming up,
processing data, or printing.
•
Solid green
—The scanner is on, but idle.
•
Blinking red
—Operator intervention is
needed.
Item
Description
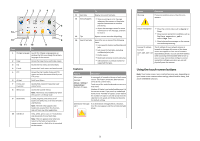
3
Sleep
Enables Sleep mode
The following are the statuses of the indicator
light and the Sleep button:
•
Entering or waking from Sleep mode—The
indicator light is illuminated solid green,
Sleep button is unilluminated.
•
Operating in Sleep mode—The indicator
light is illuminated solid green, Sleep button
is illuminated solid amber.
The following actions wake the printer from
Sleep mode:
•
Touching the screen or pressing any button
•
Opening an input tray, cover, or door
•
Sending a print job from the computer
•
Performing a power
‑
on
‑
reset with the main
power switch
4
Keypad
Lets you enter numbers, letters, or symbols on
the display
5
USB port
Lets you insert a USB flash drive to send data or
to save scanned images.
For instructions on how to use the USB port, see
“Printing from a flash drive” on page 18.
6
Submit
Lets you submit changes made in the scanner
settings
7
Stop/Cancel
Stops all scanner activity
Note:
A list of options is displayed once
Stopped
appears on the display.
8
Home
Lets you navigate back to the home screen
Understanding the colors of the Sleep
button and indicator lights
The colors of the Sleep button and the indicator lights on the scanner
control panel signify a scanner and a printer status.
Sleep button light colors and their corresponding scanner and
printer status
Sleep button light
Scanner and printer status
Off
The scanner and the printer are off, idle or in
Ready state.
Solid amber
The scanner and the printer are in Sleep
mode.
Indicator light colors and their corresponding scanner and
printer status
Indicator light
Scanner and printer status
Off
The scanner and the printer are off.
Blinking green
The scanner and the printer are warming up
or processing data.
The printer is printing.
Solid green
The scanner and the printer are on, but idle.
Blinking red
The scanner and the printer require user
intervention.
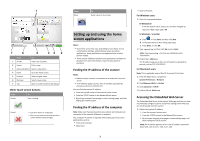
Understanding the scanner home screen
When the scanner is turned on, the display shows a basic screen,
referred to as the home screen. Touch the home screen buttons and
icons to initiate an action such as copying, faxing, or scanning; to open
the menu screen; or to respond to messages.
Note:
Your home screen may vary depending on your home screen
customization settings, administrative setup, and active embedded
solutions.
1