Lexmark MX718 Embedded Web Server Administrator s Guide
Lexmark MX718 Manual
 |
View all Lexmark MX718 manuals
Add to My Manuals
Save this manual to your list of manuals |
Lexmark MX718 manual content summary:
- Lexmark MX718 | Embedded Web Server Administrator s Guide - Page 1
Embedded Web Server Administrator's Guide October 2018 www.lexmark.com Models: C2132, CS310, CS317, CS410, CS417, CS510, CS517, CX310, CX317, CX410, CX417, CX510, CX517, M1140, M1140+, M1145, M3150, M5155, M5163, M5170, MS310, MS312, MS315, - Lexmark MX718 | Embedded Web Server Administrator s Guide - Page 2
Contents 2 Contents Overview...4 Supported devices...4 Supported web browsers...5 Accessing the Embedded Web Server...5 Parts of the Embedded Web Server...5 Understanding helper texts...6 Managing printers 7 Viewing the status of printer...7 Checking the status of parts and supplies from the - Lexmark MX718 | Embedded Web Server Administrator s Guide - Page 3
solutions...63 Security scenarios...64 Troubleshooting 69 Embedded Web Server does not open...69 Login troubleshooting...69 LDAP troubleshooting...73 Held Jobs / Print Release Lite troubleshooting 74 Scanning problems...75 Faxing problems...78 Networking problems...80 Appendix...82 Notices...89 - Lexmark MX718 | Embedded Web Server Administrator s Guide - Page 4
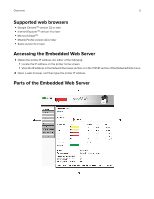
: • Configure and troubleshoot security settings. • Set up network configurations. • Configure basic and advanced fax, e-mail, and scan settings. • Configure other printer settings. • Manage downloaded solutions. • Print reports on device status and settings. Supported devices Simple‑security devices - Lexmark MX718 | Embedded Web Server Administrator s Guide - Page 5
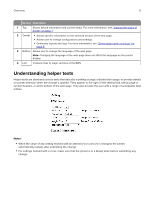
Overview 5 Supported web browsers • Google ChromeTM version 32 or later • Internet ExplorerTM version 11 or later • Microsoft EdgeTM • Mozilla Firefox version 24 or later • Safari version 6 or later Accessing the Embedded Web Server 1 Obtain the printer IP address. Do either of the following: • - Lexmark MX718 | Embedded Web Server Administrator s Guide - Page 6
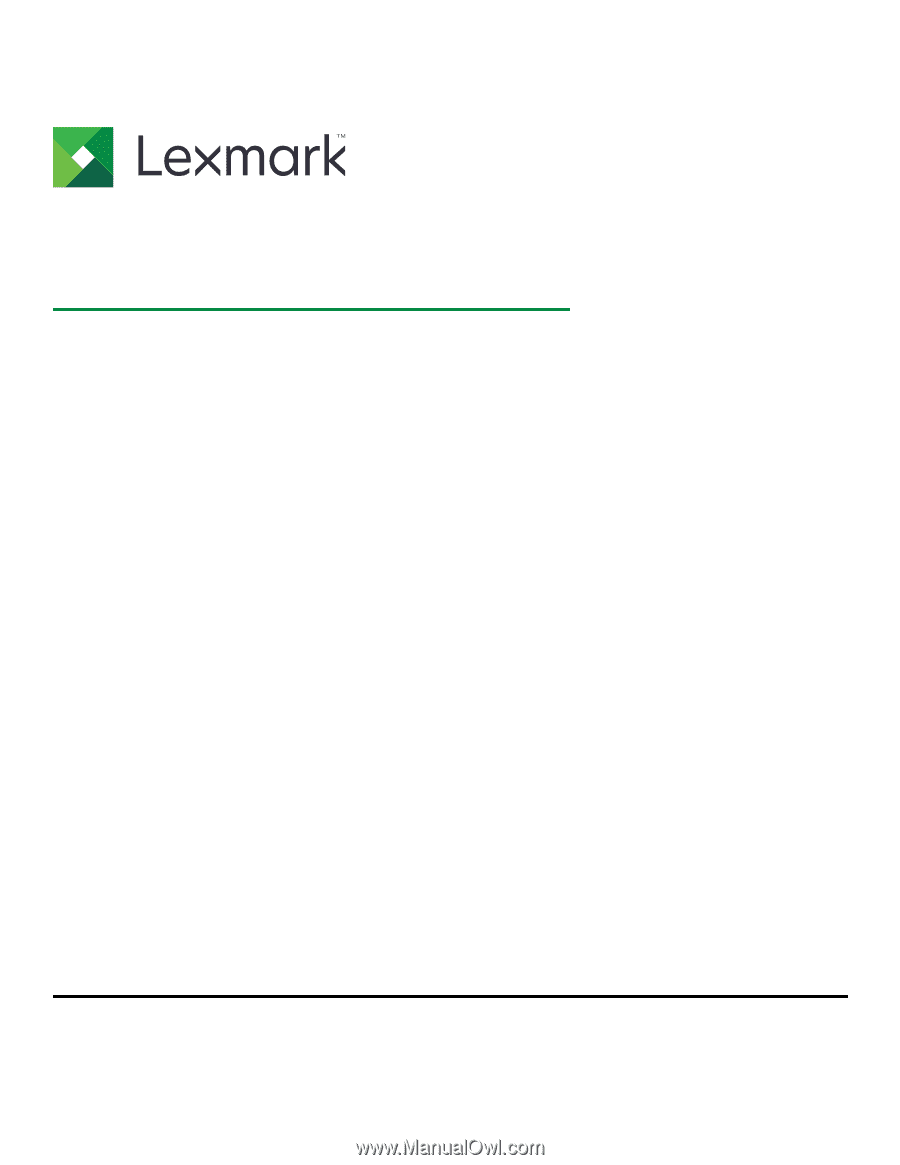
of the EWS. Understanding helper texts Helper texts are short and concise texts that describe a setting or page, indicate their usage, or provide details on printer behavior when the change is applied. They appear to the right of the setting field, below page or section headers, or at the bottom of - Lexmark MX718 | Embedded Web Server Administrator s Guide - Page 7
printing. Examples of common warning conditions include low paper, low toner, or full output bin. • A red status screen indicates the printer is in a critical condition. It requires user intervention to restore printer functions and proper working condition. Examples of critical conditions include - Lexmark MX718 | Embedded Web Server Administrator s Guide - Page 8
of estimated remaining supply that prompts the alert can be set on some supplies for some supply conditions. 1 Open a Web browser, and then type the printer IP address. 2 Click Settings > Print Settings > Supply Notifications. 3 From the drop‑down menu, select one of the following notification options - Lexmark MX718 | Embedded Web Server Administrator s Guide - Page 9
Management Protocol (SNMP) alert when the supply condition is reached. The status of the supply appears on the menus page and status page. E‑mail The printer generates an e‑mail when the supply condition is reached. The status of the supply appears on the menus page and status page. Warning The - Lexmark MX718 | Embedded Web Server Administrator s Guide - Page 10
, or SMTP server. Note: Scanning is supported only in a multifunction product. Creating a the settings. • This feature is available only in some printer models. 1 From the Embedded Web Server, click Scan 3 If necessary, click PDF Settings, Advanced Imaging, and Color Balance, and then configure - Lexmark MX718 | Embedded Web Server Administrator s Guide - Page 11
a computer using a shortcut number Note: Make sure that the printer and computer are connected to the same network. 1 Load the document. • Color-Specify the color when scanning an image. • Resolution-Set the resolution of the scanned image. • Temperature-Specify whether to generate a cooler or - Lexmark MX718 | Embedded Web Server Administrator s Guide - Page 12
the sharpness of a scanned image. • Scan edge to edge-Allow edge‑to‑edge scanning of the original document. • Color Balance-Adjust the amount of toner being used in each color. 3 Click Submit. Creating an FTP shortcut Set up the SMTP server to send e‑mail from the printer. 1 From the Embedded Web - Lexmark MX718 | Embedded Web Server Administrator s Guide - Page 13
number of your secondary or backup SMTP server. - SMTP Timeout-Set the time before the printer times out when the SMTP server does not respond. - Reply Address-Specify a reply address in File Name-Specify the file name for the scanned image. • Send me a copy-Send a copy of the e‑mail to yourself. - Lexmark MX718 | Embedded Web Server Administrator s Guide - Page 14
. • Password-Set the password to use for the web link. • Path-Set the printer network path to use for the web link. • File Name-Set the file name for printing logs. • E‑mail Bit Depth-Specify the bit depth to use for images detected as mono when the Color setting is set to Auto. • Custom Job scanning - Lexmark MX718 | Embedded Web Server Administrator s Guide - Page 15
the output. • Mirror Image-Create a mirror image of the original document. • Negative Image-Create a negative image of the original document. the amount of toner being used in each color. 3 Click Submit. Setting up the SMTP server Set up the SMTP server to send e‑mail from the printer. 1 From the - Lexmark MX718 | Embedded Web Server Administrator s Guide - Page 16
mail server has storage or file‑size restrictions or e‑mail activity on the printer is excessive, which affects network bandwidth. It is also a more secure E‑mail Settings. 2 From the E‑mail Settings section, locate the E-mail images sent as setting. 3 Select Web Link. 4 Click Submit. Configuring the - Lexmark MX718 | Embedded Web Server Administrator s Guide - Page 17
on the original document. • Paper Saver-Copy two or four sheets of a document on one page. • Print Page Borders-Place a border around each image when printing multiple pages on a single page. • Collate-Print multiple copies in sequence. • Original Size-Set the paper size of the original document - Lexmark MX718 | Embedded Web Server Administrator s Guide - Page 18
. • Scan Preview-Show the scan preview on the display. • Background Removal-Adjust the amount of background visible on a scanned image. • Color Balance-Adjust the amount of toner being used in each color. • Color Dropout-Specify which color to drop during scanning, and adjust the dropout setting for - Lexmark MX718 | Embedded Web Server Administrator s Guide - Page 19
print job. • Paper Saver-Copy two or four sheets of a document on one page. • Paper Saver Ordering-Specify the positioning of multiple‑page images. • Paper Saver Orientation-Specify the orientation of a multiple‑page document. • Paper Saver Border-Print a border when using Paper Saver. • Blank Pages - Lexmark MX718 | Embedded Web Server Administrator s Guide - Page 20
receive fax messages through your printer, using an assigned telephone line or a fax server. Note: Faxing is supported only in a multifunction product. ID- Specify how the fax is identified. • Enable Manual Fax-Set the printer to fax manually. • Memory Use-Define the allocation of non-volatile memory - Lexmark MX718 | Embedded Web Server Administrator s Guide - Page 21
configure the settings. • Resolution-Set the resolution of the scanned image. • Original Size-Specify the size of the original document. • Sides scanned at the printer. • Driver to fax-Allow the print driver to send fax. • Allow Save as Shortcut-Save fax numbers as shortcuts in the printer. • Max - Lexmark MX718 | Embedded Web Server Administrator s Guide - Page 22
• Background Removal-Adjust the amount of background visible on a scanned image. • Color Dropout-Specify which color to drop during scanning, and for incoming fax. • Auto Answer-Set the printer to receive fax automatically. • Manual Answer Code-Manually enter a code on the telephone number pad to - Lexmark MX718 | Embedded Web Server Administrator s Guide - Page 23
ring services to allow multiple telephone numbers in a single line. You can set a distinctive ring pattern for your printer to receive Select the appropriate held fax mode. • Always On-Always holds fax jobs. • Manual-Lets users select if they want to continue storing fax jobs or not. • Scheduled - Lexmark MX718 | Embedded Web Server Administrator s Guide - Page 24
Server, click Settings > Fax > Fax Server Setup. 2 From the Fax Server Default Scan Setup section, configure the settings. • Image Format-Specify the file format for the scanned image. • Content Type-Specify the content type of the original document. • Content Source-Specify the source of the original - Lexmark MX718 | Embedded Web Server Administrator s Guide - Page 25
• Use Multi‑Page TIFF-Choose between single‑ and multiple‑page TIFF files. • Enable analog receive-Set the printer to receive analog faxes. • Color Balance-Adjust the amount of toner being used in each color. • E‑mail Server Setup-Specify e‑mail server information. For more information, see "Setting - Lexmark MX718 | Embedded Web Server Administrator s Guide - Page 26
the printer to detect printer to connect only through Ethernet connection. • Network Card [X]-Disable the Ethernet network connection and set the printer printer and working properly. For more information, see the instruction then turn the printer back on. 5 Check if your printer is connected to - Lexmark MX718 | Embedded Web Server Administrator s Guide - Page 27
if LDAP server certificate is requested. This menu setting is available only in some printer models. • Use GSSAPI-Enable strong encrypted authentication through Generic Security Service Application Program Interface (GSSAPI). • Mail Attribute-Specify the attribute used to identify e‑mail addresses - Lexmark MX718 | Embedded Web Server Administrator s Guide - Page 28
they need to do before configuring printer security. Items to consider might include the following: • The location of the printer and whether authorized persons have access to by groups (either local or network). Devices that support advanced-level security are capable of running installed solutions, - Lexmark MX718 | Embedded Web Server Administrator s Guide - Page 29
Accounts • LDAP • LDAP+GSSAPI • Kerberos 5 (used only with LDAP+GSSAPI and the Smart Card Authentication application) • Active Directory (available only in some printer models) To provide simple security, use either PIN and Password, or Panel PIN Protect and Web Page Password Protect. This type of - Lexmark MX718 | Embedded Web Server Administrator s Guide - Page 30
and authorization Authorization only Authorization only Each device can support up to 140 security templates, allowing administrators to create Page Password Protect to limit access to the Embedded Web Server and secure printer functions. 1 From the Embedded Web Server, click Settings > Security > - Lexmark MX718 | Embedded Web Server Administrator s Guide - Page 31
allows the definition of simple internal device security authentication methods. Notes: • This feature is available only in advanced‑security printer models as a simple‑security access restriction method. • The device factory default settings do not contain any authentication or authorization - Lexmark MX718 | Embedded Web Server Administrator s Guide - Page 32
Securing printers 32 3 Under Modify or Remove Basic Security Setup, enter your new with a unique name of up to 128 characters to create a security template. Each device can support up to 140 security templates. Though the names of security templates must be different from one another, - Lexmark MX718 | Embedded Web Server Administrator s Guide - Page 33
3 Click Submit to save the changes, or Reset Form to cancel all changes. Notes: • To help prevent unauthorized access, log out from the printer after each session. • For a list of individual access controls, see "Appendix D: Access controls" on page 84. Editing or deleting a security template 1 From - Lexmark MX718 | Embedded Web Server Administrator s Guide - Page 34
Securing printers 34 5 If the PIN is used as the Administrator PIN, then click Admin Delete List. Setting up internal accounts Administrators can configure one internal account building block per supported device. Each internal account building block can include a maximum of 750 user accounts and - Lexmark MX718 | Embedded Web Server Administrator s Guide - Page 35
building blocks. It also simplifies certificate chain download. Note: Use HTTPS to protect the credentials that are used to join the printer to the domain. 1 From the Embedded Web Server, click Settings > Security > Security Setup. 2 Under Advanced Security Setup, click Active Directory > Join an - Lexmark MX718 | Embedded Web Server Administrator s Guide - Page 36
File to open the Kerberos Config file that was created using the Active Directory setup. c Review the file, and then click the back button of the browser. Note: To avoid issues with KDC Server Affinity Service, do not edit or copy the Kerberos Config file to use with older devices. Older devices - Lexmark MX718 | Embedded Web Server Administrator s Guide - Page 37
fier-This setting is a container or organizational unit that a device searches to validate whether an than other authentication methods. Notes: • Supported devices can store a maximum of fi for authentication. If an outage prevents the printer from communicating with the server, then users - Lexmark MX718 | Embedded Web Server Administrator s Guide - Page 38
unit), o (organization), c (country), and dc (domain). - Search Timeout-Enter a value from 5 to 30 seconds or 5 to 300 seconds, depending on your printer model to be pulled from the existing network comparable to other network services. - Anonymous LDAP Bind-Bind the Embedded Web Server with - Lexmark MX718 | Embedded Web Server Administrator s Guide - Page 39
more secure Generic Security Services Application Programming Interface ( LDAP+GSSAPI requires Kerberos 5 to be configured. • Supported devices can store a maximum of five unique LDAP+GSSAPI To help prevent unauthorized access, log out from the printer after each session. Adding an LDAP+GSSAPI setup 1 - Lexmark MX718 | Embedded Web Server Administrator s Guide - Page 40
by commas, such as cn (common name), ou (organizational unit), o (organization), c (country), and dc (domain). • Search Timeout-Enter a value from 5 to 30 seconds or 5 to 300 seconds depending on your printer model. • Use Kerberos Service Ticket-If selected, then a Kerberos ticket is presented to - Lexmark MX718 | Embedded Web Server Administrator s Guide - Page 41
Kerberos configuration file (krb5.conf) can be stored on a supported device, that file can apply to multiple realms and Kerberos Domain types of authentication rely on an external server. If an outage prevents the printer from communicating with the server, then users are able to access protected - Lexmark MX718 | Embedded Web Server Administrator s Guide - Page 42
require key requests to have a recent time stamp (usually within 300 seconds). Therefore, the printer clock must be in sync or closely aligned with the KDC system clock. You can update the printer clock settings manually. You can also set it to use Network Time Protocol (NTP) to sync automatically - Lexmark MX718 | Embedded Web Server Administrator s Guide - Page 43
a certificate signing request that can be viewed or downloaded. This facilitates the process of obtaining the signed certificate for the printer. 1 From the Embedded Web Server, click Settings > Security > Certificate Management > Set Certificate Defaults. 2 Update the information on the device to - Lexmark MX718 | Embedded Web Server Administrator s Guide - Page 44
Certificate. 9 Click Choose File, and then select the CA‑signed device certificate file that was created in step 8. 10 Click Submit. Note: The printer can now present a valid CA‑signed certificate to systems to which it attempts to negotiate an SSL or IPSec connection. Creating a new device certi - Lexmark MX718 | Embedded Web Server Administrator s Guide - Page 45
printers 45 • Organization Name-Type the name of the company or organization issuing the certificate (128‑character maximum). • Unit Name-Type the name of the unit Administrators can set default values for certificates generated for a supported device. The values entered here will be present in all - Lexmark MX718 | Embedded Web Server Administrator s Guide - Page 46
certificate monitor Note: This setting is available only in printer models that support Active Directory. When the device is joined to an Active immediately. 3 Click Submit. 4 Click Certificate Authority Management, then review the downloaded CA certificate chain by selecting on the name from the - Lexmark MX718 | Embedded Web Server Administrator s Guide - Page 47
become unavailable, such as when there is a network communication problem or an authentication server fails. Notes: • In some "public." 5 Select Enable PPM Mib (Printer Port Monitor MIB) to facilitate the automatic installation of device drivers and other printing applications. 6 Click Submit - Lexmark MX718 | Embedded Web Server Administrator s Guide - Page 48
Securing printers 48 3 Type login information in the SNMPv3 Read/Write User and SNMPv3 Hash list, select MD5 or SHA1. 6 From the SNMPv3 Privacy Algorithm list, select the strongest setting supported by your network environment. 7 Click Submit to save the changes, or Reset Form to restore the - Lexmark MX718 | Embedded Web Server Administrator s Guide - Page 49
Securing printers 49 7 From the Remote Syslog Facility menu, select a facility code for events to be logged to on the server before timing out. The default value is 30 seconds. 6 To receive responses to messages sent from the printer (in case of failed or bounced messages), type the reply address. - Lexmark MX718 | Embedded Web Server Administrator s Guide - Page 50
embedded key that is known only to Lexmark. However, the strongest security measure comes From the Embedded Web Server, click Settings > Update Firmware. 2 Browse to the flash file. 3 Click printing Note: This feature is available only in printer models that allow PIN selection from the control panel - Lexmark MX718 | Embedded Web Server Administrator s Guide - Page 51
time for a print job that you want to repeat. Verify Job Expiration Off 1 hour 4 hours 24 hours 1 week Set the expiration time that the printer prints a copy for the user to examine its quality, before printing the remaining copies. Reserve Job Expiration Off 1 hour 4 hours 24 hours 1 week Set - Lexmark MX718 | Embedded Web Server Administrator s Guide - Page 52
disabling USB host ports Note: This setting is available only in some printer models. USB host ports on devices do the following: • Detect and in the inserted USB mass storage devices, such as a flash drive. • Print a supported file from the flash drive or initiate a firmware update. • Scan data directly - Lexmark MX718 | Embedded Web Server Administrator s Guide - Page 53
reset jumper Note: This feature is available only in some printer models. If the device is locked down due to a menus. To replace the device controller board and regain access to the security menus, a service call is required. Enabling Operator Panel Lock Use the Operator Panel Lock feature to lock - Lexmark MX718 | Embedded Web Server Administrator s Guide - Page 54
• When the device is locked, incoming print and fax jobs are stored in the printer hard disk. If the hard disk is encrypted, then the jobs stored are encrypted. associated with wireless devices and connectivity, 802.1X authentication supports both wired and wireless environments. 802.1X is located - Lexmark MX718 | Embedded Web Server Administrator s Guide - Page 55
Active to enable 802.1X authentication. b Type the login name and password the printer uses to log in to the authentication server. c Select the Validate Server Certi traffic between the systems with a strong encryption. The devices support IPSec with preshared keys and certificates. Both modes can - Lexmark MX718 | Embedded Web Server Administrator s Guide - Page 56
to make TCP connections. 3 From the Restricted Server List Options menu, set the blocking option. 4 Click Submit. Securing data Physical lock Most Lexmark printers support cabled computer locks used to secure the critical and sensitive components of the device, such as the controller board and hard - Lexmark MX718 | Embedded Web Server Administrator s Guide - Page 57
, network information, scanner and bookmark settings, and embedded solutions. Some printers may have a hard disk drive installed. The printer hard disk is designed for printer-specific functionality. The hard disk lets the printer retain buffered user data from complex print jobs, form data, and - Lexmark MX718 | Embedded Web Server Administrator s Guide - Page 58
organization. • The printer is removed from your premises for service. • The printer is sold to another organization. Disposing of a printer hard disk • or the Embedded Web Server. For more information, see the printer User's Guide. • Device and network settings-Erase device and network settings, - Lexmark MX718 | Embedded Web Server Administrator s Guide - Page 59
disk are indecipherable. When an encrypted hard disk is moved to another supported device, the hard disk attempts to verify its encryption key with the the disk encryption task. Warning-Potential Damage: Do not turn off the printer during the encryption process. 4 Refresh the web page to return to - Lexmark MX718 | Embedded Web Server Administrator s Guide - Page 60
the configuration menu or the device Embedded Web Server, you can add more options for erasing groups of settings (printer, settings, or application settings). The Erase Printer Memory option (also called Wipe All Settings on some devices) erases all contents stored on non‑volatile memory. Using Wipe - Lexmark MX718 | Embedded Web Server Administrator s Guide - Page 61
the hard disk and can be recovered with substantial effort. All printer models with a hard disk support an additional mechanism for protecting residual data, which is hard disk • Preparing the device to be serviced by someone outside the organization • Removing the device from the premises of - Lexmark MX718 | Embedded Web Server Administrator s Guide - Page 62
of the hard disk. • Perform Disk Wipe-Clear all job data. • Clear Settings and Solutions-Clear all settings and applications. Note: In some printer models, the Out of Service Wiping setting is visible only if security is enabled. Make sure that the access control for the security menus is set to use - Lexmark MX718 | Embedded Web Server Administrator s Guide - Page 63
the printer until an authorized user releases the job for printing. You can send and store jobs on printers with Print Jobs Administrator's Guide. Card Authentication Lexmark devices support a number of work with a card reader driver application. The card reader driver provides card ID data to other - Lexmark MX718 | Embedded Web Server Administrator s Guide - Page 64
Administrator's Guide. Security scenarios Scenario: Printer in a public place To provide simple protection for a printer located in access control is set to user PIN, any administrator PIN set for your printer is valid for that access control. For more information, see "Simple-security - Lexmark MX718 | Embedded Web Server Administrator s Guide - Page 65
Web Server for authentication or authorization in the following conditions • Your printer is not connected to a network. • You do not use an Note: Certain building blocks (such as PINs and passwords) do not support separate authorization. 5 To use authorization groups, click Modify Groups, and - Lexmark MX718 | Embedded Web Server Administrator s Guide - Page 66
deployed on the network. User credentials and group designations can be pulled from the existing network, making access to the printer as seamless as other network services. The device automatically downloads the domain controller CA certificate chain. Before configuring the Embedded Web Server to - Lexmark MX718 | Embedded Web Server Administrator s Guide - Page 67
ports except the HTTPS (443) port and the SNMPv3 port are blocked. 1 Configure the Active Directory domain. For more information, see "Connecting your printer to an Active Directory domain" on page 35. Make sure to specify the following: • Domain name • User ID • Password Note: Make sure to enable - Lexmark MX718 | Embedded Web Server Administrator s Guide - Page 68
68 3 Configure the Smart Card Authentication bundle. For more information, see Smart Card Authentication Administrator's Guide. Note: To secure access to all applications and printer functions on the home screen, configure Background and Idle Screen. For more information, see Background and Idle - Lexmark MX718 | Embedded Web Server Administrator s Guide - Page 69
Troubleshooting 69 Troubleshooting Embedded Web Server does not open Try one or more of the following: Make sure that the printer IP address is correct View the printer IP address: • From the printer if the printer is turned on troubleshooting USB device is not supported Make sure that a supported - Lexmark MX718 | Embedded Web Server Administrator s Guide - Page 70
Troubleshooting 70 Printer home screen fails to return to a locked state when not then make sure that NTP settings are not automatically provided by the DHCP server before manually configuring NTP settings. 3 If the printer uses an NTP server, then make sure that those settings are correct and that - Lexmark MX718 | Embedded Web Server Administrator s Guide - Page 71
Troubleshooting 71 Kerberos configuration file is not uploaded This error uppercase. Domain controller certificate is not installed Make sure that the correct certificate is installed on the printer For more information, see "Managing certificates and other settings" on page 42. KDC did not respond - Lexmark MX718 | Embedded Web Server Administrator s Guide - Page 72
Troubleshooting 72 Make sure that Port 88 is not blocked by a firewall Port 88 must be opened between the printer and the realm has been added to the file The Smart Card Authentication settings do not support multiple Kerberos Realm entries. If multiple realms are needed, then create and upload a - Lexmark MX718 | Embedded Web Server Administrator s Guide - Page 73
seconds) of the Panel Login Timeout setting. 3 Apply the changes. LDAP troubleshooting LDAP lookups take a long time and then fail This issue can occur non‑SSL) and Port 636 (SSL) are not blocked by a firewall The printer uses these ports to communicate with the LDAP server. The ports must be open - Lexmark MX718 | Embedded Web Server Administrator s Guide - Page 74
correct Held Jobs / Print Release Lite troubleshooting Cannot use the Held Jobs / Print The smart card principal name or the credential provided by manual login is used to set the user ID (userid the correct printer and were printed The jobs may have been sent to a different printer, or automatically - Lexmark MX718 | Embedded Web Server Administrator s Guide - Page 75
Troubleshooting to be Held and Clear Print Data . 3 Apply the changes. Scanning problems A network destination stopped working or is invalid Try one or more of the and then confirm the destination network address. Make sure that the printer is connected to the network Make sure that the user name and - Lexmark MX718 | Embedded Web Server Administrator s Guide - Page 76
Troubleshooting 76 Check the system log 1 From the Embedded Web Server, click Settings or Configuration. 2 Depending on your printer model, do one of the following: • Click Apps > Apps Management. • Click Device Solutions > Solutions (eSF). • Click Embedded Solutions. 3 Click System > Log. 4 Select - Lexmark MX718 | Embedded Web Server Administrator s Guide - Page 77
Troubleshooting 77 Make sure that the printer and destination have the same subnet For more information, contact your system administrator. Make sure that the LDAP settings are configured properly in your printer setup and in the setup dialog For more information, contact your system administrator. - Lexmark MX718 | Embedded Web Server Administrator s Guide - Page 78
Troubleshooting 78 Faxing problems Failure to receive fax from one sender Try one Receive Settings section, click Enable Fax Receive. 3 Click Submit. If using a distinctive ring service, then confirm that the printer is configured properly to pick up the correct ring pattern 1 From the Embedded Web - Lexmark MX718 | Embedded Web Server Administrator s Guide - Page 79
Troubleshooting 79 Check the fax forwarding setting Note: This feature is available only in some printer models. 1 From the Embedded Web to all fax destinations Try one or more of the following: Make sure that the printer is not configured for Fax Server mode 1 From the Embedded Web Server, click - Lexmark MX718 | Embedded Web Server Administrator s Guide - Page 80
Troubleshooting 80 Check if you are using a PABX telephone system Private Automated and identify the status message From the Embedded Web Server, click Reports > Fax Job Log. Networking problems Printer is not communicating on the network Try one or more of the following: Check the network status - Lexmark MX718 | Embedded Web Server Administrator s Guide - Page 81
Troubleshooting 81 Check the printer port access 1 From the Embedded Web Server, click Settings > Ports > TCP/IP. 2 Locate the Restricted Server List, and then check for the printer IP address. 3 If the printer IP address is listed, then remove it. 4 Click Submit. Make sure that communication - Lexmark MX718 | Embedded Web Server Administrator s Guide - Page 82
click Download CA Certificate. Note: DER encoding is not supported. 4 Save the certificate that is offered in a fi click Download Certificate. Note: DER encoding is not supported. 8 Save the certificate that is offered in on the printer. This quick and simple process replaces the previous manual process. - Lexmark MX718 | Embedded Web Server Administrator s Guide - Page 83
Appendix 83 Note: The following example usage instructions assume that the Certificate Enrollment Web Services is installed on a Windows 2008 R2 server. 1 Open a web browser, and then type the IP address or host name of the printer in the address field. 2 From the Embedded Web Server, click Settings - Lexmark MX718 | Embedded Web Server Administrator s Guide - Page 84
Note: Some access controls are supported only in some printer models. Administrative Menus Function access control Service Engineer Menus at the Device Protects access to the Service Engineer menu from the printer control panel. Service Engineer Menus Remotely Protects access to the Service - Lexmark MX718 | Embedded Web Server Administrator s Guide - Page 85
any source other than a flash drive. Firmware files that are received through FTP, the Embedded Web Server, and other sources, are ignored (flushed) when this function is protected. Operator Panel Lock Protects access to the locking function of the printer control panel. If this function is enabled - Lexmark MX718 | Embedded Web Server Administrator s Guide - Page 86
access to the Held Jobs function. Controls the ability for some devices to print from an attached PictBridge‑enabled digital camera. Note: Supported only in some printer models. Controls the ability to release (print) held faxes. Controls access to profiles, such as scanning shortcuts, workflows, and - Lexmark MX718 | Embedded Web Server Administrator s Guide - Page 87
. For more information about configuring user access, see the Common Criteria Installation Supplement and Administrator Guide. Understanding the home screen The screen located on the front of the printer is touch‑sensitive and can be used to access device functions and navigate settings and con - Lexmark MX718 | Embedded Web Server Administrator s Guide - Page 88
Appendix 88 Using the on‑screen keyboard Some device settings require one or more alphanumeric entries, such as server addresses, user names, and passwords. When an alphanumeric entry is needed, a keyboard appears: Password ~ 1! @# 23 $ 4 5% ^ 6 &* 7 8 ( 9 ) 0 _ + - = @ QWE R T YU - Lexmark MX718 | Embedded Web Server Administrator s Guide - Page 89
services, except those expressly designated by the manufacturer, are the user's responsibility. For Lexmark technical support, visit http://support.lexmark Trademarks Lexmark, the Lexmark logo, and Markvision are trademarks or registered trademarks of Lexmark International, Inc. in the United States - Lexmark MX718 | Embedded Web Server Administrator s Guide - Page 90
Notices 90 GifEncoder GifEncoder - writes out an image as a GIF. Transparency handling and variable bit size courtesy OR CONSEQUENTIAL DAMAGES (INCLUDING, BUT NOT LIMITED TO, PROCUREMENT OF SUBSTITUTE GOODS OR SERVICES; LOSS OF USE, DATA, OR PROFITS; OR BUSINESS INTERRUPTION) HOWEVER CAUSED AND - Lexmark MX718 | Embedded Web Server Administrator s Guide - Page 91
Notices 91 "Legal Entity" shall mean the union of the acting entity and all other entities that control, are controlled by, or are under common control with that entity. For the purposes of this definition, "control" means (i) the power, direct or indirect, to cause the direction or management of - Lexmark MX718 | Embedded Web Server Administrator s Guide - Page 92
This License does not grant permission to use the trade names, trademarks, service marks, or product names of the Licensor, except as required for may choose to offer, and charge a fee for, acceptance of support, warranty, indemnity, or other liability obligations and/or rights consistent with - Lexmark MX718 | Embedded Web Server Administrator s Guide - Page 93
Notices 93 APPENDIX: How to apply the Apache License to your work. To apply the Apache License to your work, attach the following boilerplate notice, with the fields enclosed by brackets "[]" replaced with your own identifying information. (Don't include the brackets!) The text should be enclosed - Lexmark MX718 | Embedded Web Server Administrator s Guide - Page 94
Glossary of Security Terms 94 Glossary of Security Terms Access Controls Authentication Authorization Building Block Group Security Template Settings that control whether individual device menus, functions, and settings are available, and to whom. Also referred to as Function Access Controls on - Lexmark MX718 | Embedded Web Server Administrator s Guide - Page 95
29 accessing the Embedded Web Server 5 Active Directory connecting a printer to 35 active network card selecting 26 adding a Scan to settings 17 configuring FTP settings 11 Configuring Out of Service Erase 62 configuring out‑of‑service wiping 62 configuring supply notifications 8 configuring the - Lexmark MX718 | Embedded Web Server Administrator s Guide - Page 96
security 4 disk encryption status checking 59 disk wiping out of service 62 distinctive rings setting 23 domain certificate error 71 domain does not open 69 encrypting the printer hard disk 59 erasing hard disk 61 erasing non‑volatile memory 58, 59 erasing printer memory 57 erasing temporary data fi - Lexmark MX718 | Embedded Web Server Administrator s Guide - Page 97
75 non‑volatile memory 57 erasing 58 O Operator Panel Lock enabling 53 out‑of‑service wiping configuring 62 overview 4 P Panel PIN Protect 31 parts checking status 7 templates 65 creating passwords and PINs 64 creating security templates 64 printer in a public place 64 standalone or small office 65 - Lexmark MX718 | Embedded Web Server Administrator s Guide - Page 98
clock out of sync 70 printer not communicating on the network 80 problem getting user info 72 realm on card not found 72 unable to authenticate 71 unable to determine Windows user ID 74 unexpected logout 73 unknown client 72 unsupported USB device 69 USB device not supported 69 user is logged out
-
 1
1 -
 2
2 -
 3
3 -
 4
4 -
 5
5 -
 6
6 -
 7
7 -
8
-
9
-
10
-
11
-
12
-
13
-
14
-
15
-
16
-
17
-
18
-
19
-
20
-
21
-
22
-
23
-
24
-
25
-
26
-
27
-
28
-
29
-
30
-
31
-
32
-
33
-
34
-
35
-
36
-
37
-
38
-
39
-
40
-
41
-
42
-
43
-
44
-
45
-
46
-
47
-
48
-
49
-
50
-
51
-
52
-
53
-
54
-
55
-
56
-
57
-
58
-
59
-
60
-
61
-
62
-
63
-
64
-
65
-
66
-
67
-
68
-
69
-
70
-
71
-
72
-
73
-
74
-
75
-
76
-
77
-
78
-
79
-
80
-
81
-
82
-
83
-
84
-
85
-
86
-
87
-
88
-
89
-
90
-
91
-
92
-
93
-
94
-
95
-
96
-
97
-
98
 |
 |
Embedded Web Server
Administrator's Guide
October 2018
www.lexmark.com
Models:
C2132, CS310, CS317, CS410, CS417, CS510, CS517, CX310, CX317, CX410, CX417, CX510, CX517, M1140, M1140+, M1145, M3150, M5155, M5163, M5170,
MS310, MS312, MS315, MS317, MS410, MS415, MS417, MS510, MS517, MS610, MS617, MS710, MS711, MS810, MS811, MS812, MS817, MS818, MS911, MX310,
MX317, MX410, MX417, MX510, MX511, MX517, MX610, MX611, MX617, MX710, MX711, MX717, MX718, MX810, MX811, MX812, MX910, MX911, MX912, XC2130,
XC2132, XM1135, XM1140, XM1145, XM3150, XM5163, XM5170, XM5263, XM7155, XM7163, XM7170, XM7263, XM7270, XM9145, XM9155, XM9165 Printers
and MFPs