Lexmark Pinnacle Pro901 User's Guide - Page 87
Entering your user information, Setting the fax header
 |
View all Lexmark Pinnacle Pro901 manuals
Add to My Manuals
Save this manual to your list of manuals |
Page 87 highlights
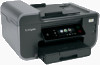
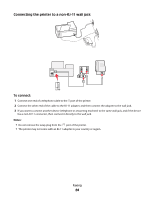
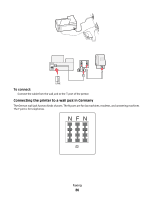
Connect the printer to any of the N ports. EXT LINE NFN PHONE LINE To connect: 1 Connect one end of a telephone cable to the port of the printer. 2 Connect the other end of the cable to the RJ-11 adapter, and then connect the adapter to an N port. 3 If you want to connect a telephone and answering machine to the same wall jack, then connect the devices as shown. Entering your user information Your user information includes your name or your company name, your fax number (your fax number is your telephone number, unless you have a dedicated fax telephone line), and the time and date on your fax machine when a transmission is made. This information appears in the header and footer of the faxes that you send. In some countries, you cannot send a fax without this information. Some fax machines also block faxes without sender information, so make sure that you enter this information in your printer. Setting the fax header 1 From the home screen, navigate to Your Fax Name: > Fax Setup > Dialing and Sending > Your Fax Name 2 Enter your name or your company name, and then touch OK. 3 Touch Your Fax Number. 4 Enter your fax number or your telephone number, and then touch Accept. Faxing 87
-
 1
1 -
2
-
3
-
4
-
5
-
6
-
7
-
8
-
9
-
10
-
11
-
12
-
13
-
14
-
15
-
16
-
17
-
18
-
19
-
20
-
21
-
22
-
23
-
24
-
25
-
26
-
27
-
28
-
29
-
30
-
31
-
32
-
33
-
34
-
35
-
36
-
37
-
38
-
39
-
40
-
41
-
42
-
43
-
44
-
45
-
46
-
47
-
48
-
49
-
50
-
51
-
52
-
53
-
54
-
55
-
56
-
57
-
58
-
59
-
60
-
61
-
62
-
63
-
64
-
65
-
66
-
67
-
68
-
69
-
70
-
71
-
72
-
73
-
74
-
75
-
76
-
77
-
78
-
79
-
80
-
81
-
 82
82 -
 83
83 -
 84
84 -
 85
85 -
 86
86 -
 87
87 -
 88
88 -
 89
89 -
 90
90 -
 91
91 -
 92
92 -
93
-
94
-
95
-
96
-
97
-
98
-
99
-
100
-
101
-
102
-
103
-
104
-
105
-
106
-
107
-
108
-
109
-
110
-
111
-
112
-
113
-
114
-
115
-
116
-
117
-
118
-
119
-
120
-
121
-
122
-
123
-
124
-
125
-
126
-
127
-
128
-
129
-
130
-
131
-
132
-
133
-
134
-
135
-
136
-
137
-
138
-
139
-
140
-
141
-
142
-
143
-
144
-
145
-
146
-
147
-
148
-
149
-
150
-
151
-
152
-
153
-
154
-
155
-
156
-
157
-
158
-
159
-
160
-
161
-
162
-
163
-
164
-
165
-
166
-
167
-
168
-
169
-
170
-
171
-
172
-
173
-
174
-
175
-
176
-
177
-
178
-
179
-
180
-
181
-
182
-
183
-
184
-
185
-
186
-
187
-
188
-
189
-
190
-
191
-
192
-
193
-
194
-
195
-
196
-
197
-
198
-
199
 |
 |