Lexmark Pinnacle Pro901 User's Guide - Page 88
Configuring the fax settings, Configuring fax settings using the fax software
 |
View all Lexmark Pinnacle Pro901 manuals
Add to My Manuals
Save this manual to your list of manuals |
Page 88 highlights
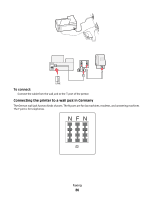
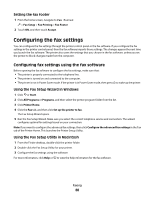
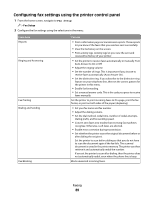
Setting the fax footer 1 From the home screen, navigate to Fax Footer: > Fax Setup > Fax Printing > Fax Footer 2 Touch ON, and then touch Accept. Configuring the fax settings You can configure the fax settings through the printer control panel or the fax software. If you configure the fax settings in the printer control panel, then the fax software imports those settings. The changes appear the next time you launch the fax software. The printer also saves the settings that you choose in the fax software, unless you set the printer to block changes made from the computer. Configuring fax settings using the fax software Before opening the fax software to configure the fax settings, make sure that: • The printer is properly connected to the telephone line. • The printer is turned on and connected to the computer. • The printer is not in Power Saver mode. If the printer is in Power Saver mode, then press to wake up the printer. Using the Fax Setup Wizard in Windows 1 Click or Start. 2 Click All Programs or Programs, and then select the printer program folder from the list. 3 Click Printer Home. 4 Click the Fax tab, and then click Set up the printer to fax. The Fax Setup Wizard opens. 5 Run the Fax Setup Wizard. Make sure you select the correct telephone service and connection. The wizard configures optimal fax settings based on your connection. Note: If you want to configure the advanced fax settings, then click Configure the advanced fax settings in the Fax tab of the Printer Home. This launches the Printer Setup Utility. Using the Fax Setup Utility in Macintosh 1 From the Finder desktop, double-click the printer folder. 2 Double-click the Fax Setup Utility for your printer. 3 Configure the fax settings using the software. For more information, click Help or to view the help information for the fax software. Faxing 88
-
 1
1 -
2
-
3
-
4
-
5
-
6
-
7
-
8
-
9
-
10
-
11
-
12
-
13
-
14
-
15
-
16
-
17
-
18
-
19
-
20
-
21
-
22
-
23
-
24
-
25
-
26
-
27
-
28
-
29
-
30
-
31
-
32
-
33
-
34
-
35
-
36
-
37
-
38
-
39
-
40
-
41
-
42
-
43
-
44
-
45
-
46
-
47
-
48
-
49
-
50
-
51
-
52
-
53
-
54
-
55
-
56
-
57
-
58
-
59
-
60
-
61
-
62
-
63
-
64
-
65
-
66
-
67
-
68
-
69
-
70
-
71
-
72
-
73
-
74
-
75
-
76
-
77
-
78
-
79
-
80
-
81
-
82
-
 83
83 -
 84
84 -
 85
85 -
 86
86 -
 87
87 -
 88
88 -
 89
89 -
 90
90 -
 91
91 -
 92
92 -
 93
93 -
94
-
95
-
96
-
97
-
98
-
99
-
100
-
101
-
102
-
103
-
104
-
105
-
106
-
107
-
108
-
109
-
110
-
111
-
112
-
113
-
114
-
115
-
116
-
117
-
118
-
119
-
120
-
121
-
122
-
123
-
124
-
125
-
126
-
127
-
128
-
129
-
130
-
131
-
132
-
133
-
134
-
135
-
136
-
137
-
138
-
139
-
140
-
141
-
142
-
143
-
144
-
145
-
146
-
147
-
148
-
149
-
150
-
151
-
152
-
153
-
154
-
155
-
156
-
157
-
158
-
159
-
160
-
161
-
162
-
163
-
164
-
165
-
166
-
167
-
168
-
169
-
170
-
171
-
172
-
173
-
174
-
175
-
176
-
177
-
178
-
179
-
180
-
181
-
182
-
183
-
184
-
185
-
186
-
187
-
188
-
189
-
190
-
191
-
192
-
193
-
194
-
195
-
196
-
197
-
198
-
199
 |
 |