Lexmark Platinum Pro900 User's Guide - Page 66
For Windows users, For Macintosh users, All Programs
 |
View all Lexmark Platinum Pro900 manuals
Add to My Manuals
Save this manual to your list of manuals |
Page 66 highlights
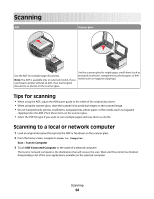
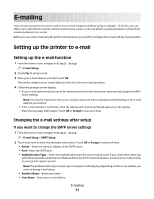
3 Touch USB-Connected Computer or the name of a network computer. The local or network computer is the destination that will receive the scan. Wait until the printer has finished downloading the list of scan applications available on the selected computer. Notes: • You may be prompted to enter a PIN if the computer requires it. Enter the PIN using the keypad. • To assign a computer name and a PIN to the computer, see the Help for the printer software associated with your operating system. 4 Select an application, and then touch Accept. 5 Select the resolution quality and the original image size. Touch Accept each time you make a selection. 6 Press to start scanning. The scan is complete when the application you selected in step 5 opens on the destination computer, and the scan appears within the application as a new file. Using the printer software For Windows users 1 Load a photo or photos facedown on the scanner glass. 2 Click or Start. 3 Click All Programs or Programs, and then select the printer program folder from the list. 4 Select Printer Home. 5 Choose your printer from the printer drop-down list. 6 Click Photo. • If you want to scan a single photo, or multiple photos as a single image, then select Single photo. • If you want to scan multiple photos at once and save them as separate images, then select Split into individual photos. Note: Allow at least 1/4 inch of space between photos if you want to scan multiple photos at once and save them as separate images. Scanning starts and the scan progress dialog appears. 7 Save the photo or photos and open in a photo editing application to edit. For Macintosh users 1 Load a photo or photos facedown on the scanner glass. 2 From the Finder desktop, double-click the printer program folder. 3 Double-click the printer Center to open the All-In-One Center. 4 From the "What is being scanned?" menu on the main screen, select Photo. 5 From the "How will the scanned image be used?" pop-up menu, choose To be printed or To be viewed on monitor/Web page. 6 From the "Send scanned image to" menu, choose a destination folder or application for the scanned image. Scanning 66
-
 1
1 -
2
-
3
-
4
-
5
-
6
-
7
-
8
-
9
-
10
-
11
-
12
-
13
-
14
-
15
-
16
-
17
-
18
-
19
-
20
-
21
-
22
-
23
-
24
-
25
-
26
-
27
-
28
-
29
-
30
-
31
-
32
-
33
-
34
-
35
-
36
-
37
-
38
-
39
-
40
-
41
-
42
-
43
-
44
-
45
-
46
-
47
-
48
-
49
-
50
-
51
-
52
-
53
-
54
-
55
-
56
-
57
-
58
-
59
-
60
-
 61
61 -
 62
62 -
 63
63 -
 64
64 -
 65
65 -
 66
66 -
 67
67 -
 68
68 -
 69
69 -
 70
70 -
 71
71 -
72
-
73
-
74
-
75
-
76
-
77
-
78
-
79
-
80
-
81
-
82
-
83
-
84
-
85
-
86
-
87
-
88
-
89
-
90
-
91
-
92
-
93
-
94
-
95
-
96
-
97
-
98
-
99
-
100
-
101
-
102
-
103
-
104
-
105
-
106
-
107
-
108
-
109
-
110
-
111
-
112
-
113
-
114
-
115
-
116
-
117
-
118
-
119
-
120
-
121
-
122
-
123
-
124
-
125
-
126
-
127
-
128
-
129
-
130
-
131
-
132
-
133
-
134
-
135
-
136
-
137
-
138
-
139
-
140
-
141
-
142
-
143
-
144
-
145
-
146
-
147
-
148
-
149
-
150
-
151
-
152
-
153
-
154
-
155
-
156
-
157
-
158
-
159
-
160
-
161
-
162
-
163
-
164
-
165
-
166
-
167
-
168
-
169
-
170
-
171
-
172
-
173
-
174
-
175
-
176
-
177
-
178
-
179
-
180
-
181
-
182
-
183
-
184
-
185
-
186
-
187
-
188
-
189
-
190
-
191
-
192
-
193
-
194
-
195
-
196
-
197
-
198
-
199
 |
 |