Lexmark Platinum Pro900 User's Guide - Page 69
Scanning FAQ, How can I improve the quality of a scan?, How do I scan in black and white?
 |
View all Lexmark Platinum Pro900 manuals
Add to My Manuals
Save this manual to your list of manuals |
Page 69 highlights
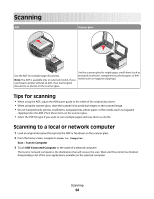
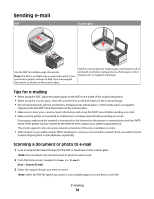
5 Choose your printer from the printer drop-down list. 6 Click PDF. Scanning starts and the scan progress dialog appears. 7 Save the document as a PDF. For Macintosh users 1 Load an original document faceup into the ADF or facedown on the scanner glass. 2 From the Finder desktop, double-click the printer program folder. 3 Double-click the printer Center to open the All-In-One Center. 4 From the "What is being scanned?" menu on the main screen, choose a document type. 5 Customize the settings as needed. 6 Click Scan. 7 Save the document as a PDF. Scanning FAQ How can I improve the quality of a scan? • Make sure your original documents are in good condition. • Make sure the application that receives the scanned document is appropriate. For example, if you are scanning a photo to edit it, then make sure you choose a photo editing application to receive the scan. If you are scanning a document to edit the text, then make sure you choose an OCR application. • Use a high resolution. How do I scan in black and white? Color is the default for all scans. To scan in black and white, do the following: 1 From the home screen of the printer control panel, touch Scan. 2 Choose a scan destination. 3 Select the settings for the scan. 4 From the Scan Options screen, touch . Why am I being asked for a PIN? PINs are a security measure used to restrict the scanned information from going into certain locations, or to keep what is being scanned from being seen or used by others. You may be prompted to enter a PIN if the network computer you are scanning to requires one. To learn how PINs get assigned to network computers, see the Help for the printer software associated with your operating system. Scanning 69
-
 1
1 -
2
-
3
-
4
-
5
-
6
-
7
-
8
-
9
-
10
-
11
-
12
-
13
-
14
-
15
-
16
-
17
-
18
-
19
-
20
-
21
-
22
-
23
-
24
-
25
-
26
-
27
-
28
-
29
-
30
-
31
-
32
-
33
-
34
-
35
-
36
-
37
-
38
-
39
-
40
-
41
-
42
-
43
-
44
-
45
-
46
-
47
-
48
-
49
-
50
-
51
-
52
-
53
-
54
-
55
-
56
-
57
-
58
-
59
-
60
-
61
-
62
-
63
-
 64
64 -
 65
65 -
 66
66 -
 67
67 -
 68
68 -
 69
69 -
 70
70 -
 71
71 -
 72
72 -
 73
73 -
 74
74 -
75
-
76
-
77
-
78
-
79
-
80
-
81
-
82
-
83
-
84
-
85
-
86
-
87
-
88
-
89
-
90
-
91
-
92
-
93
-
94
-
95
-
96
-
97
-
98
-
99
-
100
-
101
-
102
-
103
-
104
-
105
-
106
-
107
-
108
-
109
-
110
-
111
-
112
-
113
-
114
-
115
-
116
-
117
-
118
-
119
-
120
-
121
-
122
-
123
-
124
-
125
-
126
-
127
-
128
-
129
-
130
-
131
-
132
-
133
-
134
-
135
-
136
-
137
-
138
-
139
-
140
-
141
-
142
-
143
-
144
-
145
-
146
-
147
-
148
-
149
-
150
-
151
-
152
-
153
-
154
-
155
-
156
-
157
-
158
-
159
-
160
-
161
-
162
-
163
-
164
-
165
-
166
-
167
-
168
-
169
-
170
-
171
-
172
-
173
-
174
-
175
-
176
-
177
-
178
-
179
-
180
-
181
-
182
-
183
-
184
-
185
-
186
-
187
-
188
-
189
-
190
-
191
-
192
-
193
-
194
-
195
-
196
-
197
-
198
-
199
 |
 |