Lexmark Platinum Pro905 User's Guide - Page 10
Understanding the parts of the printer - support
 |
View all Lexmark Platinum Pro905 manuals
Add to My Manuals
Save this manual to your list of manuals |
Page 10 highlights
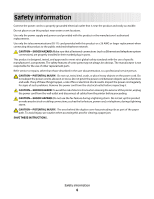
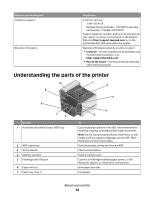
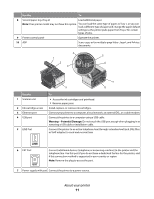
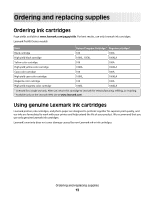
What are you looking for? Telephone support Warranty information Find it here In the US, call us at: 1-800-332-4120 Monday-Friday (8:00 AM-11:00 PM ET), Saturday and Sunday (11:00 AM-8:00 PM ET) Support telephone numbers and hours of operation for your region or country can be found on the Support Web site (http://support.lexmark.com) or on the printed warranty that came with your printer. Warranty information varies by country or region: • In the US-See the Statement of Limited Warranty included with this printer, or at http://support.lexmark.com. • Rest of the world-See the printed warranty that came with your printer. Understanding the parts of the printer 10 9 1 2 3 8 7 6 4 5 Use the 1 Automatic Document Feeder (ADF) tray 2 ADF output tray 3 Wi-Fi indicator 4 Memory card slot 5 PictBridge and USB port 6 Paper exit tray 7 Paper tray (Tray 1) To Load original documents in the ADF. Recommended for scanning, copying, or faxing multiple-page documents. Note: Do not load postcards, photos, small items, or thin media (such as magazine clippings) into the ADF. Place these items on the scanner glass. Hold documents as they exit from the ADF. Check wireless status. Insert a memory card. Connect a PictBridge-enabled digital camera, a USB Bluetooth adapter, or a flash drive to the printer. Hold paper as it exits. Load paper. About your printer 10
-
 1
1 -
2
-
3
-
4
-
 5
5 -
 6
6 -
 7
7 -
 8
8 -
 9
9 -
 10
10 -
 11
11 -
 12
12 -
 13
13 -
 14
14 -
 15
15 -
16
-
17
-
18
-
19
-
20
-
21
-
22
-
23
-
24
-
25
-
26
-
27
-
28
-
29
-
30
-
31
-
32
-
33
-
34
-
35
-
36
-
37
-
38
-
39
-
40
-
41
-
42
-
43
-
44
-
45
-
46
-
47
-
48
-
49
-
50
-
51
-
52
-
53
-
54
-
55
-
56
-
57
-
58
-
59
-
60
-
61
-
62
-
63
-
64
-
65
-
66
-
67
-
68
-
69
-
70
-
71
-
72
-
73
-
74
-
75
-
76
-
77
-
78
-
79
-
80
-
81
-
82
-
83
-
84
-
85
-
86
-
87
-
88
-
89
-
90
-
91
-
92
-
93
-
94
-
95
-
96
-
97
-
98
-
99
-
100
-
101
-
102
-
103
-
104
-
105
-
106
-
107
-
108
-
109
-
110
-
111
-
112
-
113
-
114
-
115
-
116
-
117
-
118
-
119
-
120
-
121
-
122
-
123
-
124
-
125
-
126
-
127
-
128
-
129
-
130
-
131
-
132
-
133
-
134
-
135
-
136
-
137
-
138
-
139
-
140
-
141
-
142
-
143
-
144
-
145
-
146
-
147
-
148
-
149
-
150
-
151
-
152
-
153
-
154
-
155
-
156
-
157
-
158
-
159
-
160
-
161
-
162
-
163
-
164
-
165
-
166
-
167
-
168
-
169
-
170
-
171
-
172
-
173
-
174
-
175
-
176
-
177
-
178
-
179
-
180
-
181
-
182
-
183
-
184
-
185
-
186
-
187
-
188
-
189
-
190
-
191
-
192
-
193
-
194
-
195
-
196
-
197
-
198
-
199
 |
 |