Lexmark Platinum Pro905 User's Guide - Page 116
Installing the printer on an Ethernet network, Networking FAQ, What is Wi-Fi Protected Setup?
 |
View all Lexmark Platinum Pro905 manuals
Add to My Manuals
Save this manual to your list of manuals |
Page 116 highlights
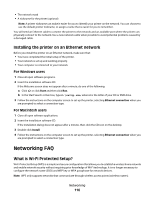
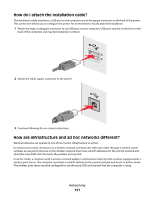
• The network mask • A nickname for the printer (optional) Note: A printer nickname can make it easier for you to identify your printer on the network. You can choose to use the default printer nickname, or assign a name that is easier for you to remember. You will need an Ethernet cable to connect the printer to the network and an available port where the printer can physically connect to the network. Use a new network cable when possible to avoid potential problems caused by a damaged cable. Installing the printer on an Ethernet network Before you install the printer on an Ethernet network, make sure that: • You have completed the initial setup of the printer. • Your network is set up and working properly. • Your computer is connected to your network. For Windows users 1 Close all open software programs. 2 Insert the installation software CD. If the Welcome screen does not appear after a minute, do one of the following: a Click , or click Start and then click Run. b In the Start Search or Run box, type D:\setup.exe, where D is the letter of your CD or DVD drive. 3 Follow the instructions on the computer screen to set up the printer, selecting Ethernet connection when you are prompted to select a connection type. For Macintosh users 1 Close all open software applications. 2 Insert the installation software CD. If the installation dialog does not appear after a minute, then click the CD icon on the desktop. 3 Double-click Install. 4 Follow the instructions on the computer screen to set up the printer, selecting Ethernet connection when you are prompted to select a connection type. Networking FAQ What is Wi-Fi Protected Setup? Wi-Fi Protected Setup (WPS) is a simple and secure configuration that allows you to establish a wireless home network and enable network security without requiring prior knowledge of Wi-Fi technology. It is no longer necessary to configure the network name (SSID) and WEP key or WPA passphrase for network devices. Note: WPS only supports networks that communicate through wireless access points (wireless routers). Networking 116
-
 1
1 -
2
-
3
-
4
-
5
-
6
-
7
-
8
-
9
-
10
-
11
-
12
-
13
-
14
-
15
-
16
-
17
-
18
-
19
-
20
-
21
-
22
-
23
-
24
-
25
-
26
-
27
-
28
-
29
-
30
-
31
-
32
-
33
-
34
-
35
-
36
-
37
-
38
-
39
-
40
-
41
-
42
-
43
-
44
-
45
-
46
-
47
-
48
-
49
-
50
-
51
-
52
-
53
-
54
-
55
-
56
-
57
-
58
-
59
-
60
-
61
-
62
-
63
-
64
-
65
-
66
-
67
-
68
-
69
-
70
-
71
-
72
-
73
-
74
-
75
-
76
-
77
-
78
-
79
-
80
-
81
-
82
-
83
-
84
-
85
-
86
-
87
-
88
-
89
-
90
-
91
-
92
-
93
-
94
-
95
-
96
-
97
-
98
-
99
-
100
-
101
-
102
-
103
-
104
-
105
-
106
-
107
-
108
-
109
-
110
-
 111
111 -
 112
112 -
 113
113 -
 114
114 -
 115
115 -
 116
116 -
 117
117 -
 118
118 -
 119
119 -
 120
120 -
 121
121 -
122
-
123
-
124
-
125
-
126
-
127
-
128
-
129
-
130
-
131
-
132
-
133
-
134
-
135
-
136
-
137
-
138
-
139
-
140
-
141
-
142
-
143
-
144
-
145
-
146
-
147
-
148
-
149
-
150
-
151
-
152
-
153
-
154
-
155
-
156
-
157
-
158
-
159
-
160
-
161
-
162
-
163
-
164
-
165
-
166
-
167
-
168
-
169
-
170
-
171
-
172
-
173
-
174
-
175
-
176
-
177
-
178
-
179
-
180
-
181
-
182
-
183
-
184
-
185
-
186
-
187
-
188
-
189
-
190
-
191
-
192
-
193
-
194
-
195
-
196
-
197
-
198
-
199
 |
 |