Lexmark Prestige Pro800 SmartSolutions User's Guide - Page 11
Adding a printer, Solution Center, Add Printer, Notes, Rename Printer
 |
View all Lexmark Prestige Pro800 manuals
Add to My Manuals
Save this manual to your list of manuals |
Page 11 highlights
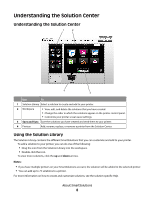
Adding a printer 1 Launch the SmartSolutions Web site on your computer. 2 Log on to the site. Note: If it is your first time to log in to the SmartSolutions Web site, then you will be prompted to create an account. 3 Click the Solution Center tab. 4 At the bottom of the screen, click Add Printer. 5 Follow the instructions to add your printer. Notes: • You only need to add your printer once. The next time you log in and use SmartSolutions, you do not need to add it again. • You can add more printers in your account. • To rename a printer, click Rename Printer in the printers area. • To remove a printer, click Remove Printer in the printers area. Getting started 11
-
 1
1 -
2
-
3
-
4
-
5
-
 6
6 -
 7
7 -
 8
8 -
 9
9 -
 10
10 -
 11
11 -
 12
12 -
 13
13 -
 14
14 -
 15
15 -
 16
16 -
17
-
18
-
19
-
20
-
21
-
22
-
23
-
24
-
25
-
26
-
27
-
28
-
29
-
30
-
31
-
32
-
33
-
34
-
35
-
36
-
37
-
38
-
39
-
40
-
41
-
42
-
43
-
44
-
45
-
46
-
47
-
48
-
49
-
50
-
51
 |
 |

Adding a printer
1
Launch the SmartSolutions Web site on your computer.
2
Log on to the site.
Note:
If it is your first time to log in to the SmartSolutions Web site, then you will be prompted to create an
account.
3
Click the
Solution Center
tab.
4
At the bottom of the screen, click
Add Printer
.
5
Follow the instructions to add your printer.
Notes:
•
You only need to add your printer once. The next time you log in and use SmartSolutions, you do not need to
add it again.
•
You can add more printers in your account.
•
To rename a printer, click
Rename Printer
in the printers area.
•
To remove a printer, click
Remove Printer
in the printers area.
Getting started
11