Lexmark Pro5500 Quick Reference
Lexmark Pro5500 Manual
 |
View all Lexmark Pro5500 manuals
Add to My Manuals
Save this manual to your list of manuals |
Lexmark Pro5500 manual content summary:
- Lexmark Pro5500 | Quick Reference - Page 1
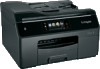
Pro5000-Pro5500 Series Quick Reference Guide January 2012 www.lexmark.com - Lexmark Pro5500 | Quick Reference - Page 2
color tanks, we recommend that you send at least two at a time to maximize the environmental benefits. This patented printer is licensed for, and designed to work with, only genuine Lexmark inkjet cartridges for the life of the patented printer for signs of such problems. Remove the power cord - Lexmark Pro5500 | Quick Reference - Page 3
supplies 18 Ordering ink cartridges...18 Replacing ink cartridges...18 Maintaining ink cartridges 19 Using the printer software 20 Minimum system requirements 20 Installing the printer software 20 Using the Windows printer software 20 Using the Macintosh printer software 21 Printing 23 - Lexmark Pro5500 | Quick Reference - Page 4
Contents 4 Configuring Wi‑Fi Protected Setup manually 41 Using SmartSolutions 42 What is SmartSolutions?...42 Troubleshooting 43 Notices 52 Edition notice...52 Index 53 - Lexmark Pro5500 | Quick Reference - Page 5
Print Preview dialog, or the printer display (depending on your printer model). Recycling • Return ink cartridges for reuse or recycling through the Lexmark Cartridge Collection Program. To return an ink cartridge, go to www.lexmark.com/recycle. Follow the instructions to request a postage‑paid bag - Lexmark Pro5500 | Quick Reference - Page 6
installation software CD that came with your printer works for the following printer models: • Pro5000 • Pro5500 Printer features Depending on the model, your printer comes with features that will help you manage and accomplish printing and imaging tasks: • Wireless networking-Print and scan from - Lexmark Pro5500 | Quick Reference - Page 7
About your printer 7 With a CD or DVD drive (Windows/Macintosh) Without a CD or DVD drive or for Linux Download the printer driver from www.lexmark.com. 4 Pull the paper tray completely out of the printer. Note: If the installation screen does not appear after a minute, then see "Installation - Lexmark Pro5500 | Quick Reference - Page 8
About your printer 6 For legal‑size paper, extend the paper tray. 1 8 8 Adjust the paper guides. 1 2 7 Load paper. 2 3 9 Insert the paper tray. SD/MS/xD/MMC Note: Make sure the paper is below the maximum fill line located on the edge - Lexmark Pro5500 | Quick Reference - Page 9
OK. OK English Espan~ ol Suomi Francais 13 Confirm the language, and then touch Yes. Language You have chosen English as the language for your Printer. Are you sure? Yes No 9 14 Set the country or region, and then touch Accept. Country / Region USA Uruguay US Virgin Islands Venezuela Accept - Lexmark Pro5500 | Quick Reference - Page 10
You are now ready to start using your new Pro5500 Series Printer. See great printing results Print a test to observe your printer in action. Configure Printer Settings Launch Printer Settings Application to configure your printer. 22 Flip down the ink cartridge access door. SD/MS/xD/MMC 1 2 - Lexmark Pro5500 | Quick Reference - Page 11
/xD/MMC 24 Close the ink cartridge access door. 2 SD/MS/xD/MMC 1 26 From the printer control panel, touch Continue to print an alignment page. SD/MS/xD/MMC Behind the cartridge access door, you will find the customer support label, which contains the ink compatibility information, model number - Lexmark Pro5500 | Quick Reference - Page 12
these items on the scanner glass. • After scanning, copying, or printer. 4 Card reader light Check the card reader status. The light comes on when a memory card is inserted and blinks when a memory card is being accessed. 5 Memory card slot Insert a memory card. 12 Use the To 6 Ink cartridge - Lexmark Pro5500 | Quick Reference - Page 13
of the printer, the customer support hot line, and the ink cartridge information. 2 Scanner glass Scan, copy, or fax photos and documents. 3 Power supply with port Connect the printer to the power cord. 4 Duplex unit • Print on both sides of a sheet of paper. • Access paper jams. 5 USB port - Lexmark Pro5500 | Quick Reference - Page 14
on the current screen. If an icon does not appear, then the function is not available. 1 2 3 4 7 6 5 Use 1 Power 2 Back To • Turn the printer on and off. • Switch to Sleep mode. Note: When the printer is on, press to switch to Sleep mode. Press and hold for three seconds to turn off the - Lexmark Pro5500 | Quick Reference - Page 15
the default print settings, touch More Options on the printer control panel. 5 SmartSolutions Access the SmartSolutions menu. 6 Ink levels icon 7 Setup icon • View the current ink levels of the installed cartridges. • Access cartridge maintenance and information functions. Access the setup menu - Lexmark Pro5500 | Quick Reference - Page 16
If necessary, touch OK or Accept after making a selection or changing a setting. Note: All the instructions in this guide start from the home screen. If you are not on the home screen, then touch . For or flash drive with the printer Insert a memory card into the card slot or a flash drive into the - Lexmark Pro5500 | Quick Reference - Page 17
inserted is supported by the printer. For more information, see "Supported memory cards and USB port while a memory card is in the card slot, then the display prompts you to choose which memory device to use. Supported Memory Stick PRO • Memory Stick Duo (with adapter) • Memory Stick PRO Duo (with - Lexmark Pro5500 | Quick Reference - Page 18
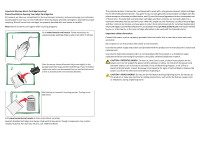
only genuine Lexmark ink cartridges. Replacing ink cartridges Make sure you have a new ink cartridge or cartridges before you begin. You must install new cartridges immediately after removing the old ones, or the ink remaining in the printhead nozzles may dry out. 1 Turn on your printer. 18 2 Open - Lexmark Pro5500 | Quick Reference - Page 19
first to save ink. • If the ink levels are too low, then you must replace the ink cartridges before you can clean the printhead nozzles. 1 From the home screen, touch > More Options. 2 Touch Clean Printhead or Deep Clean Printhead. 3 Select an option, and then wait until the printer is ready. - Lexmark Pro5500 | Quick Reference - Page 20
to: SUPPORT & DOWNLOADS > select your printer > select your operating system 3 Download the driver and install the printer software. Note: Updated printer software may be available at http://support.lexmark.com. Using the Windows printer software Software installed during printer installation When - Lexmark Pro5500 | Quick Reference - Page 21
mail a photo or document. • Edit scanned documents. • Scan documents to PDF. • Adjust settings for the printer. • Order supplies. • Maintain ink cartridges. • Register the printer. • Contact technical support. • Access the User's Guide. Manage your fax contacts. Scan a document and produce text that - Lexmark Pro5500 | Quick Reference - Page 22
you want to visit. Use Customer Support Lexmark Software Updates Lexmark Online Order Supplies Online Printer Registration Visit Lexmark SmartSolutions To Contact technical support. Download and install the latest printer software. Visit the Lexmark Web site. Order ink or supplies. Register your - Lexmark Pro5500 | Quick Reference - Page 23
page until printing stops. For Windows users 1 With a document open, click File > Print. 2 Click Properties, Preferences, Options, or Setup. 3 Navigate to: 23 Layout tab > Print on Both Sides (Duplex) area > select Print on both sides 4 Click OK to close any printer software dialogs. 5 Click OK or - Lexmark Pro5500 | Quick Reference - Page 24
least 24 hours before stacking, displaying, or storing. Canceling print jobs To cancel a print job from the printer control panel, press . To cancel a print job from the computer, do the following: For Windows users 1 Click , or click Start and then click Run. 2 In the Start Search or Run box, type - Lexmark Pro5500 | Quick Reference - Page 25
if your printer supports duplex scanning and the ADF supports the original document size. • Use the scanner glass when scanning two‑sided pages if your printer does not support duplex scanning or the ADF does not support the original document size. • When using the ADF, adjust the paper guides on - Lexmark Pro5500 | Quick Reference - Page 26
and then touch Accept. 7 Press . Follow the instructions on the display. The scan is complete when a message appears on the printer control panel indicating that the file you scanned has been saved. Scanning directly to e‑mail using the printer software For Windows users 1 Load an original document - Lexmark Pro5500 | Quick Reference - Page 27
: The preview feature is available only when scanning from the scanner glass. 5 From the Scan To pop‑up menu, choose an application that supports the PDF format. 6 From the Format pop‑up menu, choose PDF. 7 Click Scan. Canceling scan jobs Press on the printer control panel, or click Cancel on the - Lexmark Pro5500 | Quick Reference - Page 28
if your printer supports duplex scanning and the ADF supports the original document size. • Use the scanner glass when scanning two‑sided pages if your printer does not support duplex scanning or the ADF does not support the original document size. • When using the ADF, adjust the paper guides on - Lexmark Pro5500 | Quick Reference - Page 29
the setup that is applicable to your telephone service. Scenario 1: Standard telephone line Setup 1: Printer is connected to a dedicated fax line 29 Tips for this setup: • You can set the printer to receive faxes automatically (Auto Answer On) or manually (Auto Answer Off). • If you want to receive - Lexmark Pro5500 | Quick Reference - Page 30
ring service, then make sure that you set the correct ring pattern for the printer. Otherwise, the printer will not receive faxes even if you have set it to receive faxes automatically. • If you have only one telephone number on your line, then you need to set the printer to receive faxes manually - Lexmark Pro5500 | Quick Reference - Page 31
the telephone and you hear fax tones, press *9* or the manual answer code on the telephone to receive the fax. • You can also set the printer to receive faxes automatically (Auto Answer On), but you need to turn off the voice mail service when you are expecting a fax. This setting works best if - Lexmark Pro5500 | Quick Reference - Page 32
the correct splitter, plug an analog telephone into the splitter and then listen for a dial tone. 32 Scenario 4: Digital telephone service through a cable provider Setup 1: Printer is connected directly to a cable modem Follow this setup if you normally connect your telephone to a cable modem. To - Lexmark Pro5500 | Quick Reference - Page 33
that you do not have to plug your devices into the cable modem. Your cable telephone service comes from the wall jacks. 33 2 Remove the protective plug from the port. port of the printer, and then connect the telephone to the Scenario 5: Country‑ or region‑specific setup Different countries or - Lexmark Pro5500 | Quick Reference - Page 34
machine) to the same wall jack, and if the device has a non‑RJ 11 connector, then connect it directly to the wall jack. Connecting the printer in countries or regions that use serial connection In some countries or regions, you need to plug all devices into the wall jack. You cannot - Lexmark Pro5500 | Quick Reference - Page 35
region is on the list, then do not remove the wrap plug from the port of the printer. It is necessary for the proper functioning of the devices on the telephone line. 35 Connecting the printer to a wall jack in Germany The German wall jack has two kinds of ports. The N ports - Lexmark Pro5500 | Quick Reference - Page 36
plug an analog telephone into the port of the printer. 2 Listen for a dial tone. If you hear a dial tone, then the printer is properly connected to the telephone line. If you do not hear a dial tone, then review Step 1 or see the "Fax troubleshooting checklist" on page 46. Step 3: Set your fax name - Lexmark Pro5500 | Quick Reference - Page 37
before entering the contact name and fax number of the contact. 37 Using the fax software If you are connecting the printer to a computer, then you can also create a contact list using the fax software. For Windows users 1 Click or Start. 2 Click All Programs or Programs, and then select the - Lexmark Pro5500 | Quick Reference - Page 38
on your printer model, use the ADF when scanning duplex (two‑sided) pages. • To easily retrieve a document after copying or scanning, lift the ADF input tray. • When using the ADF, adjust the paper guide on the ADF to the width of the original document. • When using the scanner glass, close - Lexmark Pro5500 | Quick Reference - Page 39
service provided by your telephone company, then make sure that you set the correct ring pattern for the printer. Otherwise, the printer the handset, press on the printer or *9* on the telephone attached to the printer. Note: The default code for answering faxes manually is *9*, but for increased - Lexmark Pro5500 | Quick Reference - Page 40
same wireless network where you want to set up the printer. 40 For Windows users 1 Close all open software programs. 2 Insert the installation software CD. If the installation dialog does not appear after a minute, then launch the CD manually: a Click , or click Start and then click Run. b In the - Lexmark Pro5500 | Quick Reference - Page 41
access point or contact your system support person. Configuring Wi‑Fi Protected Setup manually If your printer or device has not yet been Method 2 Follow the instructions on the printer control panel. USE THE PERSONAL IDENTIFICATION NUMBER (PIN) METHOD 1 From the printer home screen, navigate - Lexmark Pro5500 | Quick Reference - Page 42
is a set of solutions that you can create, customize, and download from the SmartSolutions Web site (http://smartsolutions.lexmark.com) to your printer. It lets you create one-touch custom solutions to streamline repetitive copying, scanning, and printing tasks. SmartSolutions also lets you view RSS - Lexmark Pro5500 | Quick Reference - Page 43
print queue" on page 45 • "Cannot print through USB" on page 45 43 Installation screen did not appear during installation If the "Before you troubleshoot" checklist does not solve the problem, then try the following: LAUNCH THE PRINTER CD MANUALLY For Windows users 1 Click , or click Start and then - Lexmark Pro5500 | Quick Reference - Page 44
USB port on the computer. You may have connected to a defective port. REMOVE AND REINSTALL THE PRINTER SOFTWARE Printer is printing blank pages Blank pages may be caused by improperly installed ink cartridges. REINSTALL THE INK CARTRIDGES AND DEEP CLEAN AND ALIGN THE PRINTHEAD 1 Reinstall the ink - Lexmark Pro5500 | Quick Reference - Page 45
power cord into the wall outlet, and then turn on the printer. If this problem persists, then check our Web site for updates for your printer software or firmware. RECONNECT THE PRINTER POWER SUPPLY 1 Turn off the printer. Note: Make sure the printer is not in Sleep mode. Press and hold for three - Lexmark Pro5500 | Quick Reference - Page 46
"Fax troubleshooting checklist" does not solve the problem, then try one or more of the following: MAKE SURE TO ENTER YOUR USER INFORMATION IN THE PRINTER If If the receiving fax machine does not support color fax, then this option automatically converts the outgoing color fax to black and white. It - Lexmark Pro5500 | Quick Reference - Page 47
can open the fax software and configure the fax settings. Network troubleshooting If you are having trouble setting up your printer on a network, print a network setup page, and then see the complete network troubleshooting information in the Network Getting Started Guide or the comprehensive User - Lexmark Pro5500 | Quick Reference - Page 48
If you encountered problems while installing, or if your printer does not appear in the printers folder or as a printer option when sending a print job, then you can try uninstalling and reinstalling the software. Before you reinstall the software, check the troubleshooting checklist, and then - Lexmark Pro5500 | Quick Reference - Page 49
adapters. If you are having trouble printing, then try placing the computer and printer no more than 100 feet problem. CHECK YOUR ADVANCED SECURITY SETTINGS • If you are using MAC (Media Access Control) address filtering to limit access to your wireless network, then you must add the printer MAC - Lexmark Pro5500 | Quick Reference - Page 50
this, then refer to the manual that came with your wireless router. If the printer and computer have valid IP addresses and the network is operating correctly, then continue troubleshooting. MAKE SURE THE WIRELESS PORT IS SELECTED Note: This solution applies to Windows users only 1 Click , or click - Lexmark Pro5500 | Quick Reference - Page 51
Troubleshooting 51 5 Click the Ports tab. 6 Locate the selected port. The selected port has a check beside it in the Port column. 7 If the Description column of the selected port indicates that it is a USB port, then scroll through the list and select the port with Printer Port in the Description - Lexmark Pro5500 | Quick Reference - Page 52
in conjunction with other products, programs, or services, except those expressly designated by the manufacturer, are the user's responsibility. For Lexmark technical support, visit support.lexmark.com. For information on supplies and downloads, visit www.lexmark.com. If you don't have access to - Lexmark Pro5500 | Quick Reference - Page 53
40 ink conserving 5 ink cartridge access door location 12 ink cartridges replacing 18 inserting a memory card or flash drive 16 installation screen did not appear automatically 43 installing printer on wireless network (Macintosh) 40 on wireless network (Windows) 40 installing printer software 20 - Lexmark Pro5500 | Quick Reference - Page 54
using printer control panel 24 two‑sided 23 publications finding 5 Push Button Configuration method using 41 R receiving faxes Auto Answer setting 36, 39 automatically 39 manually 39 tips 39 recycling 5 replacing ink cartridges 18 RJ‑11 adapter 33 S safety information 2 scan job canceling 27 scanner - Lexmark Pro5500 | Quick Reference - Page 55
Index 55 installing printer on (Macintosh) 40 installing printer on (Windows) 40 troubleshooting 47 wireless setup information needed for 40 wireless troubleshooting cannot print over wireless network 48 Wi‑Fi Protected Setup configuring manually 41 using 40 Wi‑Fi Protected Setup logo identifying
-
 1
1 -
 2
2 -
 3
3 -
 4
4 -
 5
5 -
 6
6 -
 7
7 -
8
-
9
-
10
-
11
-
12
-
13
-
14
-
15
-
16
-
17
-
18
-
19
-
20
-
21
-
22
-
23
-
24
-
25
-
26
-
27
-
28
-
29
-
30
-
31
-
32
-
33
-
34
-
35
-
36
-
37
-
38
-
39
-
40
-
41
-
42
-
43
-
44
-
45
-
46
-
47
-
48
-
49
-
50
-
51
-
52
-
53
-
54
-
55
 |
 |

Pro5000-Pro5500 Series Quick Reference Guide
January 2012
www.lexmark.com