Lexmark Pro915 Quick Reference
Lexmark Pro915 Manual
 |
View all Lexmark Pro915 manuals
Add to My Manuals
Save this manual to your list of manuals |
Lexmark Pro915 manual content summary:
- Lexmark Pro915 | Quick Reference - Page 1
Pro910 Series Quick Reference Guide December 2011 www.lexmark.com - Lexmark Pro915 | Quick Reference - Page 2
only to Lexmark for recycling. Replacement inkjet cartridge(s) sold without these terms are available through www.lexmark.com and may be refilled by you, or a third party, as the only cartridge alternative to be used with the licensed printer. Important safety information Connect the power cord to - Lexmark Pro915 | Quick Reference - Page 3
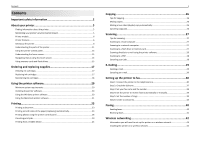
...17 Replacing ink cartridges...17 Maintaining ink cartridges 18 Using the printer software 20 Minimum system requirements 20 Installing the printer software 20 Using the Windows printer software 20 Using the Macintosh printer software 21 Printing 23 Printing a document...23 Printing on both - Lexmark Pro915 | Quick Reference - Page 4
Contents 4 What is Wi‑Fi Protected Setup 42 Configuring Wi‑Fi Protected Setup manually 43 Using SmartSolutions 44 What are SmartSolutions 44 Troubleshooting 45 Notices 54 Edition notice...54 Index 55 - Lexmark Pro915 | Quick Reference - Page 5
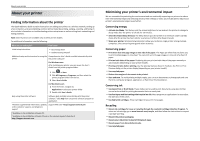
about the printer The Quick Reference Guide contains instructions on adding your printer to a wireless network, setting up a fax connection, and accomplishing common printer tasks like printing, copying, scanning, and faxing. It also includes information on troubleshooting printer setup issues as - Lexmark Pro915 | Quick Reference - Page 6
. Printer models The installation software CD that came with your printer works for the following printer models: • Lexmark Pro912 • Lexmark Pro915 • Lexmark Pro919 Printer features Depending on the model, your printer comes with features that will help you manage and accomplish printing and - Lexmark Pro915 | Quick Reference - Page 7
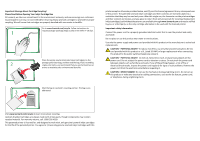
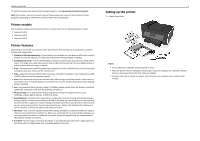
About your printer 7 2 To initiate printer setup using a computer, insert the installation software CD, or download the printer driver. With a CD or DVD drive (Windows/Macintosh) Without a CD or DVD drive or for Linux Download the printer driver from www.lexmark.com. 4 Pull the paper tray - Lexmark Pro915 | Quick Reference - Page 8
About your printer 6 For A4‑ and legal‑size paper, extend the paper tray. 1 2 7 Load paper. 8 8 Adjust the paper guides. 1 2 9 Insert the paper tray. 10 Connect the power cord only. Note: Do not attach the USB cable yet. Note: Make sure the paper is below the maximum fill line located on the edge - Lexmark Pro915 | Quick Reference - Page 9
on. SD/MS-Duo/MMC 12 Set the language on the printer control panel, and then touch OK. OK English Espan~ ol Suomi Francais 13 Confirm the language, and then touch Yes. Language You have chosen English as the language for your Printer. Are you sure? Yes No 9 14 Set the country or - Lexmark Pro915 | Quick Reference - Page 10
ink cartridges. 21 Configure other advanced fax settings later in the software installation. Lexmark Pro910 Series Installation Configure Advanced Features You can now print, but there are additional steps required to access all the features of your device. Get my printer ready to scan directly - Lexmark Pro915 | Quick Reference - Page 11
flip out the paper stop. 2 1 27 From the printer control panel, touch Continue to print an alignment page. Notes: • Install the color ink cartridges first. Then, use two hands to install the black cartridge. • Install the new ink cartridges immediately after removing the protective cap to avoid - Lexmark Pro915 | Quick Reference - Page 12
panel Operate the printer. 9 ADF Scan, copy, or fax multiple‑page letter‑, legal‑, and A4‑size documents. 12 10 11 13 12 15 EXT LINE EXT LINE 19 18 16 17 Use the To 10 Scanner unit • Access the ink cartridges and printhead. • Remove paper jams. 11 Ink cartridge access area Install - Lexmark Pro915 | Quick Reference - Page 13
no printhead is installed in the printer. Remove jammed pages. Using the printer control panel Note: The icons appear when they are selectable on the current screen. If an icon does not appear, then the function is not available. 12 3 4 7 6 5 Use 1 Power 2 Back To • Turn the printer on - Lexmark Pro915 | Quick Reference - Page 14
the current ink levels of the installed cartridges. • Access cartridge maintenance and information functions. Access the setup menu and change printer settings. 8 Eco‑Mode icon Activate Eco‑Mode to select the following options: • Change to Sleep mode after the printer is left idle for 10 minutes - Lexmark Pro915 | Quick Reference - Page 15
arrows on the card point toward the printer. • If necessary, connect the memory card to the adapter that came with it. • Make sure that the memory card inserted is supported by the printer. For more information, see "Supported memory cards and file types" on page 15. • The card reader light comes on - Lexmark Pro915 | Quick Reference - Page 16
16 The Memory Device screen appears on the display. Notes: • If the printer does not recognize the memory device, then remove and reinsert it. • If a flash drive or a digital camera set to mass storage mode is inserted into the USB port while a memory card is in the card slot, then the display - Lexmark Pro915 | Quick Reference - Page 17
ink cartridges Lexmark Pro910 Series except Pro919 Item Return Program Regular cartridge2 Cartridge1 Black cartridge 150 Not available High‑yield black cartridge 150XL, 155XL 150XLA Yellow color cartridge 150 Not available High‑yield yellow color cartridge 150XL 150XLA Cyan color - Lexmark Pro915 | Quick Reference - Page 18
mode or will temporarily power on if it is turned off. Aligning the printhead If the characters or lines on your printed image appear jagged or wavy, then you may need to align the printhead. 1 Load plain paper. 2 From the home screen, navigate to: > More Options > Align Printer An alignment page - Lexmark Pro915 | Quick Reference - Page 19
ink, so try the Clean Printhead option first to save ink. • If the ink levels are too low, then you must replace the ink cartridges before you can clean the printhead nozzles. 1 From the home screen, navigate to: > More Options 2 Touch Clean Printhead or Deep Clean Printhead. A cleaning page prints - Lexmark Pro915 | Quick Reference - Page 20
instructions on the computer screen. Using the Internet 1 Go to the Lexmark Web site at http://support.lexmark.com. 2 Navigate to: SUPPORT & DOWNLOADS > select your printer > select your operating system 3 Download the driver, and then install the printer software. Using the Windows printer software - Lexmark Pro915 | Quick Reference - Page 21
Update To • Launch applications or programs. • Scan or e‑mail a photo or document. • Edit scanned documents. • Scan documents to PDF. • Adjust settings for the printer. • Order supplies. • Maintain ink cartridges. • Register the printer. • Contact technical support. • Access the User's Guide - Lexmark Pro915 | Quick Reference - Page 22
you want to visit. Use Customer Support Lexmark Software Updates Lexmark Online Order Supplies Online Printer Registration Visit Lexmark SmartSolutions To Contact customer support. Download and install the latest printer software. Visit the Lexmark Web site. Order ink or supplies. Register your - Lexmark Pro915 | Quick Reference - Page 23
Printing Printing a document For Windows users 1 With a document open, click File > Print. 2 Click Properties, Preferences, Options, or Setup. 3 Select the print quality, the number of copies to print, the type of paper to use, and how the pages should print. 4 Click OK to close any printer software - Lexmark Pro915 | Quick Reference - Page 24
print jobs To cancel a print job from the printer control panel, press . To cancel a print job from the computer, do the following: For Windows users print easily from your iPad, iPhone, or iPod touch using any Lexmark printer connected to the same wireless network. It lets you print Web pages - Lexmark Pro915 | Quick Reference - Page 25
25 • For other Lexmark printers, your mobile device can send print jobs to your printer as long as the printer software and LexPrint Listener are installed on the computer where the printer is connected. Note: The application referred to as Rendezvous in Mac OS X version 10.2 is now called - Lexmark Pro915 | Quick Reference - Page 26
White to set a color or black-and-white copy. 5 Press . Making a two‑sided (duplex) copy automatically The automatic duplex unit supports A4- and letter-size paper. If you need to make two‑sided copies using other paper sizes, then see the instructions for making a two‑sided copy manually. Note: You - Lexmark Pro915 | Quick Reference - Page 27
appears on the printer control panel indicating that the file you scanned has been saved. Scanning to a network computer 1 Load the original document. 2 From the home screen, touch Scan > Computer. 3 Touch the name of the destination computer. Notes: • Make sure the scan software is installed on the - Lexmark Pro915 | Quick Reference - Page 28
on the printer control panel indicating that the file you scanned has been saved. Scanning directly to e‑mail using the printer software Make sure you have set up your e‑mail settings before proceeding. For more information, see the section on e‑mailing in the User's Guide. For Windows users 1 Load - Lexmark Pro915 | Quick Reference - Page 29
The printer supports only one active network connection (Ethernet or wireless) at a time. • Add contacts to your address book. When sending an e‑mail, you can just select contacts from your address book instead of typing their e‑mail addresses repeatedly. • Use the ADF when scanning two‑sided pages - Lexmark Pro915 | Quick Reference - Page 30
the power supply cord or telephone, during a lightning storm. 30 Step 1: Connect the printer to the telephone line Check the scenarios below and follow the setup that is applicable to your telephone service. Scenario 1: Standard telephone line Setup 1: Printer is connected to a dedicated fax line - Lexmark Pro915 | Quick Reference - Page 31
port. port of the printer, and then connect the answering machine To connect: Connect the cable from the wall jack to the port of the printer. Tips for this setup: • If you have only one telephone number on your line, then you need to set the printer to receive faxes automatically (Auto Answer On - Lexmark Pro915 | Quick Reference - Page 32
Setting up the printer to fax Setup 3: Printer is sharing the line with a telephone subscribed to voice mail service EXT LINE 32 When you answer the telephone and you hear fax tones, press *9* or the manual answer code on the telephone to receive the fax. • You can also set the printer to receive - Lexmark Pro915 | Quick Reference - Page 33
the printer to fax To install a filter for the printer: 1 Connect the line port of the DSL filter to the wall jack. 2 Connect a telephone cable from the port on the back of the printer to the phone port on the DSL filter. 3 To continue using a computer for Internet access, connect the computer to - Lexmark Pro915 | Quick Reference - Page 34
Setting up the printer to fax Scenario 4: Digital telephone service through a cable provider Setup 1: Printer is connected directly to a cable modem Follow this setup if you normally connect your telephone to a cable modem. 34 • If you need two phone ports for your devices but do not want to pay - Lexmark Pro915 | Quick Reference - Page 35
wall jack EXT LINE The fax ports on the back of the printer and the telephone cable that comes with the printer have RJ‑11 connectors. If you have a different type of connector in your country or region, then you may need to use an RJ‑11 adapter. To connect: 1 Connect one end of a telephone cable - Lexmark Pro915 | Quick Reference - Page 36
the printer to fax Notes: • Do not remove the wrap plug from the port of the printer. • The printer may not come with an RJ-11 adapter in your country or region. If the additional device (telephone or answering machine) has an RJ-11 connector, then you can remove the wrap plug and connect the - Lexmark Pro915 | Quick Reference - Page 37
of ports. The N ports are for fax machines, modems, and answering machines. The F port is for telephones. Connect the printer to any of the N ports. NFN EXT LINE NFN PHONE LINE To connect: 1 Connect one end of a telephone cable to the port of the printer. 2 Connect the other end of the cable - Lexmark Pro915 | Quick Reference - Page 38
. If you hear a dial tone, then the printer is properly connected to the telephone line. If you do not hear a dial tone, then review Step 1 or see the "Fax troubleshooting checklist" on page 48. Step 3: Set your fax name and fax number Your user information includes your name or your company name - Lexmark Pro915 | Quick Reference - Page 39
Setting up the printer to fax 39 Using the fax software If you are connecting the printer to a computer, then you can also create a contact list using the fax software. For Windows users 1 Click or Start. 2 Click All Programs or Programs, and then select the printer program folder from the list - Lexmark Pro915 | Quick Reference - Page 40
set a color or black‑and‑white fax, adjust the quality of the fax, set the size of the document, add a cover page, schedule the fax, or view pending faxes. Sending faxes using the computer For Windows users 1 With a document open, click File > Print. 2 Make sure the appropriate printer is selected - Lexmark Pro915 | Quick Reference - Page 41
the correct ring pattern for the printer. Otherwise, the printer will not receive faxes even if you have set it to receive faxes automatically. Receiving faxes manually 1 Make sure that Auto Answer is off: a From the home screen, navigate to: > Fax Setup > Ringing and Answering > Auto Answer b If - Lexmark Pro915 | Quick Reference - Page 42
set up and working properly. • The computer you are using is connected to the same wireless network where you want to set up the printer. 42 For Windows users 1 Close all open software programs. 2 Insert the installation software CD. If the installation dialog does not appear after a minute, then - Lexmark Pro915 | Quick Reference - Page 43
with the access point or contact your system support person. Configuring Wi‑Fi Protected Setup manually Note: Make sure your access point (wireless router) is Wi‑Fi Protected Setup (WPS) certified. For more information, see the User's Guide. If your printer or device has not yet been configured for - Lexmark Pro915 | Quick Reference - Page 44
and download from the SmartSolutions Web site (http://smartsolutions.lexmark.com) to your printer. You can create one-touch custom solutions to streamline repetitive copying, scanning, and printing tasks. You can also view RSS feeds, calendars, and online photo albums from the printer control panel - Lexmark Pro915 | Quick Reference - Page 45
telephone customer support • Firmware and software updates Setup troubleshooting • "Incorrect language appears on the display" on page 45 • "Software did not install" on page 45 • "Print job does not print or is missing pages" on page 46 • "Printer is printing blank pages" on page 47 • "Printer is - Lexmark Pro915 | Quick Reference - Page 46
the power cord into the power supply, and then plug the power cord into the wall outlet. 4 Turn on the printer. Print job does not print or is missing pages If the "Before you troubleshoot" checklist does not solve the problem, then try one or more of the following: MAKE SURE THE INK CARTRIDGES ARE - Lexmark Pro915 | Quick Reference - Page 47
of Sleep mode, then reset the power: 1 Unplug the power cord from the wall outlet, and then wait 10 seconds. 2 Insert the power cord into the wall outlet, and then turn on the printer. If this problem persists, then check our Web site for updates for your printer software or firmware. 47 RECONNECT - Lexmark Pro915 | Quick Reference - Page 48
splitter. Cannot send faxes If the "Fax troubleshooting checklist" does not solve the problem, then try one or more of the following: MAKE SURE TO ENTER YOUR USER INFORMATION IN THE PRINTER If you did not enter your user information during initial setup, then enter your fax name and fax number. This - Lexmark Pro915 | Quick Reference - Page 49
If you are having trouble setting up your printer on a network, print a network setup page, and then see the complete network troubleshooting information in the Network Getting Started Guide or the comprehensive User's Guide available on the installation software CD. Also, make sure to - Lexmark Pro915 | Quick Reference - Page 50
Services list. Locating the printer IP address • You can locate the printer IP address by viewing the printer network setup page. See the User's Guide on the software installation CD for more information on printing a network setup page. Cannot print over wireless network If you encountered problems - Lexmark Pro915 | Quick Reference - Page 51
the abilities of your access point and network adapters. If you are having trouble printing, then try placing the computer and printer no more than 100 feet apart. CHECK THE WIRELESS SIGNAL QUALITY Print a network setup page and check the signal quality. If the signal quality is listed as good - Lexmark Pro915 | Quick Reference - Page 52
OS IS COMPATIBLE WITH WIRELESS PRINTING THROUGH AIRPORT The printer supports wireless printing only through AirPort base stations for Mac OS X version 10.5 or later. "Communication not available" message displays when printing wirelessly Try one or more of the following: MAKE SURE YOUR COMPUTER AND - Lexmark Pro915 | Quick Reference - Page 53
, then refer to the manual that came with your wireless router. If the printer and computer have valid IP addresses and the network is operating correctly, then continue troubleshooting. MAKE SURE THE WIRELESS PORT IS SELECTED Note: This solution applies to Windows users only. 1 Click , or click - Lexmark Pro915 | Quick Reference - Page 54
in conjunction with other products, programs, or services, except those expressly designated by the manufacturer, are the user's responsibility. For Lexmark technical support, visit support.lexmark.com. For information on supplies and downloads, visit www.lexmark.com. If you don't have access to - Lexmark Pro915 | Quick Reference - Page 55
26 tips 26 customer support 45 D dial tone checking 37 Digital Subscriber Line (DSL) fax setup 32 digital telephone service fax setup 34 distinctive ring 38 documents faxing using the computer 40 faxing using the control panel 40 printing 23 scanning to e‑mail 29 scanning using the touch screen - Lexmark Pro915 | Quick Reference - Page 56
problems, basic solutions 45 printer software installing 20 printer solutions 44 printers supported 24 printhead aligning 18 printhead access area location 13 printhead nozzles cleaning 19 printing documents 23 network setup page 50 on both sides of the paper 23 photos using printer control panel - Lexmark Pro915 | Quick Reference - Page 57
VoIP adapter 33 W Web Links accessing 21 Web site finding 5 Windows installing printer on wireless network 42 Windows software Abbyy Sprint OCR 20 Phone Book 20 Printer Home 20 Printer Setup Utility 20 Printing Preferences 20 Product Update 20 Status Messenger 20 Status Monitor Center 20 Tools for
-
 1
1 -
 2
2 -
 3
3 -
 4
4 -
 5
5 -
 6
6 -
 7
7 -
8
-
9
-
10
-
11
-
12
-
13
-
14
-
15
-
16
-
17
-
18
-
19
-
20
-
21
-
22
-
23
-
24
-
25
-
26
-
27
-
28
-
29
-
30
-
31
-
32
-
33
-
34
-
35
-
36
-
37
-
38
-
39
-
40
-
41
-
42
-
43
-
44
-
45
-
46
-
47
-
48
-
49
-
50
-
51
-
52
-
53
-
54
-
55
-
56
-
57
 |
 |

Pro910 Series Quick Reference Guide
December 2011
www.lexmark.com