Lexmark Pro915 User's Guide - Page 103
Advanced wireless setup, Adding a printer to an existing ad hoc wireless network - wifi all in one printer
 |
View all Lexmark Pro915 manuals
Add to My Manuals
Save this manual to your list of manuals |
Page 103 highlights
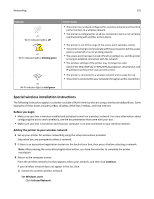
Networking 103 Advanced wireless setup Adding a printer to an existing ad hoc wireless network Before you begin, make sure: • Your wireless network adapter is properly attached to your computer and is working. • The ad hoc wireless network that the printer will connect to is available. For more information on creating an ad hoc wireless network, see the documentation that came with your operating system. Notes: • The recommended way to set up your wireless network is to use an access point. This network setup is called infrastructure network. • If your computer has My WiFi or Wi-Fi Direct, then you can create direct connections to your wireless printer. For more information, see the documentation that came with your computer. • The printer can communicate on only one wireless network at a time. Configuring the printer for an ad hoc wireless network will remove it from any other wireless network, either ad hoc or infrastructure, for which it is configured. For Windows users 1 Click or Start. 2 Click All Programs or Programs, and then select the printer program folder from the list. 3 Select your printer, and then navigate to: Printer Home > Settings > Wireless setup utility 4 Follow the instructions on the computer screen. Note: Windows Vista computers may need to be reconnected to the ad hoc network after restarting. For Macintosh users 1 From the Applications folder in the Finder, or from the Finder desktop, double-click the printer folder. 2 Double‑click Wireless Setup Assistant. 3 Follow the instructions on the computer screen.
-
 1
1 -
2
-
3
-
4
-
5
-
6
-
7
-
8
-
9
-
10
-
11
-
12
-
13
-
14
-
15
-
16
-
17
-
18
-
19
-
20
-
21
-
22
-
23
-
24
-
25
-
26
-
27
-
28
-
29
-
30
-
31
-
32
-
33
-
34
-
35
-
36
-
37
-
38
-
39
-
40
-
41
-
42
-
43
-
44
-
45
-
46
-
47
-
48
-
49
-
50
-
51
-
52
-
53
-
54
-
55
-
56
-
57
-
58
-
59
-
60
-
61
-
62
-
63
-
64
-
65
-
66
-
67
-
68
-
69
-
70
-
71
-
72
-
73
-
74
-
75
-
76
-
77
-
78
-
79
-
80
-
81
-
82
-
83
-
84
-
85
-
86
-
87
-
88
-
89
-
90
-
91
-
92
-
93
-
94
-
95
-
96
-
97
-
 98
98 -
 99
99 -
 100
100 -
 101
101 -
 102
102 -
 103
103 -
 104
104 -
 105
105 -
 106
106 -
 107
107 -
 108
108 -
109
-
110
-
111
-
112
-
113
-
114
-
115
-
116
-
117
-
118
-
119
-
120
-
121
-
122
-
123
-
124
-
125
-
126
-
127
-
128
-
129
-
130
-
131
-
132
-
133
-
134
-
135
-
136
-
137
-
138
-
139
-
140
-
141
-
142
-
143
-
144
-
145
-
146
-
147
-
148
-
149
-
150
-
151
-
152
-
153
-
154
-
155
-
156
-
157
-
158
-
159
-
160
-
161
-
162
-
163
-
164
-
165
-
166
-
167
-
168
-
169
-
170
-
171
-
172
-
173
-
174
-
175
-
176
-
177
-
178
-
179
-
180
-
181
-
182
-
183
-
184
-
185
-
186
-
187
-
188
-
189
-
190
-
191
-
192
-
193
-
194
-
195
-
196
-
197
-
198
-
199
-
200
 |
 |