Lexmark Pro915 User's Guide - Page 153
Print troubleshooting, Poor quality at the edges of the Check minimum print settings
 |
View all Lexmark Pro915 manuals
Add to My Manuals
Save this manual to your list of manuals |
Page 153 highlights
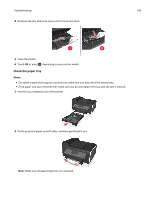
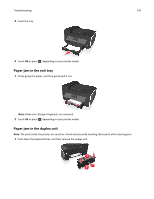
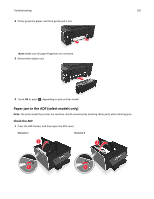
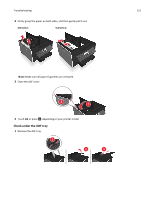
Troubleshooting 153 Print troubleshooting • "Poor quality at the edges of the page" on page 153 • "Streaks or lines on printed image" on page 154 • "Print speed is slow" on page 154 • "Computer slows down when printing" on page 155 Poor quality at the edges of the page If the "Before you troubleshoot" checklist does not solve the problem, then try one or more of the following: CHECK MINIMUM PRINT SETTINGS Unless you are using the borderless feature, use these minimum print margin settings: • Left and right margins: - 6.35 mm (0.25 in.) for letter‑size paper - 3.37 mm (0.133 in.) for all paper sizes except letter • Top margin: 1.7 mm (0.067 in.) • Bottom margin: 12.7 mm (0.5 in.) SELECT THE BORDERLESS PRINT FEATURE For Windows users 1 With a photo open, click File > Print. 2 Click Properties, Preferences, Options, or Setup. 3 Navigate to: Paper/Finishing tab > select a borderless setting > OK 4 Click Print. For Macintosh users 1 With a photo open, choose File > Page Setup. 2 From the "Format for" pop‑up menu, choose your printer. 3 From the Paper Size pop‑up menu, choose a paper size that has "(Borderless)" in its name. For example, if you loaded a 4 x 6 photo paper, then choose US 4 x 6 in (Borderless). 4 Click OK. 5 From the menu bar, choose File > Print. 6 From the Printer pop‑up menu, choose your printer. 7 From the print options pop‑up menu, choose Quality & Media. 8 From the Paper Type pop‑up menu, choose a paper type.
-
 1
1 -
2
-
3
-
4
-
5
-
6
-
7
-
8
-
9
-
10
-
11
-
12
-
13
-
14
-
15
-
16
-
17
-
18
-
19
-
20
-
21
-
22
-
23
-
24
-
25
-
26
-
27
-
28
-
29
-
30
-
31
-
32
-
33
-
34
-
35
-
36
-
37
-
38
-
39
-
40
-
41
-
42
-
43
-
44
-
45
-
46
-
47
-
48
-
49
-
50
-
51
-
52
-
53
-
54
-
55
-
56
-
57
-
58
-
59
-
60
-
61
-
62
-
63
-
64
-
65
-
66
-
67
-
68
-
69
-
70
-
71
-
72
-
73
-
74
-
75
-
76
-
77
-
78
-
79
-
80
-
81
-
82
-
83
-
84
-
85
-
86
-
87
-
88
-
89
-
90
-
91
-
92
-
93
-
94
-
95
-
96
-
97
-
98
-
99
-
100
-
101
-
102
-
103
-
104
-
105
-
106
-
107
-
108
-
109
-
110
-
111
-
112
-
113
-
114
-
115
-
116
-
117
-
118
-
119
-
120
-
121
-
122
-
123
-
124
-
125
-
126
-
127
-
128
-
129
-
130
-
131
-
132
-
133
-
134
-
135
-
136
-
137
-
138
-
139
-
140
-
141
-
142
-
143
-
144
-
145
-
146
-
147
-
 148
148 -
 149
149 -
 150
150 -
 151
151 -
 152
152 -
 153
153 -
 154
154 -
 155
155 -
 156
156 -
 157
157 -
 158
158 -
159
-
160
-
161
-
162
-
163
-
164
-
165
-
166
-
167
-
168
-
169
-
170
-
171
-
172
-
173
-
174
-
175
-
176
-
177
-
178
-
179
-
180
-
181
-
182
-
183
-
184
-
185
-
186
-
187
-
188
-
189
-
190
-
191
-
192
-
193
-
194
-
195
-
196
-
197
-
198
-
199
-
200
 |
 |