Lexmark S405 Quick Reference
Lexmark S405 - Interpret Color Inkjet Manual
 |
UPC - 734646318440
View all Lexmark S405 manuals
Add to My Manuals
Save this manual to your list of manuals |
Lexmark S405 manual content summary:
- Lexmark S405 | Quick Reference - Page 1
Lexmark Interpret S400 Series Quick Reference Guide November 2010 www.lexmark.com - Lexmark S405 | Quick Reference - Page 2
lexmark.com and may be refilled by you, or a third party, as the only cartridge alternative to be used with the licensed printer. Important safety information Connect the power shock results. Inspect the power cord regularly for signs of such problems. Remove the power cord from the electrical outlet - Lexmark S405 | Quick Reference - Page 3
replacing ink cartridges 10 Ordering ink cartridges...10 Replacing ink cartridges...10 Maintaining ink cartridges 11 Using the printer software 12 Minimum system requirements 12 Installing the printer software 12 Using the Windows printer software 13 Using the Macintosh printer software 14 - Lexmark S405 | Quick Reference - Page 4
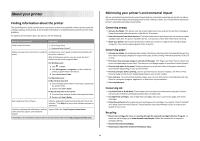
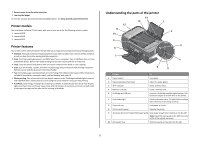
About your printer Finding information about the printer The Quick Reference Guide contains basic instructions on how to accomplish common printer tasks like printing, copying, and scanning. It also includes information on troubleshooting common printer setup problems. For additional information - Lexmark S405 | Quick Reference - Page 5
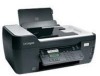
The installation software CD that came with your printer works for the following printer models: • Lexmark S405 • Lexmark S408 • Lexmark S415 Printer features Your printer comes with full features that will help you manage and accomplish printing and imaging tasks: • Wireless. Print and scan from - Lexmark S405 | Quick Reference - Page 6
when plugging in or removing a USB cable or installation cable. Install the printhead. Note: The carrier moves to the printhead access area when no printhead is installed in the printer. Install, replace, or remove ink cartridges. • Access the ink cartridges and printhead. • Remove paper jams. 6 - Lexmark S405 | Quick Reference - Page 7
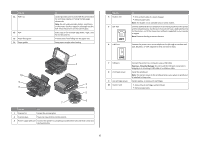
and hold for three seconds to feed or eject paper from the printer. 9 Back button • Return to the previous screen. • Exit from one menu level to a higher one. 10 Setup button Access the setup menu and change printer settings. Note: The Copy, Scan, Fax, and Photo button lights are off when this - Lexmark S405 | Quick Reference - Page 8
mode. Start a print, scan, fax, or copy job, depending on which mode is selected. 6 2-Sided/Eco-Mode Activate 2-Sided to: • Print on both sides of the paper (duplex). Activate Eco-Mode to: • Print on both sides of the paper (duplex). • Change to Power Saver mode after the printer is left idle for - Lexmark S405 | Quick Reference - Page 9
If necessary, connect the memory card to the adapter that came with it. • Make sure that the memory card inserted is supported by the printer. For more information, see "Supported memory cards and file types" on page 9. • The flash drive uses the same port that is used for a PictBridge camera cable - Lexmark S405 | Quick Reference - Page 10
the Lexmark Web site at www.lexmark.com. Replacing ink cartridges Make sure you have a new ink cartridge or cartridges before you begin. You must install new cartridges immediately after removing the old ones, or the ink remaining in the printhead nozzles may dry out. 1 Turn on your printer. 2 Open - Lexmark S405 | Quick Reference - Page 11
. Using the printer software For Windows users 1 Load plain paper. 2 Click or Start. 3 Click All Programs or Programs, and then select the printer program folder from the list. 4 Navigate to: Printer Home > select your printer > Maintenance tab > Align cartridges 5 Follow the instructions on the - Lexmark S405 | Quick Reference - Page 12
10 and 8.04 LTS (Web only)* • Linux openSUSE 11.1 and 11.0 (Web only)* • Linux Fedora 10 (Web only)* * The printer driver for this operating system is available only at http://support.lexmark.com. Installing the printer software Note: If you installed the printer software on this computer before but - Lexmark S405 | Quick Reference - Page 13
system 3 Download the driver and install the printer software. Note: Updated printer software may be available at http://support.lexmark.com. Using the Windows printer software Software installed during printer installation When you set up the printer using the installation software CD, all - Lexmark S405 | Quick Reference - Page 14
cartridge installation. • Print a test page. • Print an alignment page. • Clean the printhead nozzles. • Order ink or supplies. • Register the printer. • Contact technical support. Wireless Setup Assistant (in Mac OS X version 10.6) Set up the printer on a wireless network. or Lexmark Wireless - Lexmark S405 | Quick Reference - Page 15
a document For Windows users 1 With a document open, click File > Print. 2 Click Properties, Preferences, Options, or Setup. 3 Select the print quality, the number of copies to print, the type of paper to use, and how the pages should print. 4 Click OK to close any printer software dialogs. 5 Click - Lexmark S405 | Quick Reference - Page 16
a PIN to the computer, see the Help for the printer software associated with your operating system. Canceling print jobs To cancel a print job from the printer control panel, press . To cancel a print job from the computer, do the following: For Windows users 1 Click , or click Start and then click - Lexmark S405 | Quick Reference - Page 17
file type if you want to scan multiple pages and save them as one file. • To initiate network scanning from the printer, make sure that "Enable network scan to computer" is selected in the General tab of the Scan Center. This is available only in Mac OS X version 10.6. Scanning to a local or network - Lexmark S405 | Quick Reference - Page 18
if you want to scan multiple pages and save them as one file. 6 Press to start scanning. The scan is complete when a message appears on the printer control panel indicating that the file you scanned has been saved. Scanning directly to e-mail using the printer software For Windows users 1 Load an - Lexmark S405 | Quick Reference - Page 19
error messages, and resolve any errors. • Check for paper jam messages, and clear any jams. • Check the ink cartridges, and install new cartridges if necessary. • Use the Service Center to locate and solve the problem (Windows only). • Turn the printer off, wait about 10 seconds, and then turn the - Lexmark S405 | Quick Reference - Page 20
on the display, indicating that the printer has been reset. 3 Complete the initial printer setup. Printhead errors If the "Before you troubleshoot" checklist does not solve the problem, then try the following: REMOVE AND REINSERT THE PRINTHEAD 1 Open the printer and lift the latch. 2 Remove the - Lexmark S405 | Quick Reference - Page 21
the printer, and then reinsert it. 3 Plug the power cord into the wall outlet, and then turn on the printer. Print job does not print or is missing pages If the "Before you troubleshoot" checklist does not solve the problem, then try one or more of the following: MAKE SURE THE INK CARTRIDGES ARE - Lexmark S405 | Quick Reference - Page 22
AND ALIGN THE PRINTHEAD 1 Reinstall the ink cartridges, see "Replacing ink cartridges" on page 10 for more information. If the cartridges do not seem to fit, make sure the printhead is properly seated, and then try installing the cartridges again. 2 Load plain paper. 3 From the printer control panel - Lexmark S405 | Quick Reference - Page 23
trouble setting up your printer on a network, print a network setup page, and then see the complete network troubleshooting information in the Network Getting Started Guide or the comprehensive User's Guide available on the installation software CD. Printing a network setup page A network setup
-
 1
1 -
 2
2 -
 3
3 -
 4
4 -
 5
5 -
 6
6 -
 7
7 -
8
-
9
-
10
-
11
-
12
-
13
-
14
-
15
-
16
-
17
-
18
-
19
-
20
-
21
-
22
-
23
 |
 |

Lexmark Interpret S400 Series Quick
Reference Guide
November 2010
www.lexmark.com