Lexmark T430 Quick Reference Guide
Lexmark T430 Manual
 |
View all Lexmark T430 manuals
Add to My Manuals
Save this manual to your list of manuals |
Lexmark T430 manual content summary:
- Lexmark T430 | Quick Reference Guide - Page 1
2 Unfold the extension. 3 Slide the width guide all the way to the right. 4 Place Cancel the current job. Load Manual The printer is ready for print media to driver data did not match what the printer was expecting. If the situation recurs, try printing from another printer driver. © 2004 Lexmark - Lexmark T430 | Quick Reference Guide - Page 2
have to remove the print cartridge to clear a jam in this area. 3 Close the rear output bin door. 23x Paper Jam (duplex jam) Print media can jam under the printer and above Tray 1 when the duplex function is in use. To clear this type of jam, follow the instructions under the appropriate paper
-
 1
1 -
 2
2
 |
 |
Quick Reference
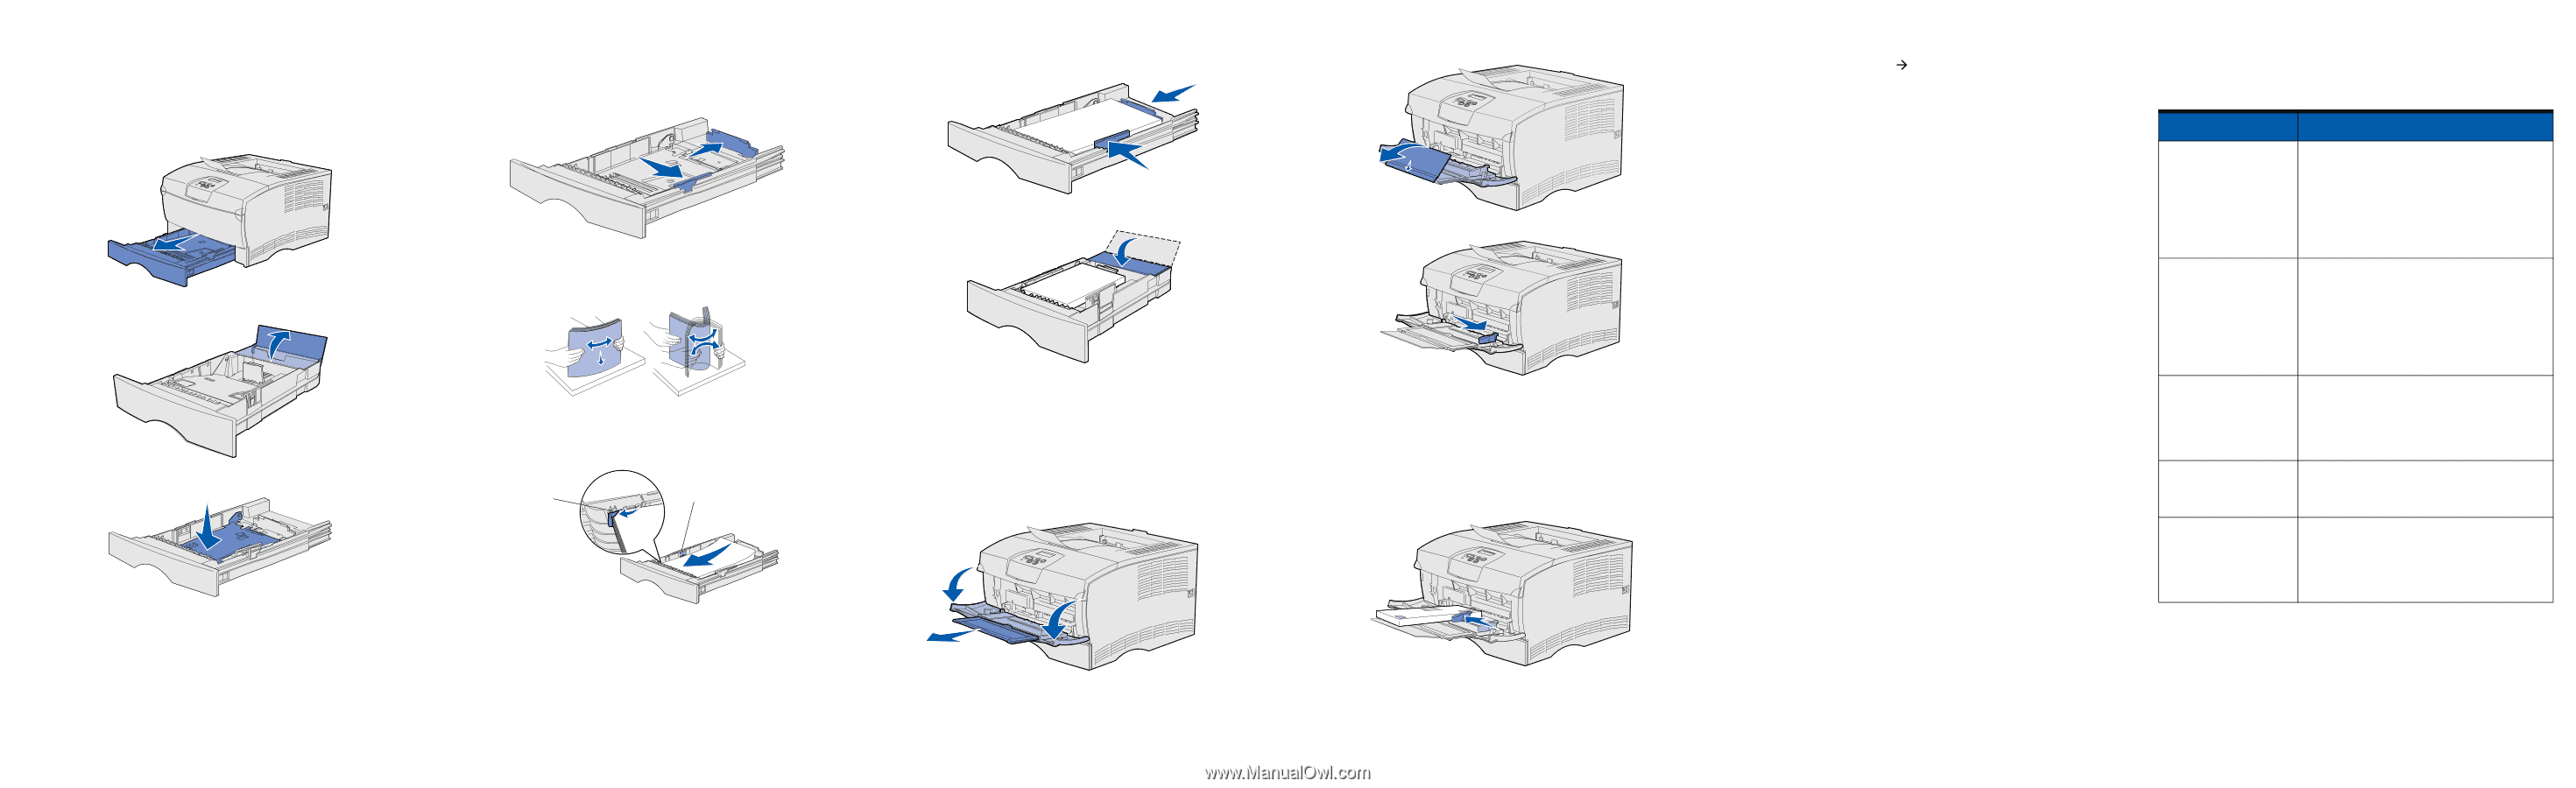
Loading a tray
1
Remove the tray completely.
For the optional 500-sheet tray, open the cover.
2
Press the metal plate down.
3
Squeeze the width guide tab and the width guide together, and
then slide the guide all the way to the right.
4
Squeeze the length guide tab and the length guide together, and
then slide the guide to its fully extended position.
5
Flex the sheets back and forth to loosen them, and then fan
them. Do not fold or crease the print media. Straighten the edges
of the stack on a level surface.
6
Place the print media against the left side of the tray and insert it
under the metal stop, print side down. Do not bend or wrinkle the
sheets.
Note:
Do not exceed the maximum stack height. Overfilling
the tray may cause a jam.
7
Slide the width and length guides until they lightly touch the
edges of the print media.
8
For the optional 500-sheet tray, close the cover.
9
Reinstall the tray.
Loading the multipurpose feeder
The multipurpose feeder accepts plain paper, envelopes,
transparencies, card stock, and labels.
1
Open the multipurpose feeder door, and then pull out the
extension.
2
Unfold the extension.
3
Slide the width guide all the way to the right.
4
Place paper print side up, or envelopes flap side down, in the
feeder. Push the print media forward without forcing it.
Note:
Orient the print media correctly for the size, type, and
print method you are using. Refer to the publications
CD for detailed information about orienting print media.
Do not overfill the feeder.
5
Slide the width guide until it lightly touches the side of the stack.
6
In your word processor, spreadsheet, browser, or other
application, select
File
Print
.
7
Click
Properties
(or
Options
,
Printer
, or
Setup
depending on
the application) to view the printer driver settings.
8
Select
MP Feeder
from the Form Source list box.
9
Select your print media type (envelopes, transparencies, and so
on) from the Media Type list box.
10
Click
OK
, and then send your print job as usual.
Canceling a print job
If the job you want to cancel is printing, and Busy appears on the
display:
1
Press
Menu
until you see
Job Menu
, and then press
Select
.
2
Press
Menu
until you see
Cancel Job
, and then press
Select
.
Printing a menu settings page
1
Make sure the printer is on and the
Ready
message appears.
2
Press and release
Menu
until you see
Utilities Menu
, and
then press
Select
.
3
Press and release
Menu
until you see
Print Menus
, and then
press
Select
.
Common operator panel messages
For a more detailed list of operator panel messages, refer to the
publications CD.
Metal stop
Maximum stack height indicator
Message
Actions
Change Tray <x>
The printer is requesting
a different size or type of
print media than what is
loaded.
•
Remove the currently loaded print media
from the specified tray, and then load the
requested print media.
•
Press
Select
to clear the message and
print on the print media currently loaded in
the tray.
•
Cancel the current job.
Load Manual
The printer is ready for
print media to be
inserted into the
multipurpose feeder.
•
Load the multipurpose feeder with the print
media specified on the second line of the
display.
•
Press
Select
or
Go
to ignore the manual
feed request and print on print media
already installed in one of the trays.
•
Cancel the current job.
Waiting
The printer has received
data to print but is
waiting for a command or
additional data.
•
Press
Go
to print the contents of the buffer.
•
Cancel the current job.
Not Ready
The printer is not ready
to process data.
Press
Go
to ready the printer to receive jobs.
Flushing Buffer
The printer is discarding
the current print job.
•
Wait for the message to clear.
•
Sometimes this message means the driver
data did not match what the printer was
expecting. If the situation recurs, try
printing from another printer driver.
© 2004 Lexmark International, Inc., All rights reserved.
P/N 26H0080
E.C. 10H044
*26H0080*
Printed in USA
03/04