Lexmark X1150 User's Guide - Page 22
Lexmark's All-In-One warranty does not cover repair of failures or damage - install
 |
UPC - 734646480000
View all Lexmark X1150 manuals
Add to My Manuals
Save this manual to your list of manuals |
Page 22 highlights
6 Insert the new cartridge. Make sure the color print cartridge is secure in the left carrier and then snap the lid closed. If you are installing a black print cartridge, make sure that it is secure in the right carrier, and then snap the lid closed. 7 Lift the scanner unit and push the scanner support back while lowering the scanner unit until it is completely closed. Lexmark's All-In-One warranty does not cover repair of failures or damage caused by a refilled cartridge. We do not recommend use of refilled cartridges. Refilling cartridges can affect print quality and cause damage to the All-In-One. For best results, use Lexmark supplies. 18
-
 1
1 -
2
-
3
-
4
-
5
-
6
-
7
-
8
-
9
-
10
-
11
-
12
-
13
-
14
-
15
-
16
-
 17
17 -
 18
18 -
 19
19 -
 20
20 -
 21
21 -
 22
22 -
 23
23 -
 24
24 -
 25
25 -
 26
26 -
 27
27 -
28
-
29
-
30
-
31
-
32
-
33
-
34
-
35
 |
 |

18
6
Insert the new cartridge. Make sure the color print cartridge is
secure in the left carrier and then
snap
the lid closed
.
If you are installing a black print cartridge, make sure that it is
secure in the right carrier, and then
snap
the lid closed.
7
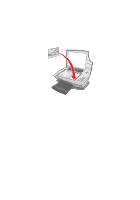
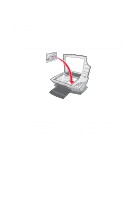
Lift the scanner unit and push the scanner support back while
lowering the scanner unit until it is completely closed.
Lexmark’s All-In-One warranty does not cover repair of failures or damage
caused by a refilled cartridge. We do not recommend use of refilled
cartridges. Refilling cartridges can affect print quality and cause damage to
the All-In-One. For best results, use Lexmark supplies.