Lexmark X204N User's Guide - Page 150
Paper jam message remains after jam is cleared, Solving print quality problems, Blank s
 |
UPC - 734646157643
View all Lexmark X204N manuals
Add to My Manuals
Save this manual to your list of manuals |
Page 150 highlights
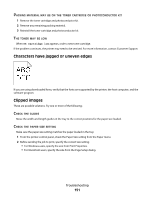
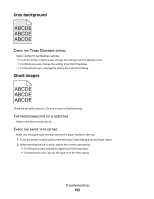
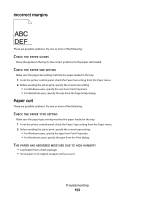
CHECK THE GUIDES Move the guides in the paper tray to the correct positions for the paper size loaded. THE PAPER ABSORBED MOISTURE DUE TO HIGH HUMIDITY • Load paper from a fresh package. • Store paper in its original wrapper until you use it. Paper jam message remains after jam is cleared The paper path is not clear. Clear jammed paper from the entire paper path, and then press . Solving print quality problems The information in the following topics may help you solve print quality problems. If these suggestions still do not correct the problem, then contact Customer Support. You may have a printer part that requires adjustment or replacement. Isolating print quality problems To help isolate print quality problems, print the print quality test pages: 1 Turn the printer off. 2 Load paper. 3 From the printer control panel, hold down and the right arrow button while turning the printer on. 4 Release the buttons when CONFIG MENU appears. 5 Press the arrow buttons until Prt Quality Pgs appears, and then press . The print quality test pages print. 6 Press the arrow buttons until Exit Config Menu appears, and then press . Resetting the Printer appears briefly, and then Ready appears. Blank pages These are possible solutions. Try one or more of the following: Troubleshooting 150
-
 1
1 -
2
-
3
-
4
-
5
-
6
-
7
-
8
-
9
-
10
-
11
-
12
-
13
-
14
-
15
-
16
-
17
-
18
-
19
-
20
-
21
-
22
-
23
-
24
-
25
-
26
-
27
-
28
-
29
-
30
-
31
-
32
-
33
-
34
-
35
-
36
-
37
-
38
-
39
-
40
-
41
-
42
-
43
-
44
-
45
-
46
-
47
-
48
-
49
-
50
-
51
-
52
-
53
-
54
-
55
-
56
-
57
-
58
-
59
-
60
-
61
-
62
-
63
-
64
-
65
-
66
-
67
-
68
-
69
-
70
-
71
-
72
-
73
-
74
-
75
-
76
-
77
-
78
-
79
-
80
-
81
-
82
-
83
-
84
-
85
-
86
-
87
-
88
-
89
-
90
-
91
-
92
-
93
-
94
-
95
-
96
-
97
-
98
-
99
-
100
-
101
-
102
-
103
-
104
-
105
-
106
-
107
-
108
-
109
-
110
-
111
-
112
-
113
-
114
-
115
-
116
-
117
-
118
-
119
-
120
-
121
-
122
-
123
-
124
-
125
-
126
-
127
-
128
-
129
-
130
-
131
-
132
-
133
-
134
-
135
-
136
-
137
-
138
-
139
-
140
-
141
-
142
-
143
-
144
-
 145
145 -
 146
146 -
 147
147 -
 148
148 -
 149
149 -
 150
150 -
 151
151 -
 152
152 -
 153
153 -
 154
154 -
 155
155 -
156
-
157
-
158
-
159
-
160
-
161
-
162
-
163
-
164
-
165
-
166
-
167
-
168
-
169
-
170
-
171
-
172
-
173
-
174
-
175
-
176
-
177
-
178
-
179
-
180
-
181
-
182
-
183
-
184
 |
 |
