Lexmark X204N User's Guide - Page 22
Installing the printer on a wired network, For Windows users, For Macintosh users - user manual
 |
UPC - 734646157643
View all Lexmark X204N manuals
Add to My Manuals
Save this manual to your list of manuals |
Page 22 highlights
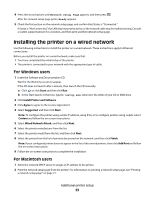
4 Press the arrow buttons until Network Setup Page appears, and then press . After the network setup page prints, Ready appears. 5 Check the first section on the network setup page, and confirm that Status is "Connected." If Status is "Not Connected," the LAN drop may not be active, or the network cable may be malfunctioning. Consult a system support person for a solution, and then print another network setup page. Installing the printer on a wired network Use the following instructions to install the printer on a wired network. These instructions apply to Ethernet connections. Before you install the printer on a wired network, make sure that: • You have completed the initial setup of the printer. • The printer is connected to your network with the appropriate type of cable. For Windows users 1 Insert the Software and Documentation CD. Wait for the Welcome screen to appear. If the CD does not launch after a minute, then launch the CD manually: a Click , or click Start and then click Run. b In the Start Search or Run box, type D:\setup.exe, where D is the letter of your CD or DVD drive. 2 Click Install Printer and Software. 3 Click Agree to agree to the License Agreement. 4 Select Suggested, and then click Next. Note: To configure the printer using a static IP address, using IPv6, or to configure printers using scripts, select Custom and follow the on-screen instructions. 5 Select Wired Network Attach, and then click Next. 6 Select the printer manufacturer from the list. 7 Select the printer model from the list, and then click Next. 8 Select the printer from the list of printers discovered on the network, and then click Finish. Note: If your configured printer does not appear in the list of discovered printers, then click Add Port and follow the on-screen instructions. 9 Follow the on-screen instructions to complete the installation. For Macintosh users 1 Allow the network DHCP server to assign an IP address to the printer. 2 Print the network setup page from the printer. For information on printing a network setup page, see "Printing a network setup page" on page 21. Additional printer setup 22
-
 1
1 -
2
-
3
-
4
-
5
-
6
-
7
-
8
-
9
-
10
-
11
-
12
-
13
-
14
-
15
-
16
-
 17
17 -
 18
18 -
 19
19 -
 20
20 -
 21
21 -
 22
22 -
 23
23 -
 24
24 -
 25
25 -
 26
26 -
 27
27 -
28
-
29
-
30
-
31
-
32
-
33
-
34
-
35
-
36
-
37
-
38
-
39
-
40
-
41
-
42
-
43
-
44
-
45
-
46
-
47
-
48
-
49
-
50
-
51
-
52
-
53
-
54
-
55
-
56
-
57
-
58
-
59
-
60
-
61
-
62
-
63
-
64
-
65
-
66
-
67
-
68
-
69
-
70
-
71
-
72
-
73
-
74
-
75
-
76
-
77
-
78
-
79
-
80
-
81
-
82
-
83
-
84
-
85
-
86
-
87
-
88
-
89
-
90
-
91
-
92
-
93
-
94
-
95
-
96
-
97
-
98
-
99
-
100
-
101
-
102
-
103
-
104
-
105
-
106
-
107
-
108
-
109
-
110
-
111
-
112
-
113
-
114
-
115
-
116
-
117
-
118
-
119
-
120
-
121
-
122
-
123
-
124
-
125
-
126
-
127
-
128
-
129
-
130
-
131
-
132
-
133
-
134
-
135
-
136
-
137
-
138
-
139
-
140
-
141
-
142
-
143
-
144
-
145
-
146
-
147
-
148
-
149
-
150
-
151
-
152
-
153
-
154
-
155
-
156
-
157
-
158
-
159
-
160
-
161
-
162
-
163
-
164
-
165
-
166
-
167
-
168
-
169
-
170
-
171
-
172
-
173
-
174
-
175
-
176
-
177
-
178
-
179
-
180
-
181
-
182
-
183
-
184
 |
 |
