Lexmark X204N User's Guide - Page 74
Sending a fax at a scheduled time, For Mac OS X version 10.5 users - printer driver
 |
UPC - 734646157643
View all Lexmark X204N manuals
Add to My Manuals
Save this manual to your list of manuals |
Page 74 highlights
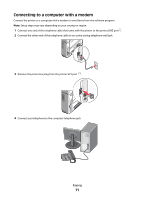
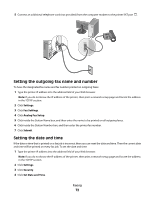
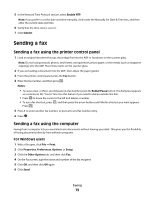
For Mac OS X version 10.5 users The steps for sending a fax from the computer vary depending on your operating system. For specific instructions using other Macintosh OS versions, see your Mac OS Help. 1 With a document open, choose File > Print. 2 From the Printer pop-up menu, choose your printer. Note: In order to see the fax options on the Print dialog, you must use the fax driver for your printer. To install the fax driver, choose Add a printer, and then install the printer again with a different name, choosing the fax version of the driver. 3 Enter the fax information (for example, the name and number of the fax recipient). 4 Click Fax. Sending a fax at a scheduled time 1 Load an original document faceup, short edge first into the ADF or facedown on the scanner glass. Note: Do not load postcards, photos, small items, transparencies, photo paper, or thin media (such as magazine clippings) into the ADF. Place these items on the scanner glass. 2 If you are loading a document into the ADF, then adjust the paper guides. 3 From the printer control panel, press the Fax button. 4 Enter the fax number, and then press . 5 From the Fax area, press the Options button. 6 Press the arrow buttons until Delayed Send appears, and then press . 7 Using the keypad, enter the time you want to send the fax. If the printer clock is set to 12 Hour format, then use the arrow buttons to select AM or PM. 8 Press . 9 Using the keypad, enter the date you want to send the fax. 10 Press . 11 Press Faxing 74
-
 1
1 -
2
-
3
-
4
-
5
-
6
-
7
-
8
-
9
-
10
-
11
-
12
-
13
-
14
-
15
-
16
-
17
-
18
-
19
-
20
-
21
-
22
-
23
-
24
-
25
-
26
-
27
-
28
-
29
-
30
-
31
-
32
-
33
-
34
-
35
-
36
-
37
-
38
-
39
-
40
-
41
-
42
-
43
-
44
-
45
-
46
-
47
-
48
-
49
-
50
-
51
-
52
-
53
-
54
-
55
-
56
-
57
-
58
-
59
-
60
-
61
-
62
-
63
-
64
-
65
-
66
-
67
-
68
-
 69
69 -
 70
70 -
 71
71 -
 72
72 -
 73
73 -
 74
74 -
 75
75 -
 76
76 -
 77
77 -
 78
78 -
 79
79 -
80
-
81
-
82
-
83
-
84
-
85
-
86
-
87
-
88
-
89
-
90
-
91
-
92
-
93
-
94
-
95
-
96
-
97
-
98
-
99
-
100
-
101
-
102
-
103
-
104
-
105
-
106
-
107
-
108
-
109
-
110
-
111
-
112
-
113
-
114
-
115
-
116
-
117
-
118
-
119
-
120
-
121
-
122
-
123
-
124
-
125
-
126
-
127
-
128
-
129
-
130
-
131
-
132
-
133
-
134
-
135
-
136
-
137
-
138
-
139
-
140
-
141
-
142
-
143
-
144
-
145
-
146
-
147
-
148
-
149
-
150
-
151
-
152
-
153
-
154
-
155
-
156
-
157
-
158
-
159
-
160
-
161
-
162
-
163
-
164
-
165
-
166
-
167
-
168
-
169
-
170
-
171
-
172
-
173
-
174
-
175
-
176
-
177
-
178
-
179
-
180
-
181
-
182
-
183
-
184
 |
 |