Lexmark X204N User's Guide - Page 78
Viewing a fax log, Canceling an outgoing fax, Understanding fax options, Original Size, Content
 |
UPC - 734646157643
View all Lexmark X204N manuals
Add to My Manuals
Save this manual to your list of manuals |
Page 78 highlights
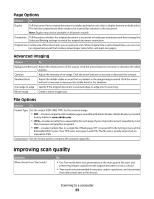
5 Select Block No Name Fax. This option blocks all incoming faxes that have a private caller ID or no fax station name. 6 In the Banned Fax List field, enter the phone numbers or fax station names of specific fax callers you want to block. 7 Click Submit. Viewing a fax log 1 Type the printer IP address into the address field of your Web browser. Note: If you do not know the IP address of the printer, then print a network setup page and locate the IP address in the TCP/IP section. 2 Click Reports. 3 Click Fax Job Log or Fax Call Log. Canceling an outgoing fax A fax can be canceled when the document is in the ADF or on the scanner glass. To cancel a fax: 1 From the printer control panel, press . Stopping appears, and then Cancel Job appears. 2 Press to cancel the job. Canceling appears. The printer clears all pages in the ADF or printer and then cancels the job. Understanding fax options Original Size This option lets you choose the size of the documents you are going to fax. Content This option tells the printer the original document type. Content affects the quality and size of your scan to fax. • Text-Emphasizes sharp, black, high-resolution text against a clean, white background • Text/Photo-Used when the original documents are a mixture of text and graphics or pictures • Photograph-Tells the scanner to pay extra attention to graphics and pictures. This setting increases the time it takes to scan, but emphasizes a reproduction of the full dynamic range of tones in the original document. This increases the amount of information saved. Faxing 78
-
 1
1 -
2
-
3
-
4
-
5
-
6
-
7
-
8
-
9
-
10
-
11
-
12
-
13
-
14
-
15
-
16
-
17
-
18
-
19
-
20
-
21
-
22
-
23
-
24
-
25
-
26
-
27
-
28
-
29
-
30
-
31
-
32
-
33
-
34
-
35
-
36
-
37
-
38
-
39
-
40
-
41
-
42
-
43
-
44
-
45
-
46
-
47
-
48
-
49
-
50
-
51
-
52
-
53
-
54
-
55
-
56
-
57
-
58
-
59
-
60
-
61
-
62
-
63
-
64
-
65
-
66
-
67
-
68
-
69
-
70
-
71
-
72
-
 73
73 -
 74
74 -
 75
75 -
 76
76 -
 77
77 -
 78
78 -
 79
79 -
 80
80 -
 81
81 -
 82
82 -
 83
83 -
84
-
85
-
86
-
87
-
88
-
89
-
90
-
91
-
92
-
93
-
94
-
95
-
96
-
97
-
98
-
99
-
100
-
101
-
102
-
103
-
104
-
105
-
106
-
107
-
108
-
109
-
110
-
111
-
112
-
113
-
114
-
115
-
116
-
117
-
118
-
119
-
120
-
121
-
122
-
123
-
124
-
125
-
126
-
127
-
128
-
129
-
130
-
131
-
132
-
133
-
134
-
135
-
136
-
137
-
138
-
139
-
140
-
141
-
142
-
143
-
144
-
145
-
146
-
147
-
148
-
149
-
150
-
151
-
152
-
153
-
154
-
155
-
156
-
157
-
158
-
159
-
160
-
161
-
162
-
163
-
164
-
165
-
166
-
167
-
168
-
169
-
170
-
171
-
172
-
173
-
174
-
175
-
176
-
177
-
178
-
179
-
180
-
181
-
182
-
183
-
184
 |
 |