Lexmark X204N User's Guide - Page 82
Understanding scan profile options, Standard scan settings
 |
UPC - 734646157643
View all Lexmark X204N manuals
Add to My Manuals
Save this manual to your list of manuals |
Page 82 highlights
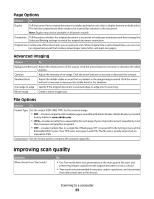
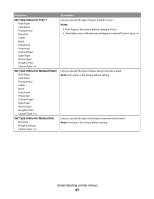
d Press the arrow buttons until Profiles appears, and then press . e Press # , and then enter the shortcut number. f Press . 9 Return to the computer to view the file. The output file is saved in the location you specified or launched in the program you specified. Understanding scan profile options These options let you select preset formats or customize the scan job settings. You can adjust these settings: Standard scan settings Choose To Quick Setup Select preset output settings. To customize the scan job settings, select Custom. Then change the following settings as needed: • Custom • Text Document • Photo (for display) • Photo (for editing) • Presentation/Article • Drawing/Sketch • Last Used Scan Options Default Content Tell the printer the original document type. Choose from Text, Mixed, or Photo. Content affects the quality and size of your scanned file. Text-Emphasizes sharp, black, high-resolution text against a clean, white background. Use Text mode when text preservation is the main goal of the scan, and preserving images copied from the original document is not a concern. Text mode is recommended for receipts, carbon copy forms, and documents that contain only text or fine line art. Mixed-Used when the original documents are a mixture of text and graphics or pictures. Mixed mode is recommended for magazine articles, business graphics, and brochures. Photo-Tells the scanner to pay extra attention to graphics and pictures. This setting increases the time it takes to scan, but emphasizes a reproduction of the full dynamic range of tones in the original document. This increases the amount of information saved. Use Photo mode when scanning photos printed on a laser printer or taken from a magazine or newspaper. Darkness Adjust how light or dark your scanned documents will turn out in relation to the original document. Color Tell the printer the color of the original documents. You can select Gray, BW (Black and White), or Color. Resolution Adjust the output quality of your file. Increasing the image resolution increases the file size and the time needed to scan your original document. Image resolution can be decreased to reduce the file size. Scanning to a computer 82
-
 1
1 -
2
-
3
-
4
-
5
-
6
-
7
-
8
-
9
-
10
-
11
-
12
-
13
-
14
-
15
-
16
-
17
-
18
-
19
-
20
-
21
-
22
-
23
-
24
-
25
-
26
-
27
-
28
-
29
-
30
-
31
-
32
-
33
-
34
-
35
-
36
-
37
-
38
-
39
-
40
-
41
-
42
-
43
-
44
-
45
-
46
-
47
-
48
-
49
-
50
-
51
-
52
-
53
-
54
-
55
-
56
-
57
-
58
-
59
-
60
-
61
-
62
-
63
-
64
-
65
-
66
-
67
-
68
-
69
-
70
-
71
-
72
-
73
-
74
-
75
-
76
-
 77
77 -
 78
78 -
 79
79 -
 80
80 -
 81
81 -
 82
82 -
 83
83 -
 84
84 -
 85
85 -
 86
86 -
 87
87 -
88
-
89
-
90
-
91
-
92
-
93
-
94
-
95
-
96
-
97
-
98
-
99
-
100
-
101
-
102
-
103
-
104
-
105
-
106
-
107
-
108
-
109
-
110
-
111
-
112
-
113
-
114
-
115
-
116
-
117
-
118
-
119
-
120
-
121
-
122
-
123
-
124
-
125
-
126
-
127
-
128
-
129
-
130
-
131
-
132
-
133
-
134
-
135
-
136
-
137
-
138
-
139
-
140
-
141
-
142
-
143
-
144
-
145
-
146
-
147
-
148
-
149
-
150
-
151
-
152
-
153
-
154
-
155
-
156
-
157
-
158
-
159
-
160
-
161
-
162
-
163
-
164
-
165
-
166
-
167
-
168
-
169
-
170
-
171
-
172
-
173
-
174
-
175
-
176
-
177
-
178
-
179
-
180
-
181
-
182
-
183
-
184
 |
 |
