Lexmark X264 Maintenance Guide
Lexmark X264 Manual
 |
View all Lexmark X264 manuals
Add to My Manuals
Save this manual to your list of manuals |
Lexmark X264 manual content summary:
- Lexmark X264 | Maintenance Guide - Page 1
Lexmark X264dn, X363dn, X364dn, and X364dw Maintenance Guide September 2009 www.lexmark.com - Lexmark X264 | Maintenance Guide - Page 2
5 Moving the printer to another location...6 Shipping the printer...6 Ordering supplies...7 Ordering toner cartridges...7 Ordering a photoconductor kit...7 Ordering ADF replacement parts...8 Replacing supplies...8 Replacing the toner cartridge...8 Replacing the photoconductor kit...10 Contents 2 - Lexmark X264 | Maintenance Guide - Page 3
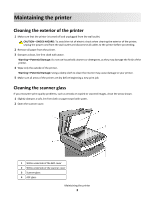
only the outside of the printer. Warning-Potential Damage: Using a damp cloth to clean the interior may cause damage to your printer. 5 Make sure all areas of the printer are dry before beginning a new print job. Cleaning the scanner glass If you encounter print quality problems, such as streaks on - Lexmark X264 | Maintenance Guide - Page 4
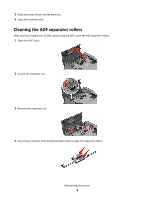
Wipe the areas shown and let them dry. 4 Close the scanner cover. Cleaning the ADF separator rollers After you have copied over 50,000 copies using the ADF, clean the ADF separator rollers. 1 Open the ADF cover. 2 Unlock the separator roll. 3 Remove the separator roll. 4 Use a clean, lint-free cloth - Lexmark X264 | Maintenance Guide - Page 5
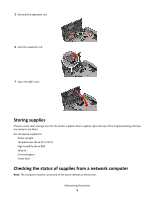
roll. 7 Close the ADF cover. Storing supplies Choose a cool, clean storage area for the printer supplies. Store supplies right side up in their original packing until you are ready to use them. Do not expose supplies to: • Direct sunlight • Temperatures above 35°C (95°F) • High humidity above 80 - Lexmark X264 | Maintenance Guide - Page 6
address of the printer, print a network setup page and locate the IP address in the TCP/IP section. 2 Click Device Status. The Device Status page appears, displaying a summary of supply levels. Moving the printer to another location Warning-Potential Damage: Damage to the printer caused by improper - Lexmark X264 | Maintenance Guide - Page 7
faded, and then replace the cartridge. Recommended toner cartridges and part numbers Part Name Toner Cartridge High Yield Toner Cartridge Regular Cartridge X264A21G X264H21G Lexmark Return Program Cartridge X264A11G X264H11G Ordering a photoconductor kit The printer issues a message to let you - Lexmark X264 | Maintenance Guide - Page 8
parts Order ADF replacement parts if you experience problems with paper double-feeding or failing to feed through the Automatic Document Feeder. Part name ADF input tray ADF separator pad ADF separator roll Part number 40X5470 40X5472 40X5471 Replacing supplies Replacing the toner cartridge - Lexmark X264 | Maintenance Guide - Page 9
2 Press the button on the base of the photoconductor kit, and then pull the toner cartridge out using the handle. 3 Unpack the new toner cartridge. 4 Shake the cartridge in all directions to distribute the toner. Maintaining the printer 9 - Lexmark X264 | Maintenance Guide - Page 10
toner cartridge in as far as it will go. The cartridge clicks into place when correctly installed. 6 Close the front door. Replacing the photoconductor kit The printer automatically notifies you before the photoconductor kit reaches a page maximum by showing 84 PC Kit life warning or 84 Replace PC - Lexmark X264 | Maintenance Guide - Page 11
To replace the photoconductor kit: 1 Open the front door by pressing the button on the left side of the printer and lowering the front door. 2 Pull the photoconductor kit and toner cartridge out of the printer as a unit by pulling on the toner cartridge handle. 3 Place the unit on a flat, clean - Lexmark X264 | Maintenance Guide - Page 12
exposure can cause print quality problems. 6 Insert the toner cartridge into the photoconductor kit by aligning the rollers on the toner cartridge with the tracks. Push the toner cartridge until it clicks into place. 7 Install the unit into the printer by aligning the arrows on the guides of the - Lexmark X264 | Maintenance Guide - Page 13
After you replace the photoconductor kit, reset the photoconductor counter. To reset the counter, see the instruction sheet that came with the new photoconductor kit. Warning-Potential Damage: Resetting the photoconductor counter without replacing the photoconductor may damage your printer and void
-
 1
1 -
 2
2 -
 3
3 -
 4
4 -
 5
5 -
 6
6 -
 7
7 -
8
-
9
-
10
-
11
-
12
-
13
 |
 |

Lexmark X264dn, X363dn, X364dn, and
X364dw
Maintenance Guide
September 2009
www.lexmark.com