Lexmark X2650 User's Guide - Page 20
Using the Windows printer software, Add a Printer - printer driver
 |
UPC - 734646057394
View all Lexmark X2650 manuals
Add to My Manuals
Save this manual to your list of manuals |
Page 20 highlights
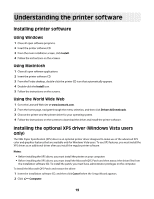
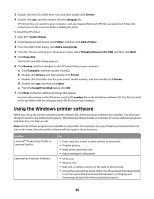
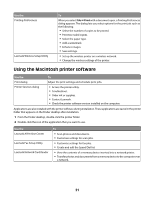
3 Double-click the CD or DVD drive icon, and then double-click Drivers. 4 Double-click xps, and then double-click the setupxps file. XPS driver files are copied to your computer, and any required Microsoft XPS files are launched. Follow the instructions on the screen to finish installing the patch. To install the XPS driver: 1 Click Œ Control Panel. 2 Under Hardware and Sound, click Printer, and then click Add a Printer. 3 From the Add Printer dialog, click Add a local printer. 4 From the "Use an existing port" drop-down menu, select Virtual printer port for USB, and then click Next. 5 Click Have disk. The Install From Disk dialog appears. 6 Click Browse, and then navigate to the XPS driver files on your computer: a Click Computer, and then double-click (C:). b Double-click Drivers, and then double-click Printer. c Double-click the folder that has your printer model number, and then double-click Drivers. d Double-click xps, and then click Open. e From the Install From Disk dialog, click OK. 7 Click Next on the two additional dialogs that appear. For more information on the XPS driver, see the XPS readme file on the installation software CD. The file is located in the xps folder with the setupxps batch file (D:\Drivers\xps\readme). Using the Windows printer software When you set up the printer using the printer software CD, all the necessary software was installed. You may have chosen to install some additional programs. The following table provides an overview of various software programs and what they can help you do. Note: Not all of these programs are available on all printers. For example, if you purchased a printer that does not scan or fax items, then the printer software will not support these functions. Use the LexmarkTM Productivity Studio or Lexmark FastPics Lexmark Fax Solutions Software To • Scan, copy, fax, e-mail, or print a photo or document. • Transfer photos. • Make photo greeting cards. • Adjust settings for the printer. • Send a fax. • Receive a fax • Add, edit, or delete contacts in the built-in phone book. • Access the Lexmark Fax Setup Utility. Use the Lexmark Fax Setup Utility to set the Speed Dial and Group Dial numbers, set Ringing and Answering, and print fax history and status reports. 20
-
 1
1 -
2
-
3
-
4
-
5
-
6
-
7
-
8
-
9
-
10
-
11
-
12
-
13
-
14
-
 15
15 -
 16
16 -
 17
17 -
 18
18 -
 19
19 -
 20
20 -
 21
21 -
 22
22 -
 23
23 -
 24
24 -
 25
25 -
26
-
27
-
28
-
29
-
30
-
31
-
32
-
33
-
34
-
35
-
36
-
37
-
38
-
39
-
40
-
41
-
42
-
43
-
44
-
45
-
46
-
47
-
48
-
49
-
50
-
51
-
52
-
53
-
54
-
55
-
56
-
57
-
58
-
59
-
60
-
61
-
62
-
63
-
64
-
65
-
66
-
67
-
68
-
69
 |
 |
