Lexmark X342N Service Manual - Page 104
Printhead removal, Top cover removal on Registration on,
 |
UPC - 734646256292
View all Lexmark X342N manuals
Add to My Manuals
Save this manual to your list of manuals |
Page 104 highlights
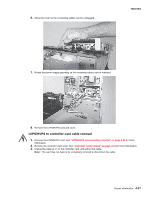
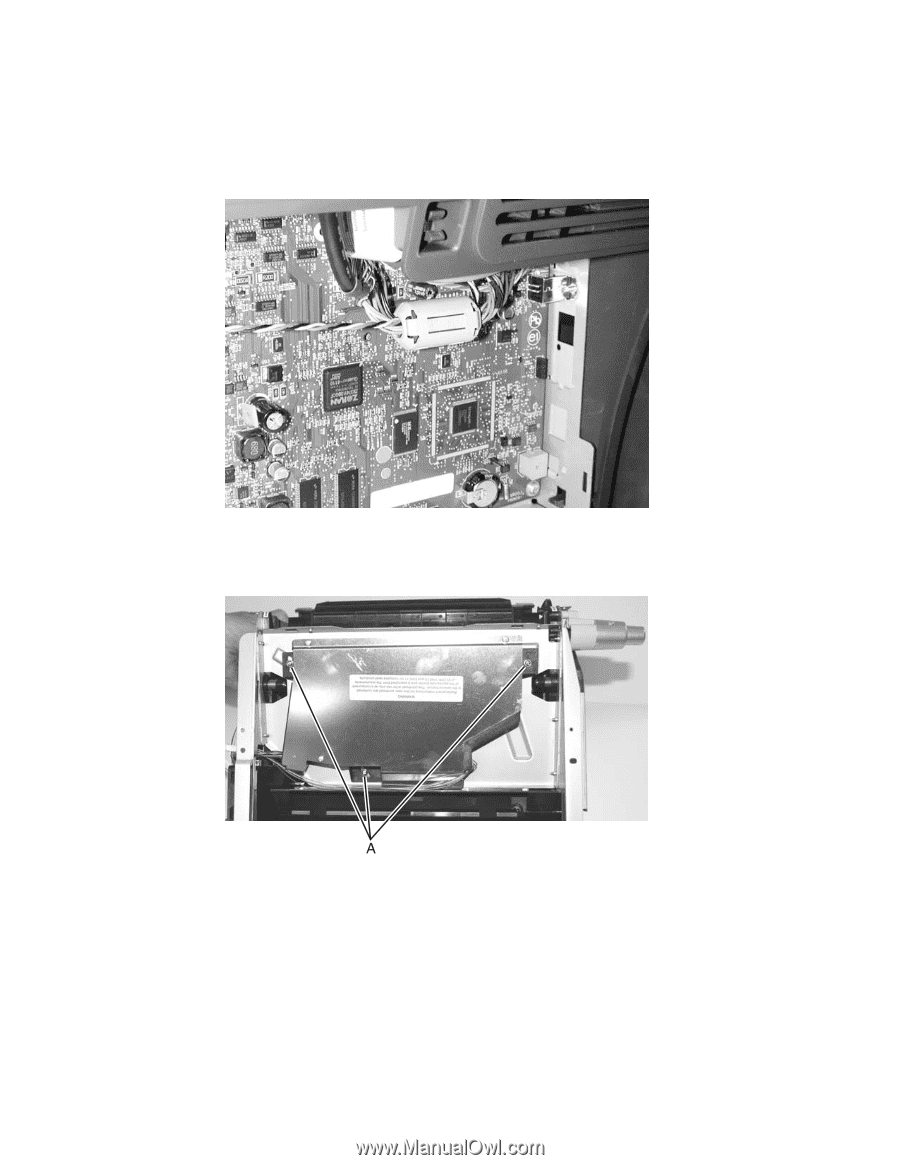
7003-XXX Printhead removal 1. Remove the top cover. See "Top cover removal" on page 4-11 for more information. 2. Remove the toroid from the group of cables at the top of the controller card. 3. Unplug the printhead cables at locations J11 and J12 on the controller card and on the printhead. 4. Remove three screws (A) that secure the printhead to the cross brace, and lift the printhead out. Note: Notice the alignment of the printhead at each screw before removing the screws. Note: Printer registration must be set after replacing the printhead. See Go to "Registration" on page 3-6. 4-32 Service Manual manuals4you.com
-
 1
1 -
2
-
3
-
4
-
5
-
6
-
7
-
8
-
9
-
10
-
11
-
12
-
13
-
14
-
15
-
16
-
17
-
18
-
19
-
20
-
21
-
22
-
23
-
24
-
25
-
26
-
27
-
28
-
29
-
30
-
31
-
32
-
33
-
34
-
35
-
36
-
37
-
38
-
39
-
40
-
41
-
42
-
43
-
44
-
45
-
46
-
47
-
48
-
49
-
50
-
51
-
52
-
53
-
54
-
55
-
56
-
57
-
58
-
59
-
60
-
61
-
62
-
63
-
64
-
65
-
66
-
67
-
68
-
69
-
70
-
71
-
72
-
73
-
74
-
75
-
76
-
77
-
78
-
79
-
80
-
81
-
82
-
83
-
84
-
85
-
86
-
87
-
88
-
89
-
90
-
91
-
92
-
93
-
94
-
95
-
96
-
97
-
98
-
 99
99 -
 100
100 -
 101
101 -
 102
102 -
 103
103 -
 104
104 -
 105
105 -
 106
106 -
 107
107 -
 108
108 -
 109
109 -
110
-
111
-
112
-
113
-
114
-
115
-
116
-
117
-
118
-
119
-
120
-
121
-
122
-
123
-
124
-
125
-
126
-
127
-
128
-
129
-
130
-
131
-
132
-
133
-
134
-
135
-
136
-
137
-
138
-
139
-
140
-
141
-
142
-
143
-
144
-
145
-
146
-
147
-
148
-
149
-
150
-
151
-
152
-
153
-
154
-
155
-
156
-
157
-
158
-
159
-
160
-
161
-
162
-
163
 |
 |
4-32
Service Manual
7003-XXX
Printhead removal
1.
Remove the top cover. See
“Top cover removal” on page 4-11
for more information.
2.
Remove the toroid from the group of cables at the top of the controller card.
3.
Unplug the printhead cables at locations J11 and J12 on the controller card and on the printhead.
4.
Remove three screws (A) that secure the printhead to the cross brace, and lift the printhead out
.
Note:
Notice the alignment of the printhead at each screw before removing the screws.
Note:
Printer registration must be set after replacing the printhead. See Go to
“Registration” on
page 3-6
.
manuals4you.com
manuals4you.com